PLEASE NOTE! This guide is far from complete, but I have made it public anyway, because even in its current state it can help many people.
I – like many of my peers – hang out at various online forums where people often post pictures of a lens and ask: “Can you help me identify this lens mount?”.

This article is intended to help with the task of identifying lens mounts.
Please, be aware that there are more than a hundred lens mounts1, and that this article cannot cover them all. Instead, this article will try to cover as many as possible (and I will keep adding to the article as I gather more samples).
This article is a companion piece to the Introduction to lens mounts -article, so if you feel you want to learn more about lens mounts, head over there first (or later).
Table of Contents
Question 1: Thread, breech-lock or bayonet mount?
Start by identifying the type of mount you have. If you need help, see more details here.
The first step is identifying the mount type (bayonet, breech-lock or thread-mount). See also the illustration of these three basic types below.
A thread or screw-mount has threads, using which the lens is screwed into the camera. If your lens is a thread mount-lens, jump here to continue its identification.
A breech-lock mount uses a locking ring to securely attach the lens to the camera. With some lenses that locking ring is part of the lens (making the lens fairly simple to identify as a breech-lock lens). If your lens has a rotatable locking ring, you’ve positively identified your lens as a breech-lock mount, jump here to continue its identification. (Besides these, there are breech-lock mounts with which the locking-ring is mounted on the camera (and may thus be equivocal). These are listed under bayonet mounts.)
Finally, there are bayonet mounts, which all rely on a twisting motion (around the lens optical axis) to lock a lens in place. If your lens does not have threads or a locking ring, it is a bayonet mount lens (or a breech-lock lens with the locking ring on the camera-end). Jump here for identifying your bayonet mount.
Group 1: Thread-mount lenses
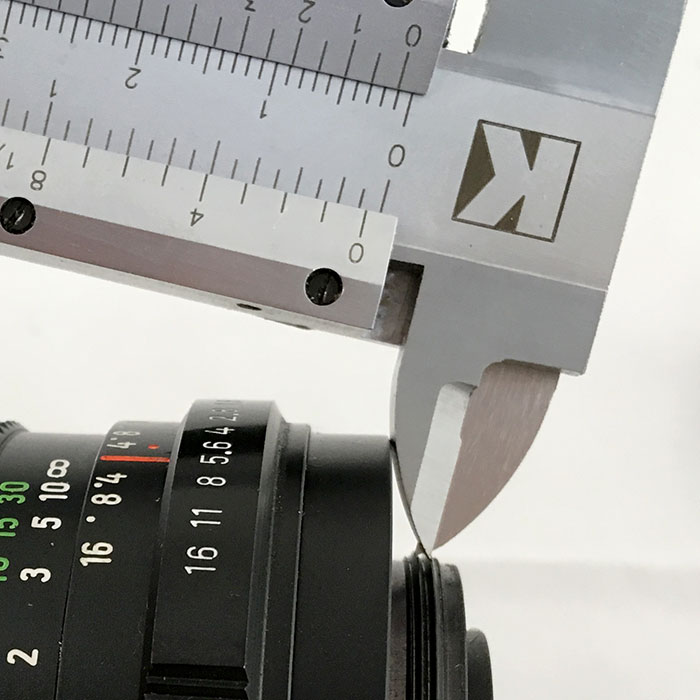
Thread mount lenses are relatively easy to spot as a group, because of the highly prominent existence of threads on the lens mount. That said, there are quite a lot of these, and the first step you need to do in order to identify the mount is to pick up a measurement tool (if you have a caliper, all the better).
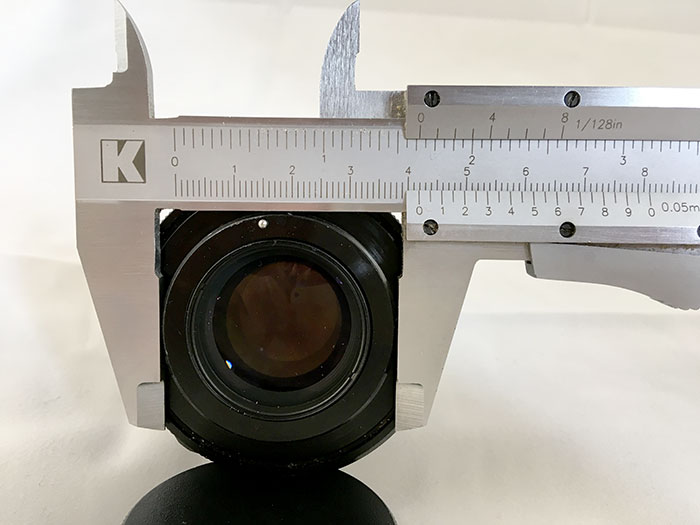
Notice that the reading is roughly 41,85 mm (most M42 lenses vary between 41,77 and 41,92 mm).
Often it is enough to measure the diameter of the mount, but in some cases it is also necessary to measure or test the thread pitch (distance between ridges in thread). Once you have the diameter, see below:
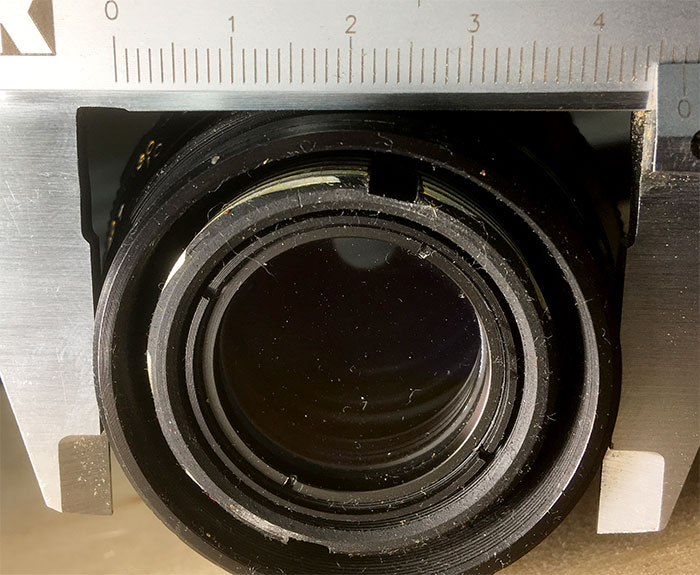
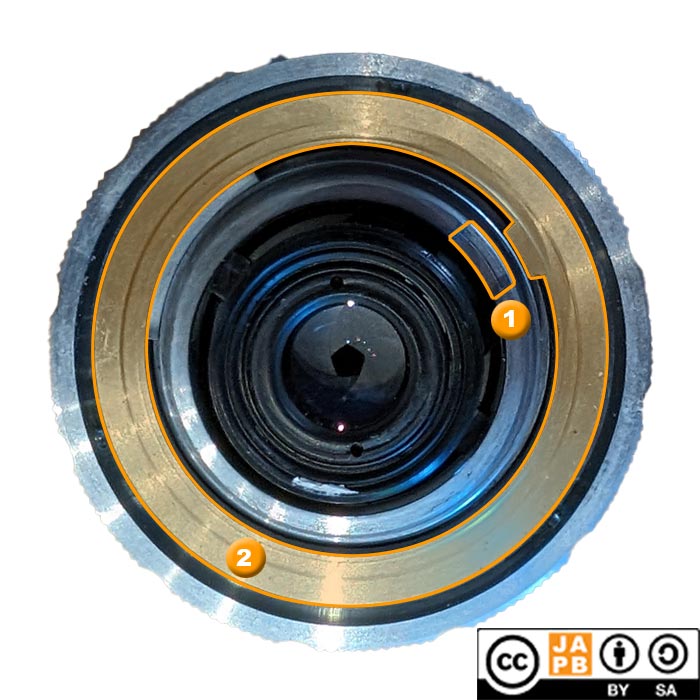
58 mm threads (inner)
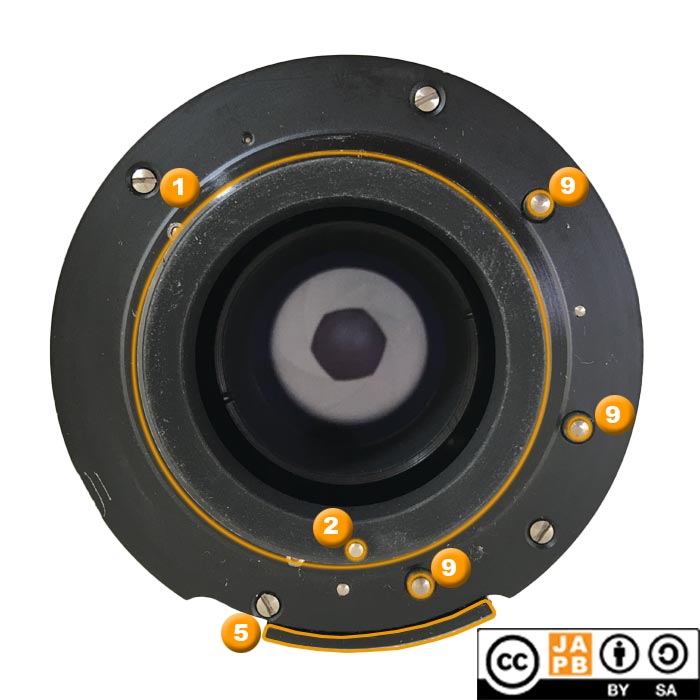
58 mm is the thread diameter of the Tamron Adapt-a-matic intermediate mount‘s breech-lock ring.
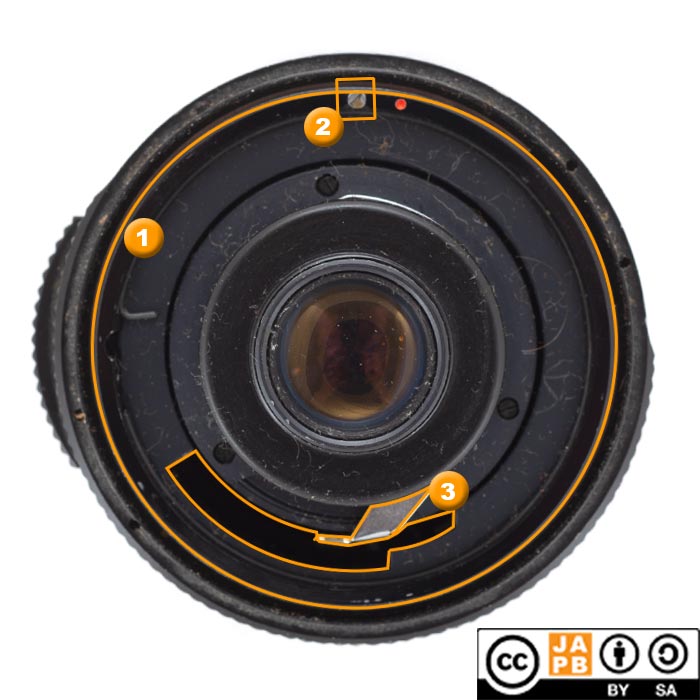
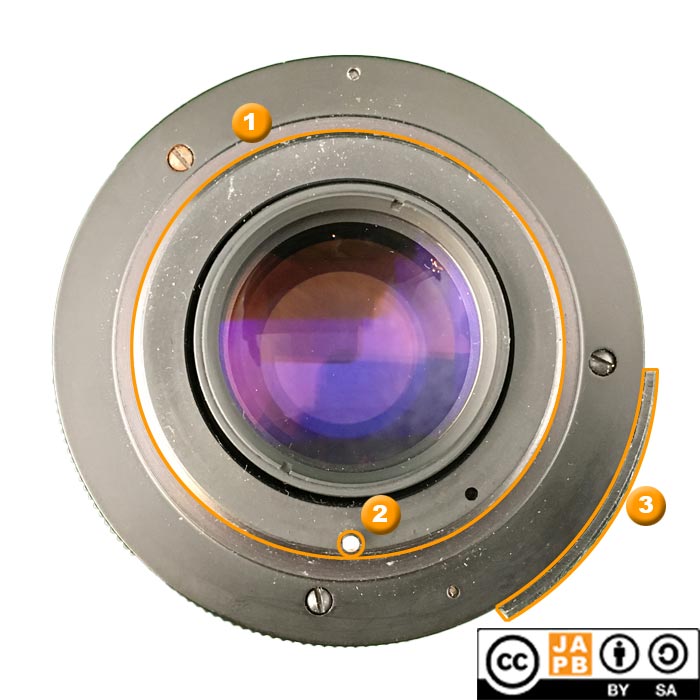
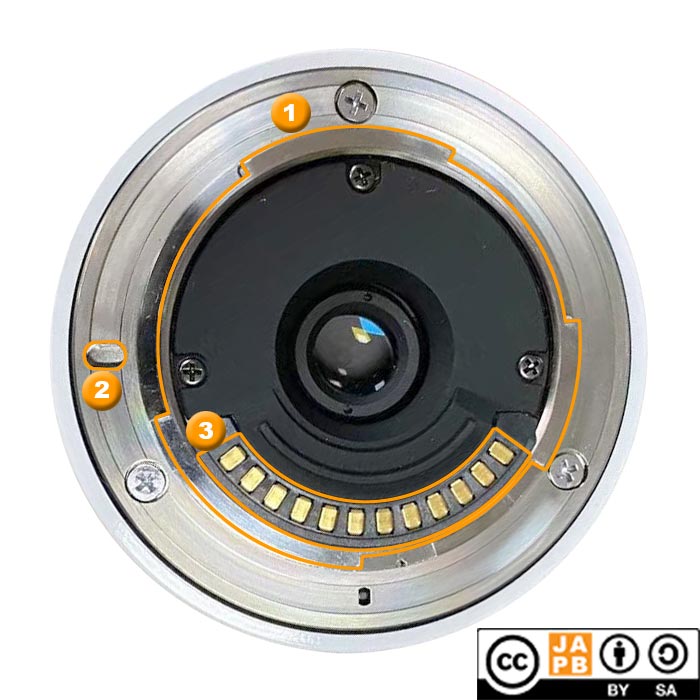
Key Characteristics of Tamron Adapt-a-matic lenses
[1] 58 mm thread mount (Does not protrude. You have to know to look for it)
[2] Orientation pin to help orient adapter
[3] Opening (dark) for adapter’s lever to couple with aperture mechanism lever (silver)
Details on the Tamron Adapt-a-matic mount
The Tamron Adapt-a-matic is the predecessor of the Tamron Adaptall mount and is not strictly speaking a lens mount, but is instead an intermediate mount.
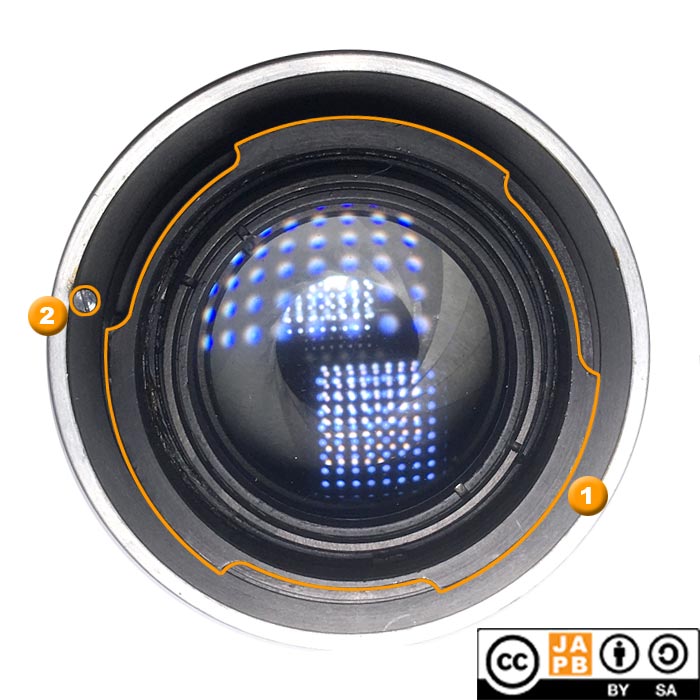
55 mm threads (inner)
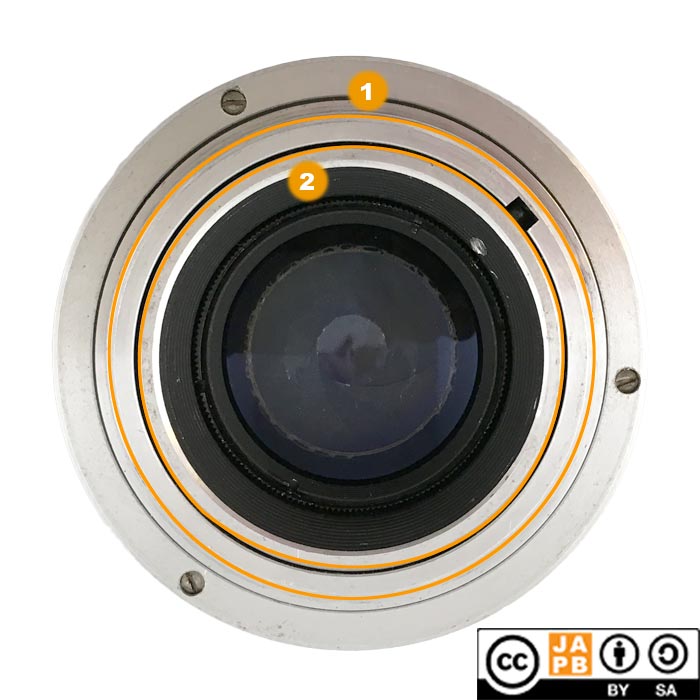
55 mm is the thread diameter of the Diax mount’s breech-lock ring. The Diax mount was used by a relatively unsuccessful line of 1950s German viewfinders and rangefinders.
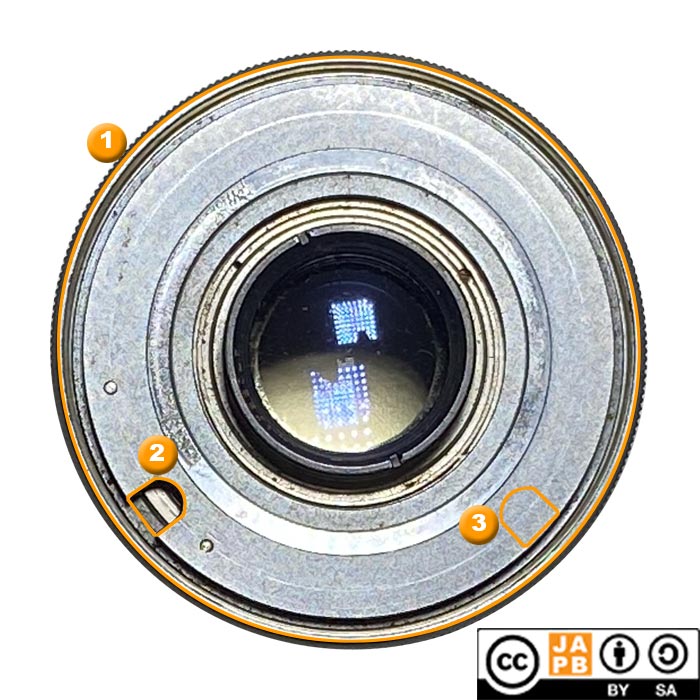
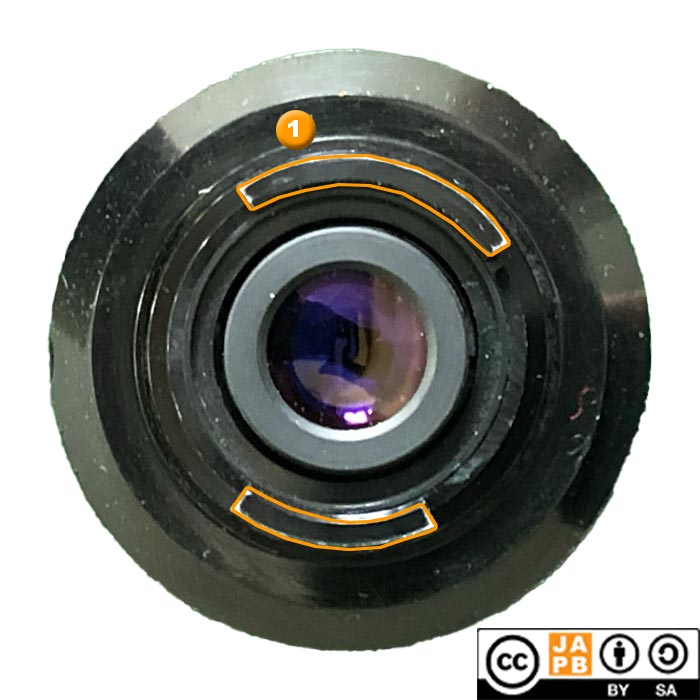
Key characteristics of the mount of Diax lenses (image oriented so that lens top is down):
[1] fastening ring with threads on the inside (Diameter 55 mm).
[2] rangefinder cam (moves in tandem with focusing motion) to communicate focusing distance to body (Diax B lenses).
[3] location of rangefinder cam on Diax (Ia/IIa lenses)
Details on the Diax mount:
See the JAPB page on the Diax mount
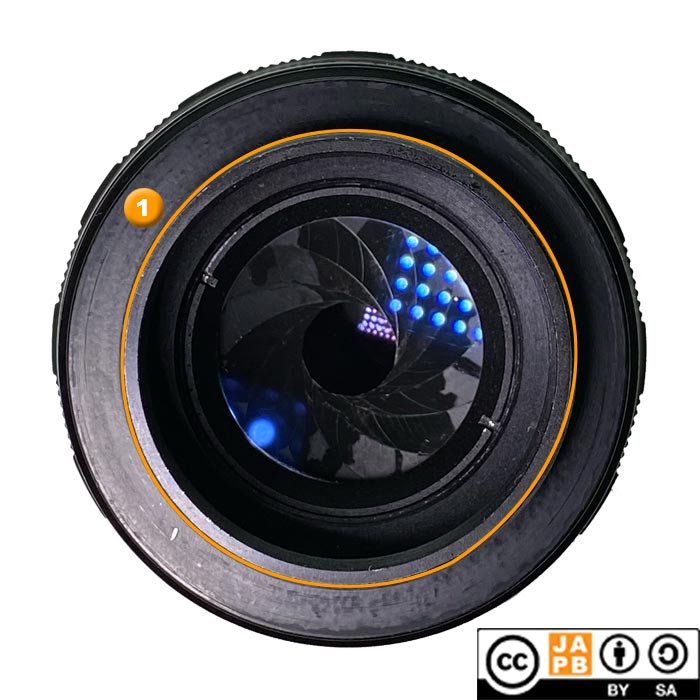
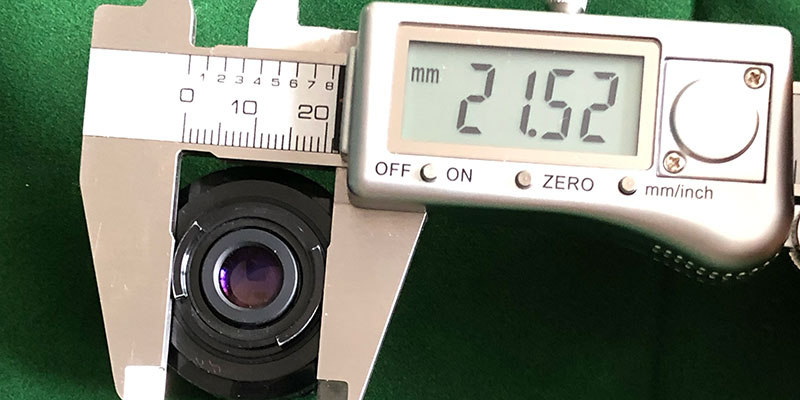
47 mm threads (outer)
This is most probably an M47 mount (47 mm with thread pitch of 0,75 mm). The M47-mount is not to be confused with the M42 or the T-mount (, that also has a 42mm diameter).
The M47 is technically not a lens mount (as there were no cameras made for m47), but is an intermediate mount. The idea of M47 lenses is not to be mounted directly on a camera, but to be screwed into an adapter that is then mounted on a camera.
As the M47 does not facilitate any lens-body communication, it is usually available only on older SLR lenses.
Online information on the M47 intermediate mount is scarce, even the name is not clear (it is sometimes referred to as ‘T-thread’, which – problematically – is also used as a synonym for the T-mount). Calling it the M47 mount is a JAPB initiative.
Specifications (rough measurements):
Thread: 47 mm diameter; 0,75 mm pitch
Flange Focal distance: ≈48,6 mm
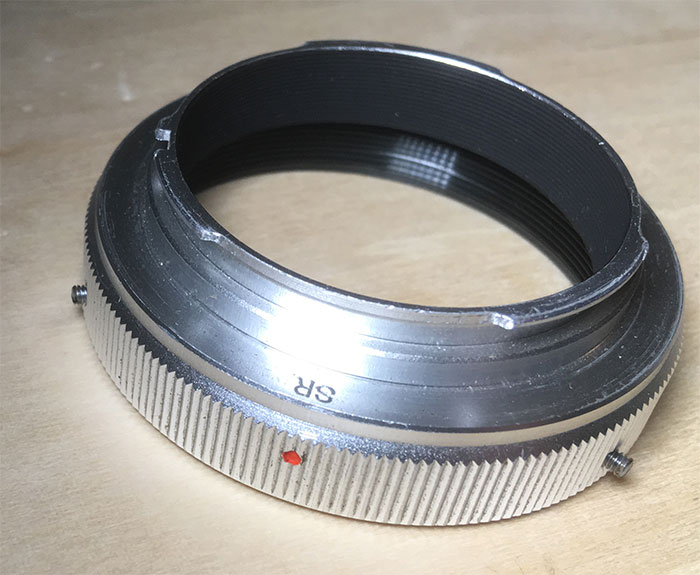
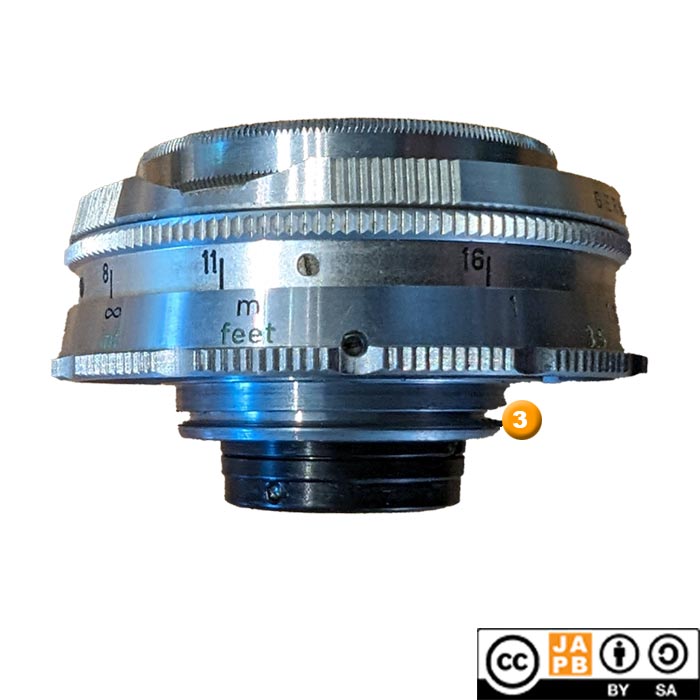
Adapting a M47 lens
Your best bet for mounting a M47 lens, is to hunt down an original adapter-ring, such as the M47-to-Minolta SR adapter pictured below.
44 mm threads (outer)
The Miranda camera offered dual mounts (on the camera). The Miranda bayonet mount as well as an internal 44 mm thread to be used for adapting lenses.
As few lenses ever left a factory sporting a 44 mm thread, see if the 44 mm diameter thread is an adapter (most likely mounted on top of a M42 mount) that you can remove?
See the JAPB page on the Miranda lens mount(s) for details.
42 mm threads (outer)
There are two alternatives:
1) Most probably a classic M42 thread mount, but it might also be a
2) T-mount or one of its variants.
To make sure, measure the thread pitch. The thread pitch of M42 is 1 mm (M42x1.0), whereas the thread pitch of the T-mount is 0,75 mm (M42x0.75).
M42
The M42 is the quintessential general thread mount for SLR cameras, and M42 lenses have been manufactured by a plethora of manufacturers (and sold under even more names). Moreover, the M42 mount is relatively easy to positively identify by the unique combination of thread diameter (42 mm) and thread pitch (1.0 mm).
However, the M42 mount has several variations that each add elements to the basic thread mount interface (stop down pins, aperture indicator levers, even electronic contacts) users should be aware of because they often radically change the appearance of the lens mount and (in some cases) even impact adaptability.
Note: While we will try to cover the breadth of the M42 mount here, we will only do so for identification purposes. I recommend you look at the JAPB page for the M42 mount for further details.
M42 plain (just the thread mount)
This is the earliest version of the M42 mount, and was used only on lenses that either had a direct aperture coupling or preset lenses.

Identifiable traits:
[1] 42 mm diameter thread (with 1.0 mm thread pitch]
M42 auto
This version of the M42 mount adds a simple pin (moves in/out) that allows the body to stop down the lens’ diaphragm (thereby enabling open-aperture composition and focusing) for metering and picture-taking. This is likely the most numerous form of the M42 mount.
The picture above shows the M42 mount in its most typical form: an ‘auto’ lens.
[1] 42 mm diameter thread (with 1.0 mm thread pitch]
[2] pin for stopping down lens to user-defined aperture (used in automatic mode).
[3] switch for selecting between auto(matic) and manual aperture mode (Common, but strictly speaking optional)
(NOTE! While the most typical implementation of the camera-driven stop-down mechanism is a simple, thin pin, there are lenses in which the pin is considerably thicker)
M42 with two-way communication
To circumvent the need to manually stop down the lens (for metering purposes) the lens needed to be able to ‘report’ to the body what aperture the user had selected. To facilitate this, several proprietary approaches were devised, the most usual (and typical) of which will be shown.
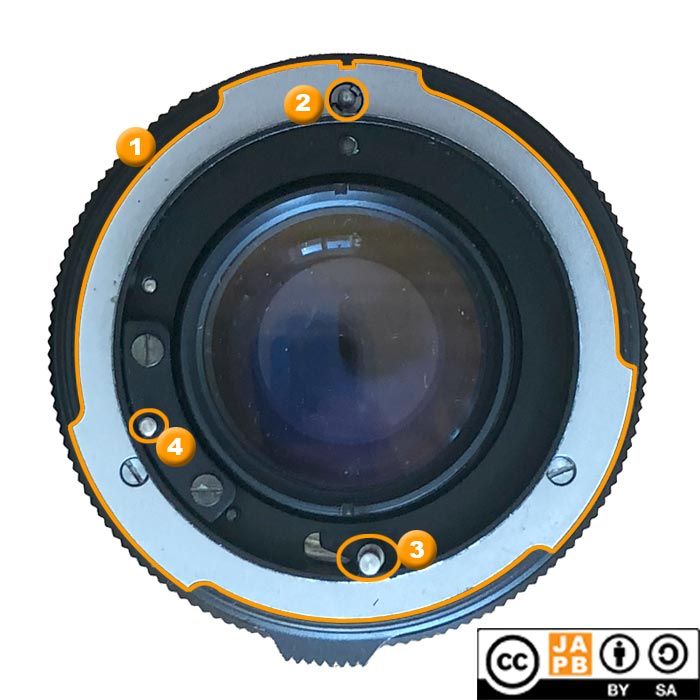
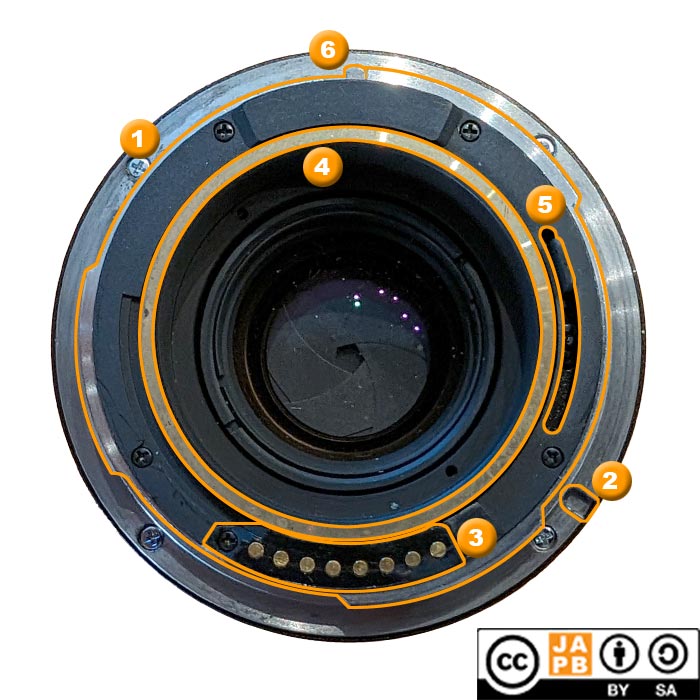
Two-way communication the Pentax way (1969)
The Picture above shows the mechanical aperture communication method pioneered by Pentax starting in 1969:
[1] 42 mm diameter thread (with 1.0 mm thread pitch]
[2] pin for stopping down lens to user-defined aperture (used in automatic mode).
[3] aperture linkage lever, directly coupled to the aperture ring, thus allowing a compatible body to read the selected aperture.
[4] Feeler pin to activate the auto-setting on the auto/manual selector
[5] Switch for selecting between auto(matic) and manual aperture mode.
[6] Rotation stopper to make sure lens is mounted at correct angle (may hinder using the lens on cameras not designed with this in mind).
Two-way communication the Zeiss Ikon/Voigtländer way (1972):
[1] 42 mm diameter thread (with 1.0 mm thread pitch]
[2] pin for stopping down lens to user-defined aperture (used in automatic mode).
[3] depth-of-field preview switch.
[4] Aperture setting indicator (the deeper this can be pressed, the smaller the aperture)
[5] Recess indicating to compatible cameras that this is a lens equipped with [4].
In terms of compatibility this implementation is wholly benign, as none of the extra interfaces implemented here hinder using these lenses on any other M42 camera or adapter.
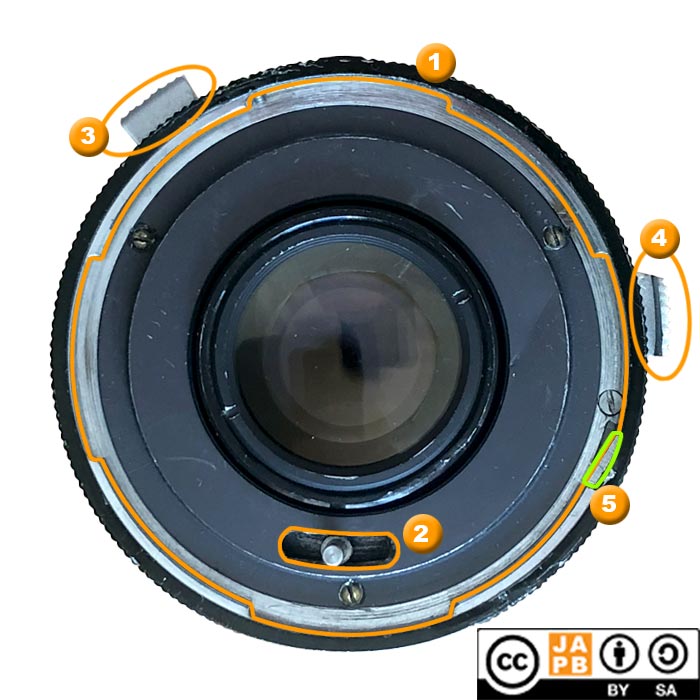
Two-way communication the Fujinon way (1972)
Introduced by Fuji Photo Film in 1972, this proprietary system only found on Fujinon M42 lenses extends the basic setup of M42 auto lenses:
[1] 42 mm diameter thread (with 1.0 mm thread pitch];
[2] pin for stopping down lens to user-defined aperture;
[7] backwards protrusion of the aperture ring that allows a compatible camera body is able to read the aperture ring position directly;
[8] locking groove in the base of the flange to secure that the lens is mounted at the correct rotational angle.
While the locking apparatus was implemented in a way that did not hinder cross-compatibility, the aperture ring protrusion means that Fujinon lenses that have this protrusion can not be mounted on most M42 cameras (and even make trouble with some adapters). As a result of this, you will find many lenses where the protrusion has been filed away.
Two-way communication the Mamiya way (1974)
In a move that resembles Fuji’s 1972 move (above), Mamiya in 1974 introduced their own addition to the M42 mount (these lenses have the abbreviation ‘SX’ in their name), which is characterised by:
[1] 42 mm diameter thread (with 1.0 mm thread pitch];
[2] pin for stopping down lens to user-defined aperture;
[7] pin in the aperture ring that allows a compatible camera body is able to read the aperture ring position directly (moves with aperture ring);
[8] locking groove in the base of the flange to secure that the lens is mounted at the correct rotational angle.
Like with the Fujinon adaptation of the M42 mount, the locking apparatus was implemented in a way that did not hinder cross-compatibility. However the aperture ring pin means that Mamiya lenses that have this pin can not be mounted on most M42 cameras (and even make trouble with some adapters). As a result of this, you will find many Mamiya SX lenses where the pin and even the base of the aperture ring has been milled away.
Further details can be found in the JAPB article on all Mamiya 35 mm SLR mounts.
Two-way communication the Praktica way (1969)
The electronic approach to aperture communication was pioneered by the East German camera industry (Carl Zeiss Jena, Pentacon, Meyer-Optik), and was the first instance of electronic communication between camera and lens. This approach to extending the M42 mount was introduced with the Praktica LLC camera in 1969.
The Picture details the ‘electronic’ version of the M42 mount.
[1] 42 mm diameter thread (with 1.0 mm thread pitch]
[2] pin for stopping down lens to user-defined aperture (used in automatic mode).
[5] Switch for selecting between auto(matic) and manual aperture mode.
[9] Three spring-loaded electronic contacts on the lens’ mount flange
Further details on the M42 mount:
See the JAPB page on the M42 mount.
T/T2-mount
The T/T2 mount is very similar to the M42 mount in that it has the same diameter, but it also has a different, tighter thread distance. This means that you might mistakenly try to mount a T/T2 lens on an M42 camera or adapter, only to find that it jams. Please. Do not use force.
Characteristics of a T/T2 mount:
[1] 42 mm diameter threads with a thread pitch of 0,75 mm (M42×0.75)
(no camera–lens communication)
Further details on the T/T2 mount:
See the JAPB page on the T/T2 mount.
40 mm threads (outer)
Note! Rare. Recheck your measurements, but if you’re sure …
The M40 (thread pitch 1.0 mm) thread mount was used by the Praktiflex-camera (1939-1947) and only a handful of lenses were ever produced for it – most of them made by Carl Zeiss and Schneider-Kreuznach.
Even though the camera is rare (partially due to WWII), its quality lenses may entice the entrepreneurial aficionado to build a DIY adapter.
39 mm threads (outer)
Welcome to the land of (potential) confusion. There are five types of thread-mount lenses with a diameter of 39 mm. Besides that, the M39 has also been used for non-lens optical arrangements, such as the Leitz Visoflex I (Not every optical instrument you find fitted with an M39 thread is necessarily a photographic lens).
Leica Thread Mount (LTM):
The original Leica M39 thread mount lenses were made for early rangefinders by Leica and everyone who copied the design (including Canon, FED, Zorki…)
This mount has many names and is variously referred to as “Leica thread mount“, “Leica screw mount” (and acronyms LTM and LSM) as well as “L39” or “M39“.
The standard LTM mount is a thread mount that has an outside diameter of 39 mm, a thread pitch of 26 turns per inch ( roughly 0.98/mm) and a 28,8 mm flange focal distance. The somewhat oddball thread pitch is based on Leica’s previous work with microscopes, and is one of the curiosities of what in essence is a century of photographic legacy.
There is a wide variety of lenses available for LTM, and due to their sometimes high quality and uniformly modest size (rangefinder lenses), they are attractive to lens hackers everywhere. Ready-made adapters are widely available for all mILC’s as well as for adapting these lenses to the later Leica M-mount.
Characteristics of an LTM mount:
[1] 39 mm diameter threads
[2] Inner cam that moves forward/backward in tandem with focusing action.
The easiest way to distinguish LTM lenses from other 39 mm thread lenses is that LTM lenses always have:
1) an aperture mechanism,
2) a focusing mechanism, and
3) an inner cam that extends and withdraws as the lens’ focus is operated (this is the mechanism that facilitates the camera’s rangefinder coupling).
Details on the LTM mount:
See the JAPB page on the LTM mount.
Zenit M39 (which JAPB also calles Z39):
There is also the Zenit M39 mount, which is a standard M39x1.0 screw, but will not work correctly with a LTM adapter because of a significantly different flange focal distance (45,2 vs 28,8 mm).
This lens mount was used by early Soviet Zenit SLR’s (later Zenit SLR’s migrated to using the M42 mount). These lenses are neither rare nor commonplace. If you have one and want to mount it, the best way is a combination of using a regular LTM adapter and a 16,4 mm (M39->M39) distance ring (these are available online).
Details on the Z39 mount:
See the JAPB page on the Z39 mount.
Enlarger lenses:
Enlarger lenses (M39x1.0), are easily identified by having aperture controls but lacking a focusing mechanism.
Enlarger lenses are well-known to anyone who’s ever been in a darkroom printing their own pictures. While not made for cameras, enlarger lenses are potentially useful for a wide range of photography – from macro work to close-to-normal use – but necessitate using a helicoid adapter or an adapter and a set of bellows.
Canon EX set lenses
Also the Canon EX-mount uses a 39 mm thread mount. The Canon EX line was a not entirely successful attempt by Canon to create a SLR system using set lenses. In this approach lenses were composed of two parts: a rear lens (3 elements, 2 groups) built in to the camera and an interchangeable front lens. Only a limited number of front lenses (EX 35/3.5; EX 50/1.8; EX 95/3.5; and EX 125/3.5) were offered before discontinuation. These lenses are easily distinguished by having ‘Canon EX’ on the name ring.
Paxette:
Finally, there is also the Paxette -mount, used solely by the Braun Paxette cameras, and here the situation is similar to that of the Zenit M39 mount, except that DIY-adapters are the only route (to my current knowledge), due to the 44 mm FFD of the Paxette -mount. See more here.
38 mm threads (outer)
Here there are two alternatives, neither of which are well known to JAPB, so we’ll have to direct you otherwhere.
• Opema viewfinder/rangefinder. While in many ways similar to the Leica thread mount, attempting to use Opema mount lenses on LTM bodies (or vice versa) risks damaging the lenses and threads.
37 mm threads (outer)
The first generation Asahiflex (Pentax) cameras used a 37 mm (M37) thread. See more on wikipedia.
32–33 mm threads (outer)
This is likely the mount of an Argus C. As the design measure is in inches, accounts of the Argus C thread mount’s diameter in millimetres varies a bit.
26 mm threads (outer)
The thread-mounted Robot -cameras use a 26 mm thread with a thread pitch of 0,5 mm (tight). While very similar in diameter to C-mount (look below), the thread pitch is sufficiently different that cross-threading will certainly lead to damage.
25,4 mm (1 inch) threads (outer)
These lenses are typically C-mount lenses.
C-mount
The C-mount is used in 16 mm motion picture cameras, microscopes and industrial cameras.
The flange focal distance of the C-mount is only ≈ 17,5 mm and thus longer than that of almost all current mILC cameras (Nikon Z being the sole exception). As the image circle of these lenses is limited by design, their adaptability on current mILC’s is very limited.
On the other hand, should you have a Samsung NX mini (FFD: 6,95 mm; sensor size 13,2×8,8 mm), Pentax Q (FFD: 9,2 mm; sensor size 7,44×5,58 mm) or Nikon 1 (FFD: 17 mm; sensor size 13,2×8,8 mm) camera body, C-mount lenses are obviously interesting
N.B! There is also a variant of the C-mount (going under the name CS-mount), with an even shorter FFD of ≈12,5 mm.
Images will be added later, sorry.
If you want to support this page, be in touch and send pictures of lens mounts.
24 mm threads (outer)
M24x1.0 is the lens mount of the Soviet Narciss miniature interchangeable lens camera’s mount.
The Narciss was designed for 16 mm film, and an image size of 14×21 mm. This means that these lenses are of limited utility to anyone using a sensor larger than micro four thirds. I have yet to find accounts of successful adaptations (If You have, please notify me). In any case, few of these cameras (or lenses) made it far outside the iron curtain (I’ve seen some in Finland).
More info here.
15,88 mm (5/8 inch) threads (outer)
These lenses are D-mount lenses, designed for 8 mm film cameras. As with C-mount lenses (see above), these lenses are limitedly useful on modern current mILC’s, but some enterprising adaptations have been made.
Even smaller thread mounts …
…can be found in various optical instruments – ranging from CCTV -camera lenses to various industrial applications. Due to typically minuscule image circle and very shallow flange focal distances, the adaptability of such lenses is practically non-existent.
Group 2: Obvious breech-lock lenses
The weight here is on the ‘obvious’ because there are some breech-lock lenses, that you cannot conclusively identify as such, because the locking collar or ring is not on the lens but on the camera. So the question you need to ask here is: is there a ring on the lens’ mount which you rotate to lock the lens in place?
If no, jump to bayonet mounts.
If yes, the we’ve narrowed it down significantly from the beginning.
Breech-lock lenses
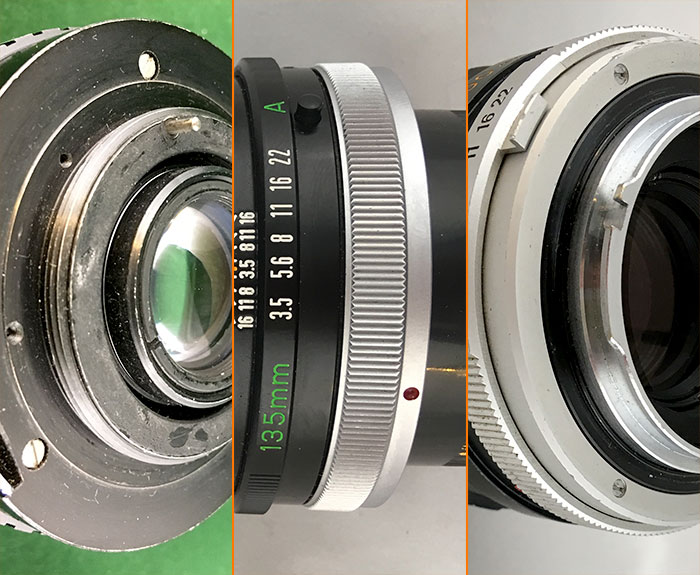
Focusing only on those breech-lock lenses that have a fastening ring on the lens, one can clearly see that there are both fastening rings that work based on threads (Diax, Tamron Adapt-a-matic) and those that are based on some system of openings and prongs (Canon R, Canon FL, Canon FD, T-4/TX, Icarex BM and Contax G)
Canon R, Canon FL and Canon FD lenses have a clearly prominent breech-lock locking ring at the base of the lens. The difference between FL and FD is also cearly visible in the number of levers: One (FL) or two (R or FD). The Canon R mount is relatively rare, and can be differentiated by that its two levers are grouped together between 12 and 1 o’clock. For the difference between R, FL and FD mounts, see picture below.
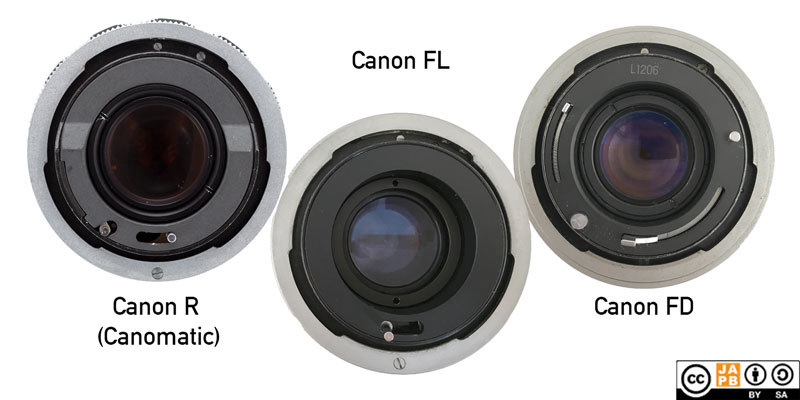
Middle: Canon FL mount (on FL 55 mm f/1.2)
Right: Canon FD mount (on FD 55 mm f/1.2)
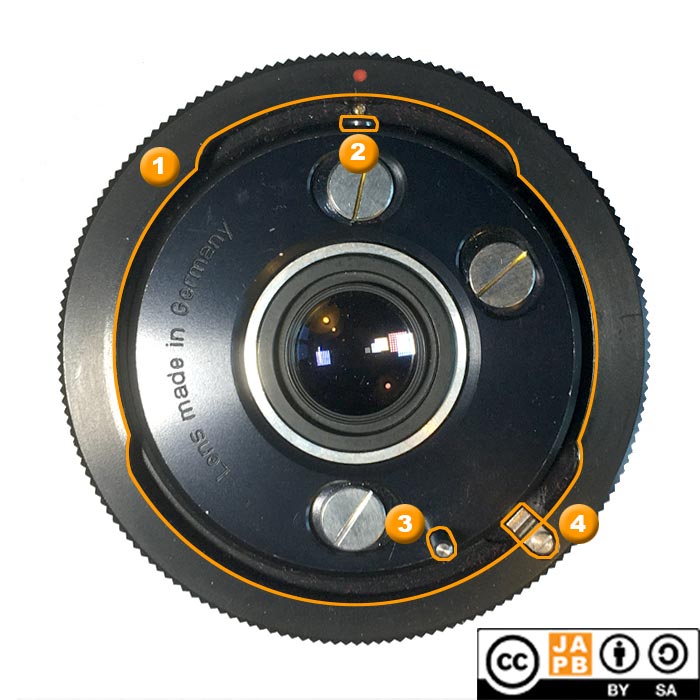
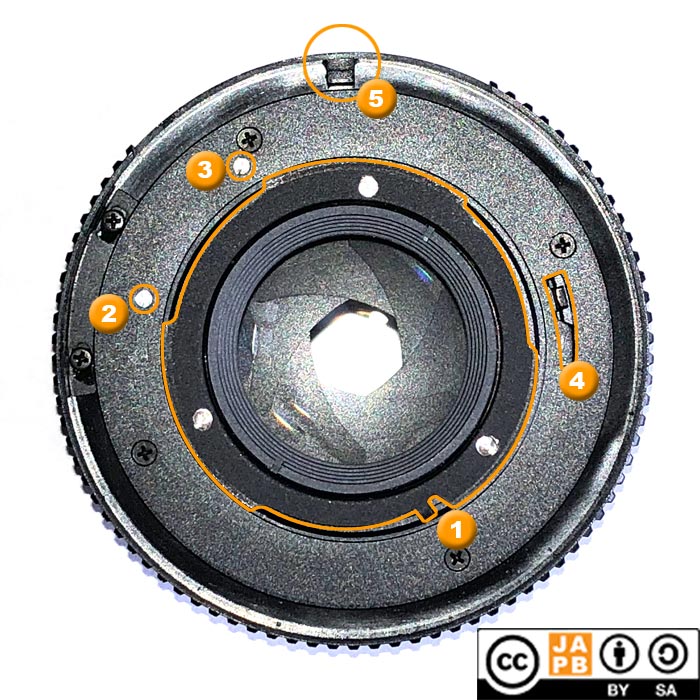
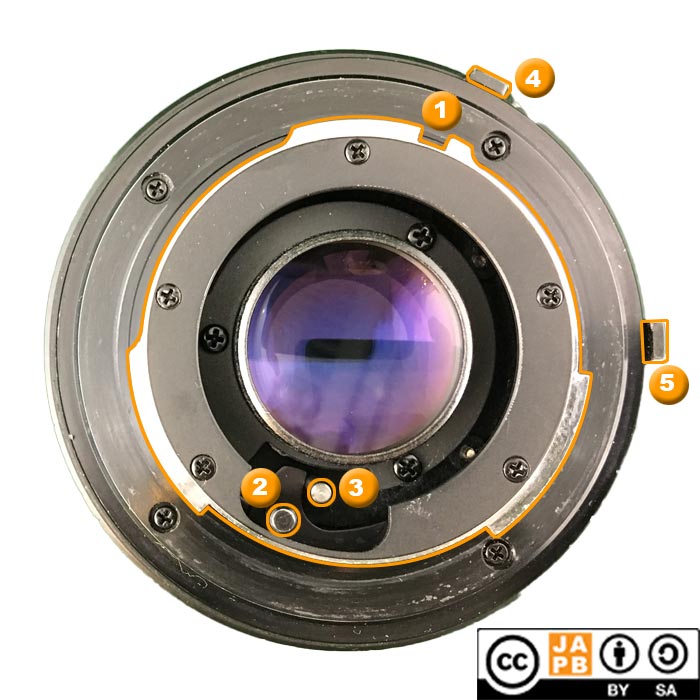
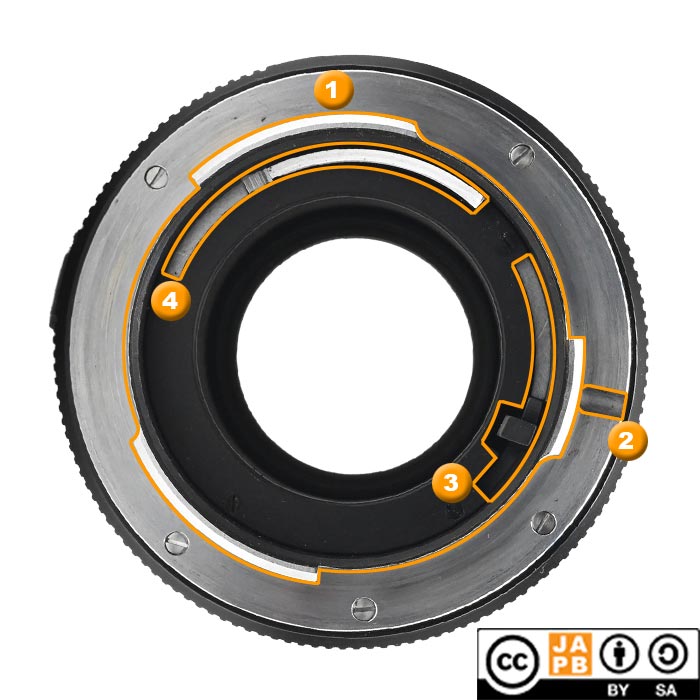
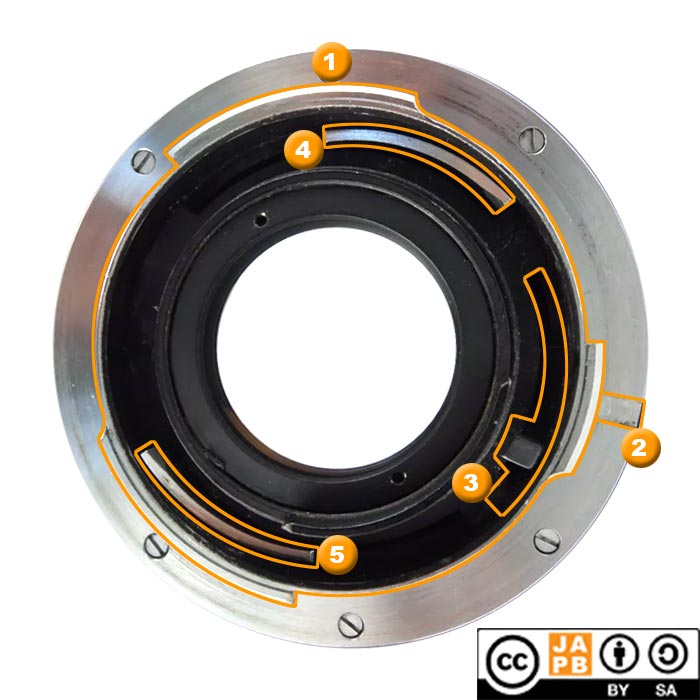
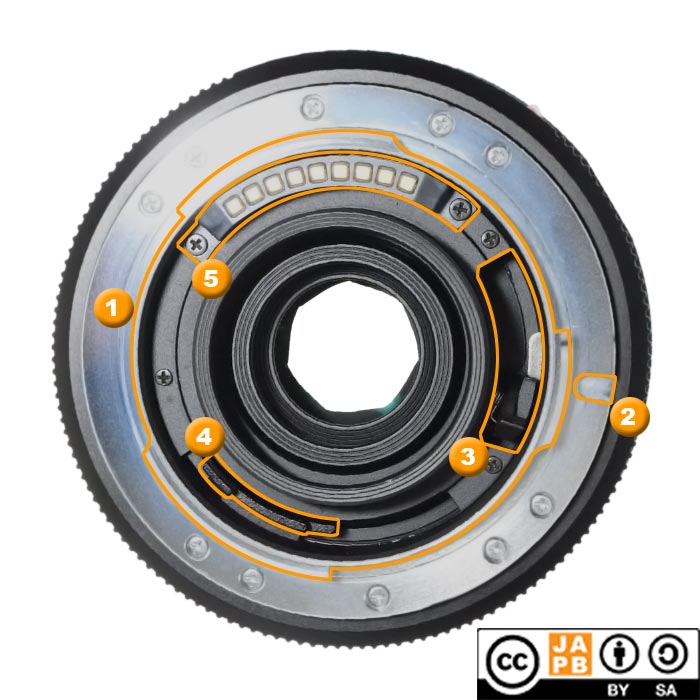
Canon FD mount
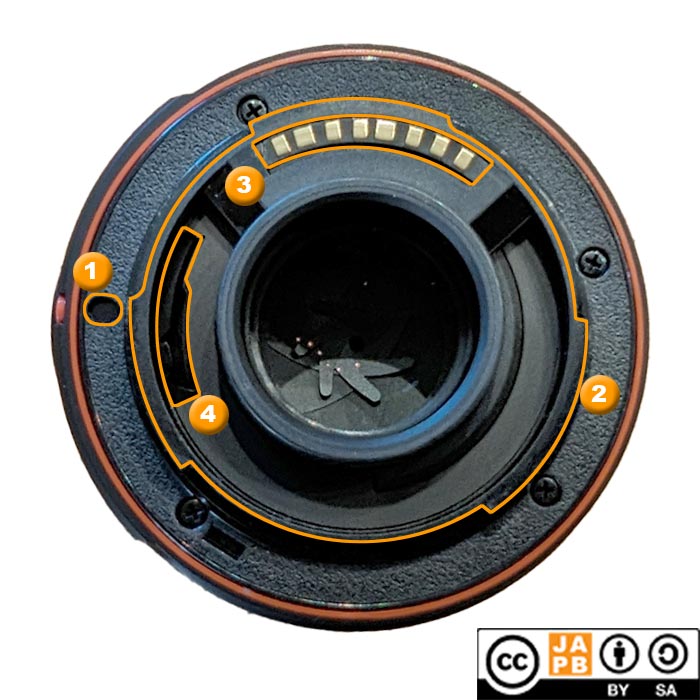
The Canon FD mount is a breech-lock mount, which means that lenses are inserted straight into the camera, and a locking ring is tightened to attach the lens. Please also compare with the characteristics of the Canon FL and Canon R mounts (below) to avoid confusion.
Key characteristics of the mount of Canon FD lenses
[1] Breech-lock locking ring, rotates approximately 90 degrees (when not connected to a camera or adapter).
[2] Alignment pin.
[3] Stop-down lever.
[4] Aperture indicator lever.
Details on the Canon FD mount:
See the JAPB article on the Canon FD mount.
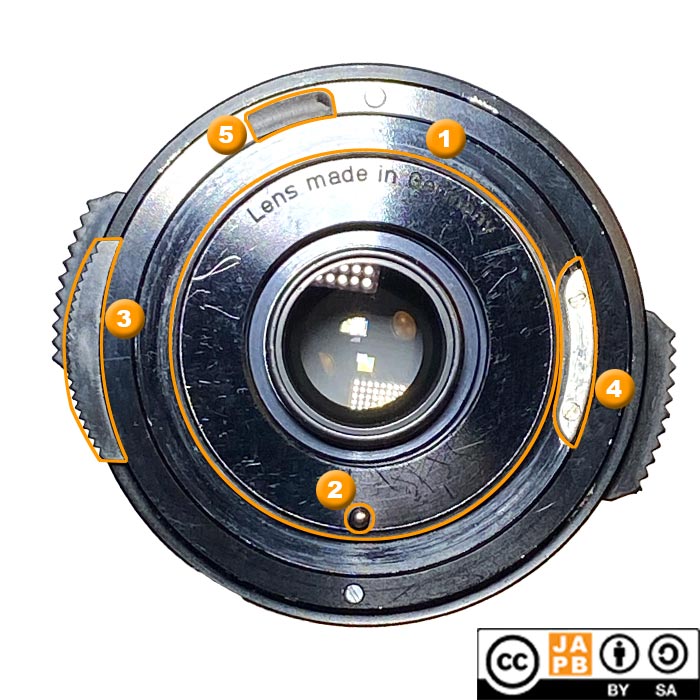
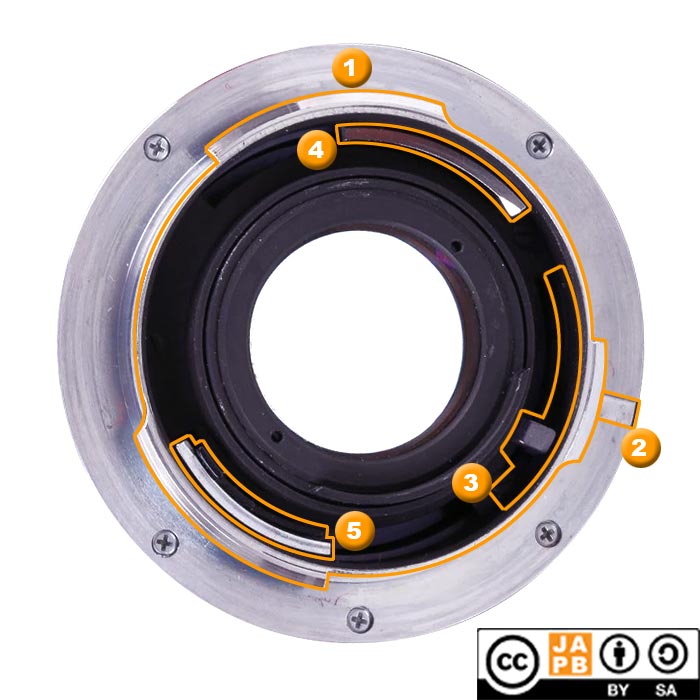
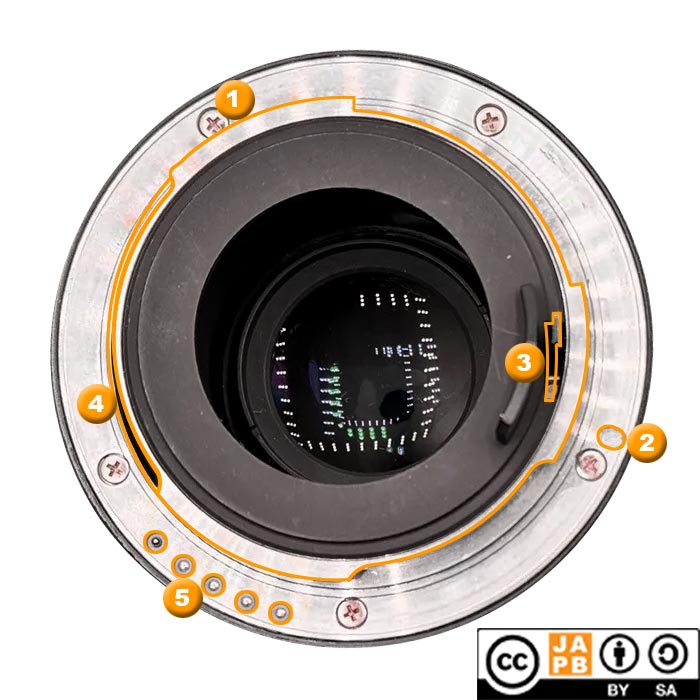
Canon FL mount
The Canon FL mount is a breech-lock mount, which means that lenses are inserted straight into the camera, and a locking ring is tightened to attach the lens. Please also compare with the characteristics of the Canon FD and Canon R mounts (above and below) to avoid confusion.
Key characteristics of the mount of Canon FL lenses:
[1] Breech lock locking ring, rotates approximately 90 degrees (when not connected to a camera).
[2] Alignment pin.
[3] Stop-down lever.
Details on the Canon FL mount:
See the JAPB article on the Canon FL mount.
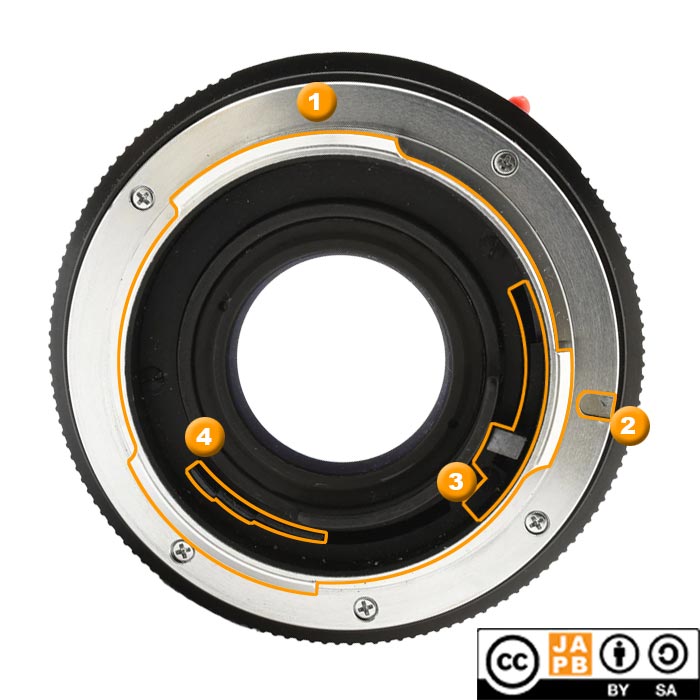
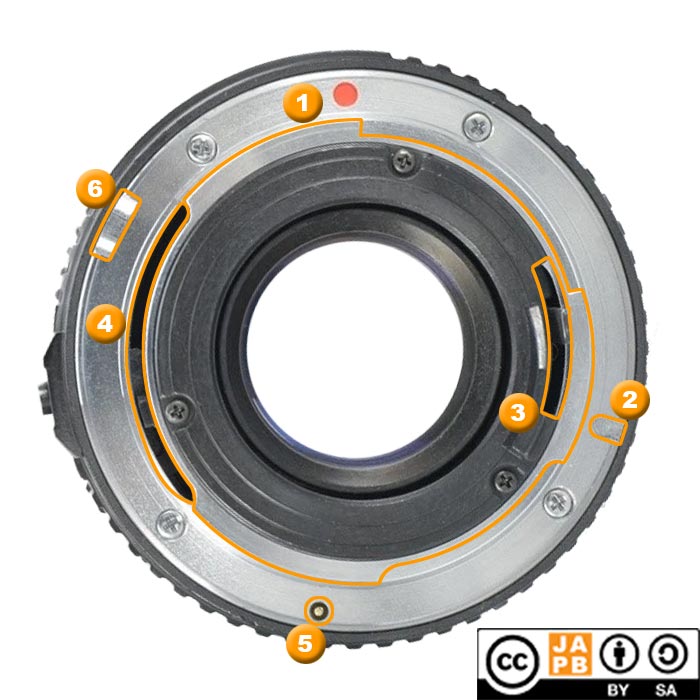
Canon R mount
This refers to the Canon R-mount (1959-1964), which is the predecessor to the Canon FL -mount. Now that Canon’s new mirrorless mount is called RF but sometimes abbreviated as only R, I’m thinking this mount should be renamed the Canonflex mount (for the series of cameras that used it) or, better yet, the Canomatic mount (because that’s how Canon referred to these lenses).
The Canon R mount is a breech-lock mount, which means that lenses are inserted straight into the camera, and a locking ring is tightened to attach the lens. Please also compare with the characteristics of the Canon FD and Canon FL mounts (above) to avoid confusion.
Key characteristics of the mount of Canon R (Canomatic) lenses:
[1] Breech lock locking ring, rotates approximately 90 degrees (when not connected to a camera).
[2] Alignment pin.
[3] Aperture arming lever.
[4] Aperture stop-down triggering lever.
Details on the Canon R mount:
See the JAPB article on the Canon R mount
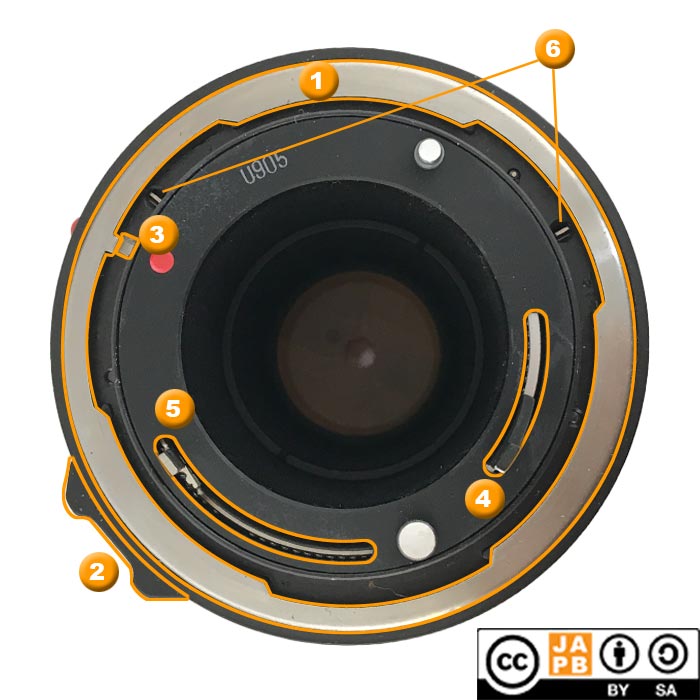
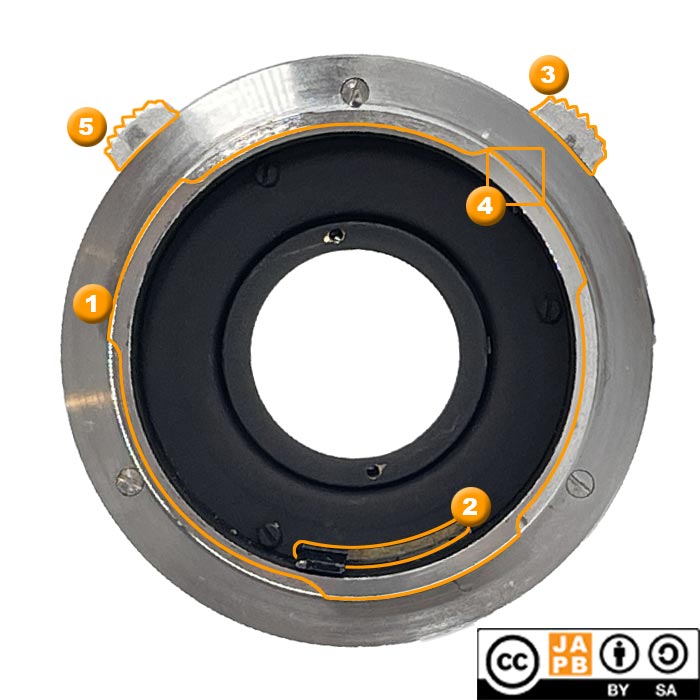
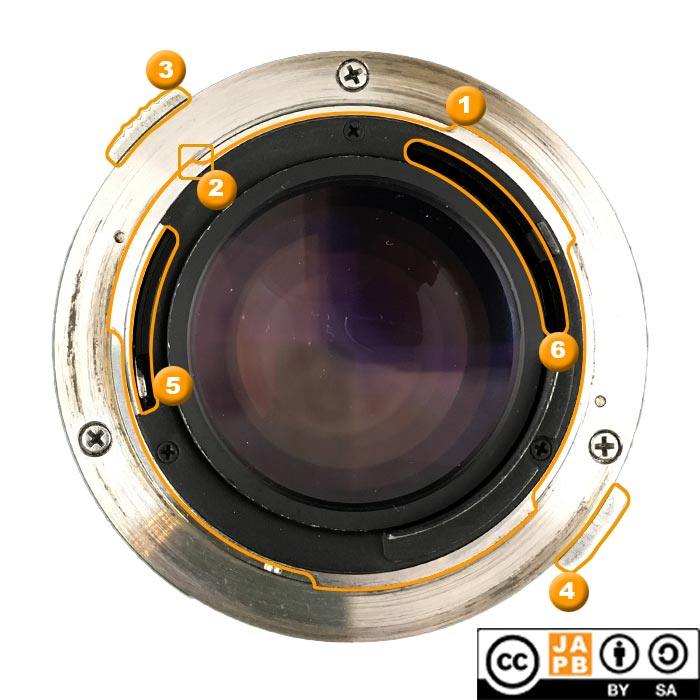
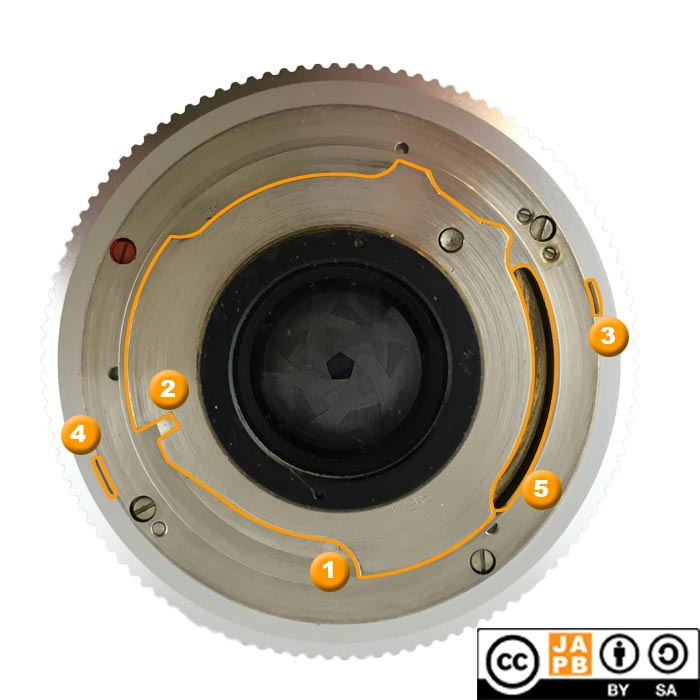
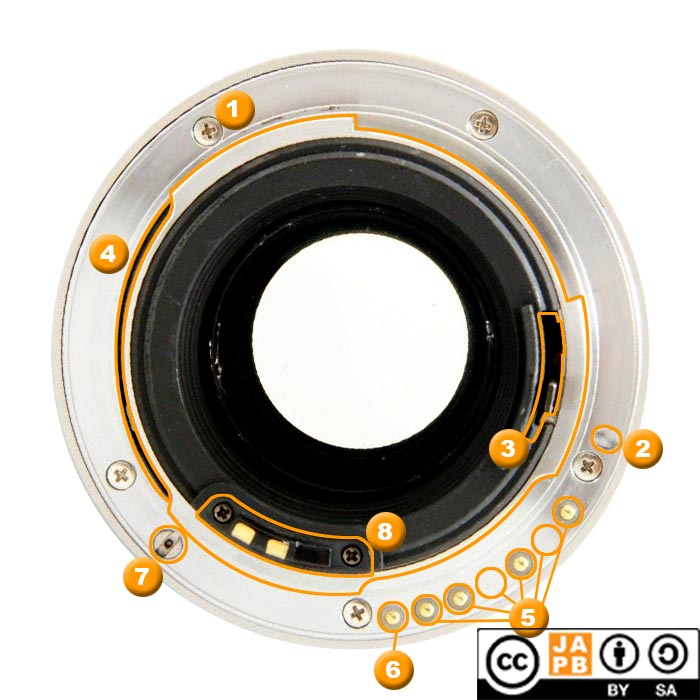
Contax G mount
The Contax G is technically a breech-lock mount (even though it does not look like it). Therefore it is included here.
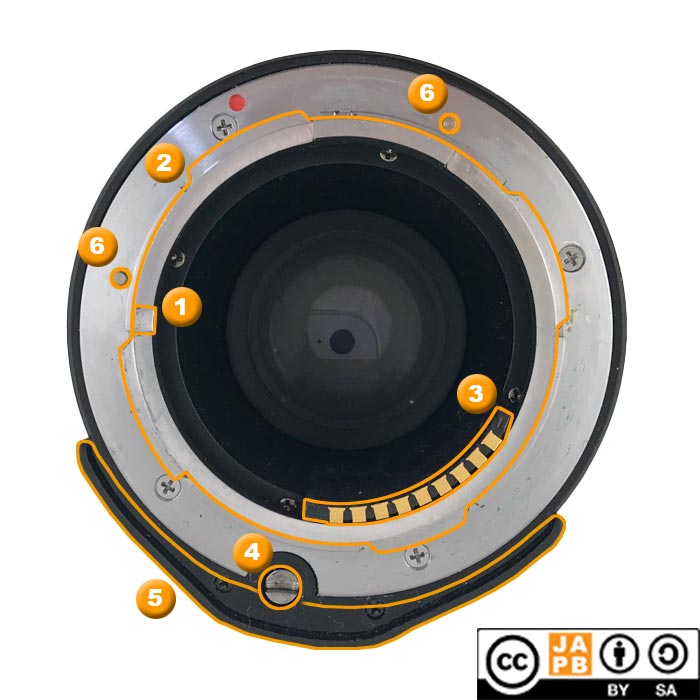
Key characteristics of the Contax G -mount:
[1] Locking notch at 09:00 (but, unusually, on the rearwards facing end of the “bayonet”, not on the flange and not on a bayonet prong)
[2] Bayonet-like construction* with four prongs
[3] Bank of electronic contacts
[4] Slot-drive screw
[5] Bulge (housing gearing for slot-drive)
[6] Pins for detecting mounting on camera (or adapter)
*While technically a breech-lock mount (you insert the lens straight into the camera, then twist a ring on the lens to mount it securely), the Contax G mount evidences a great many bayonet-like features. Not only does it seem to have what looks like an obvious four pronged bayonet construction, it also has a locking notch (although whether it should be classed as a locking notch or locking groove is debatable), which also is a typical bayonet trait. In one sense, the Contax G mount has it all (except for threads).
Details on the Contax G -mount
See the JAPB page on the Contax G -mount
Diax mount
The Diax mount was used by a relatively unsuccessful line of 1950s German viewfinders and rangefinders. It uses a threaded breech lock ring.
Key characteristics of the mount of Diax lenses (image oriented so that lens top is down):
[1] fastening ring with threads on the inside (Diameter 55 mm).
[2] rangefinder cam (moves in tandem with focusing motion) to communicate focusing distance to body (Diax B lenses).
[3] location of rangefinder cam on Diax (Ia/IIa lenses)
Details on the Diax mount:
See the JAPB page on the Diax mount.
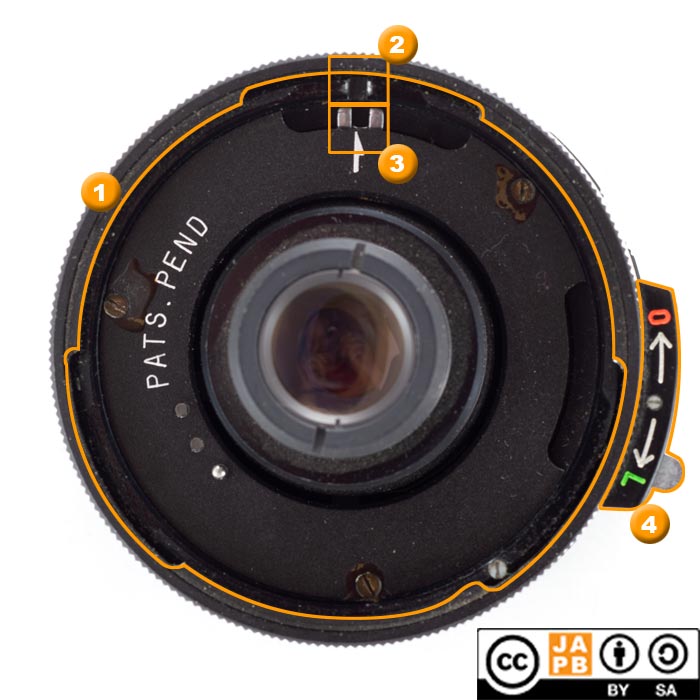
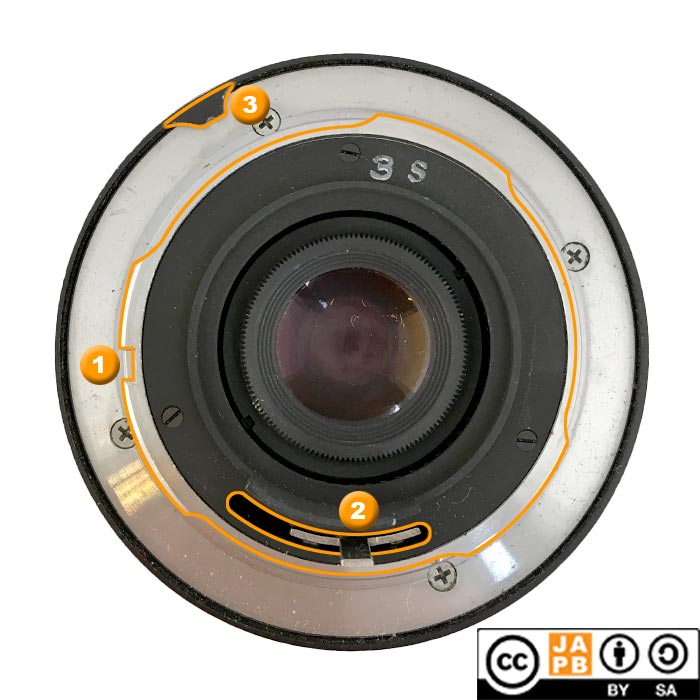
Icarex BM mount
Key characteristics of the mount of Icarex BM lenses:
[1] Breech-lock ring with two openings of different sizes
[2] Breech-lock registration pin (always aligned with lens top)
[3] Aperture stop-down pin
[4] Thingamajig (I have no idea what this is for. If someone knows, please enligten me)
Note! The rear of Icarex BM lenses typically (based on four lenses) have very prominent slot-screw heads, but their number and spacing is not a definite characteristic.
Details on the Icarex BM mount:
See the JAPB page on the Icarex BM mount.
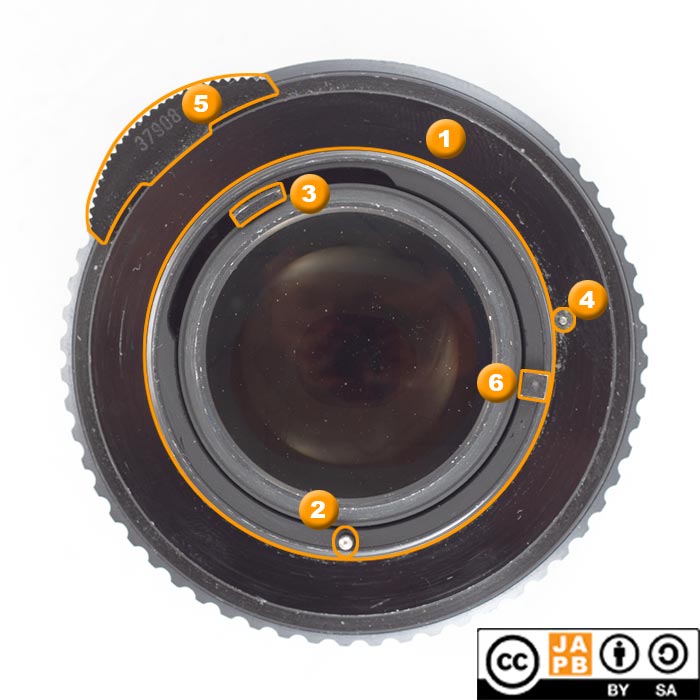
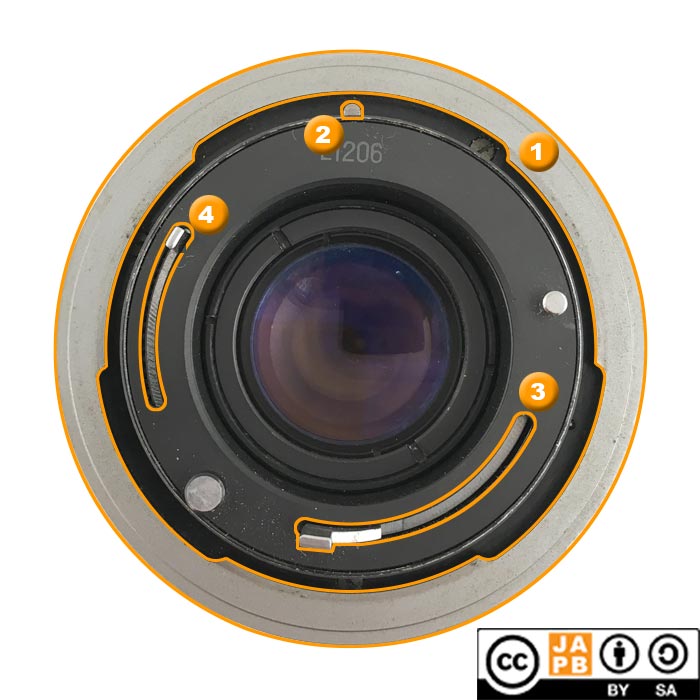
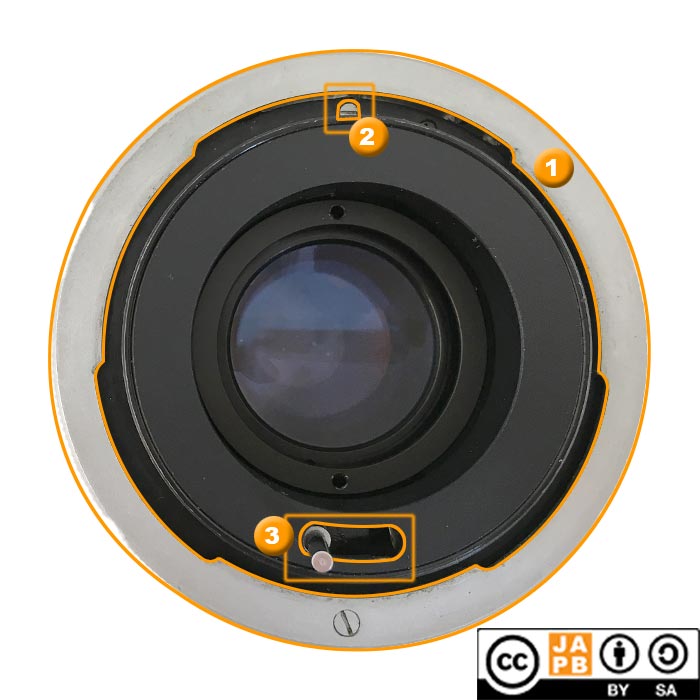
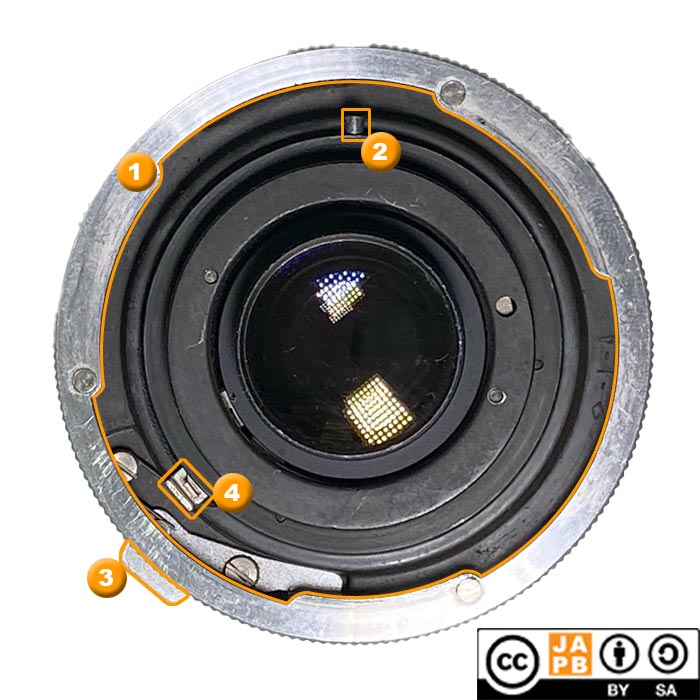
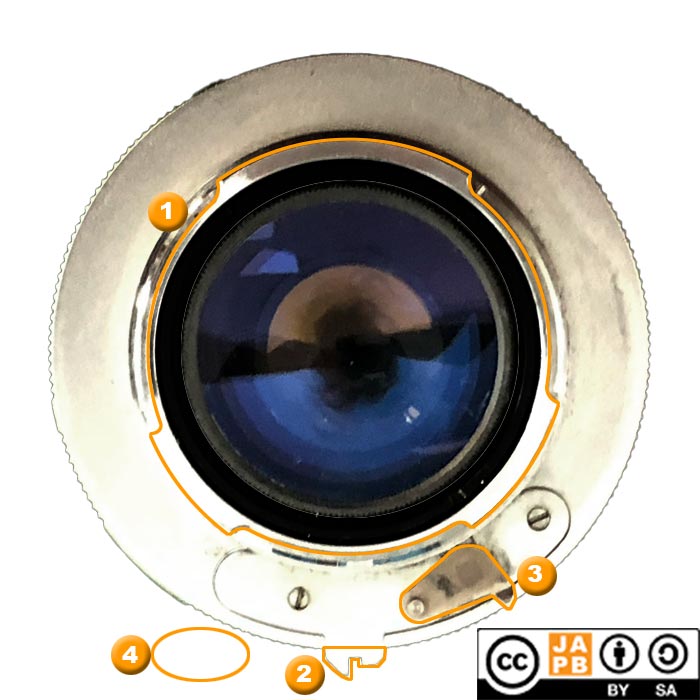
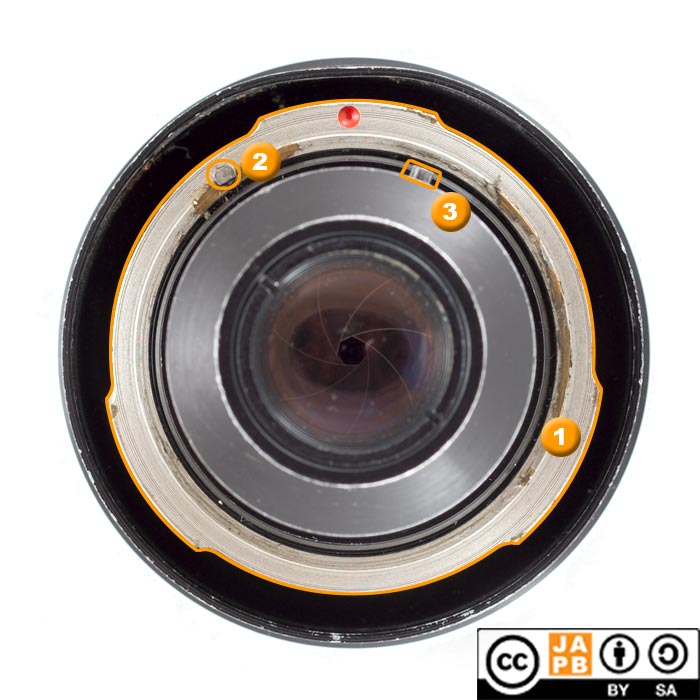
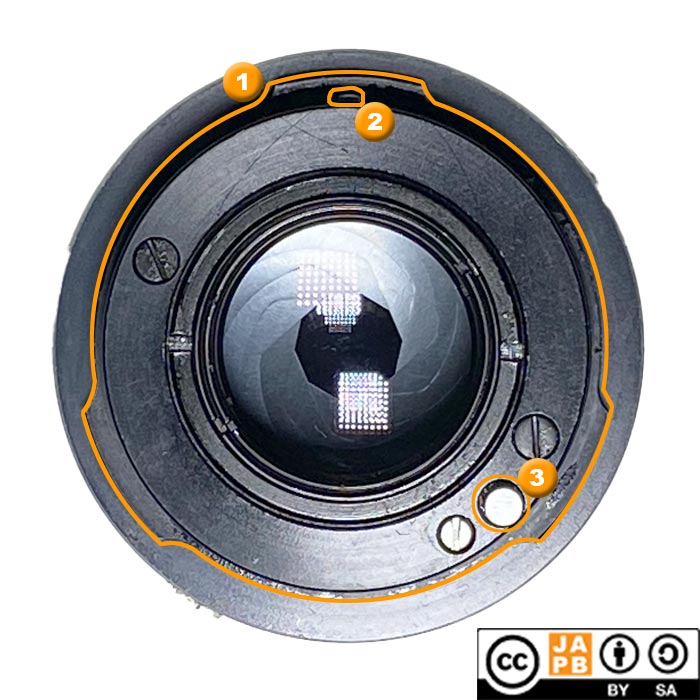
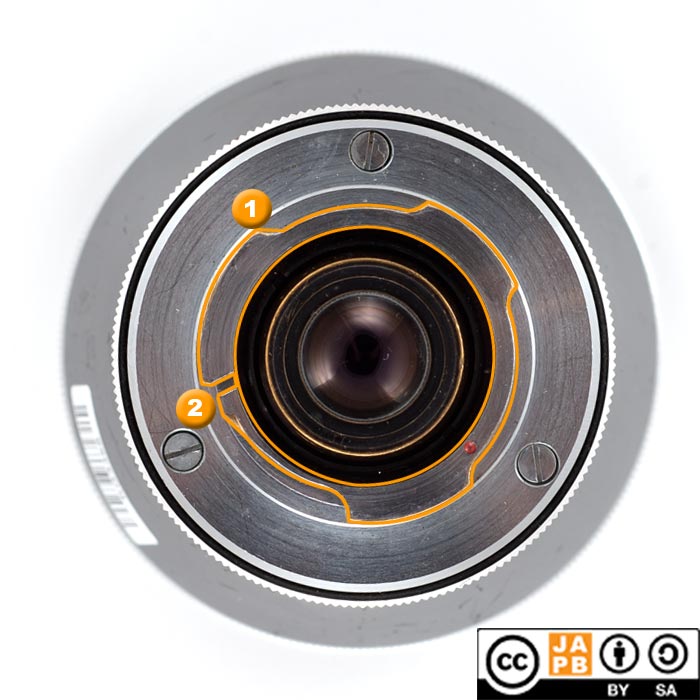
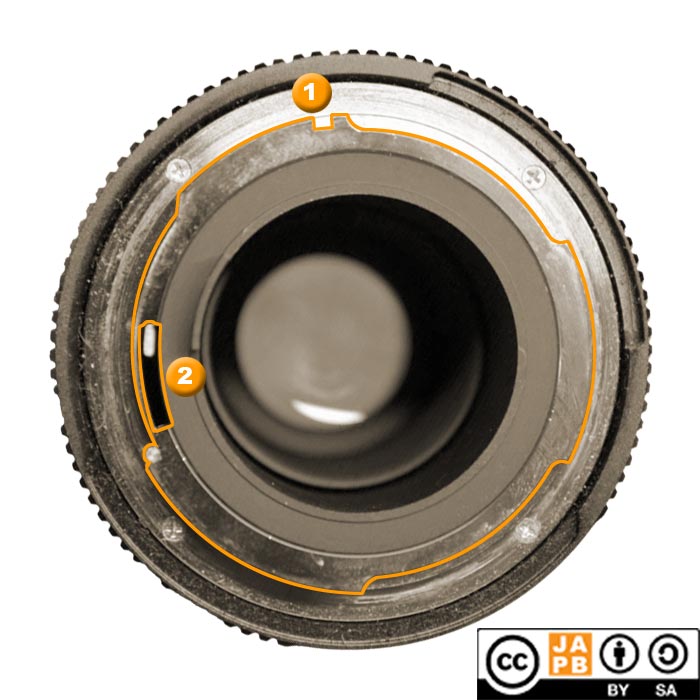
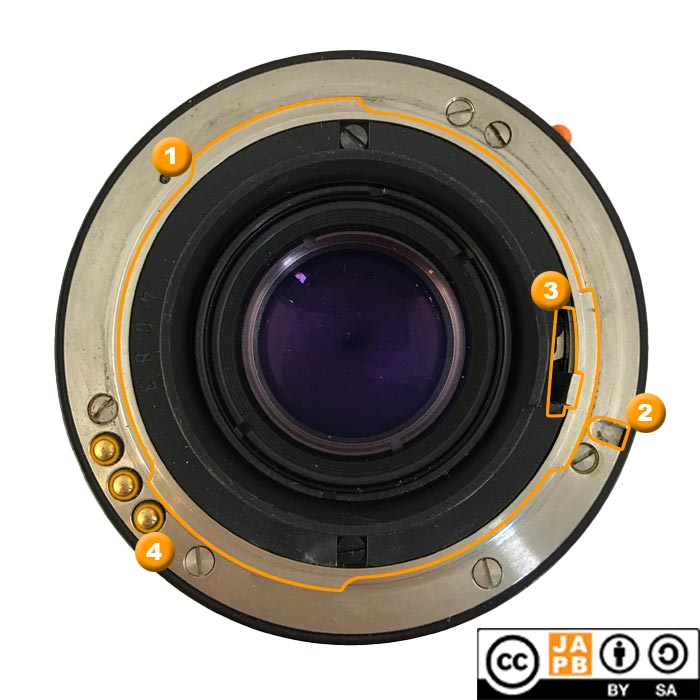
Tamron Adapt-a-matic mount
The Tamron Adapt-a-matic is an intermediate mount that uses a threaded breech-lock ring.
Key Characteristics of Tamron Adapt-a-matic lenses
[1] 58 mm thread mount (Does not protrude. You have to know to look for it)
[2] Orientation pin to help orient adapter
[3] Opening (dark) for adapter’s lever to couple with aperture mechanism lever (silver)
Details on the Tamron Adapt-a-matic mount
The Tamron Adapt-a-matic is the predecessor of the Tamron Adaptall mount and is not strictly speaking a lens mount, but is instead an intermediate mount.
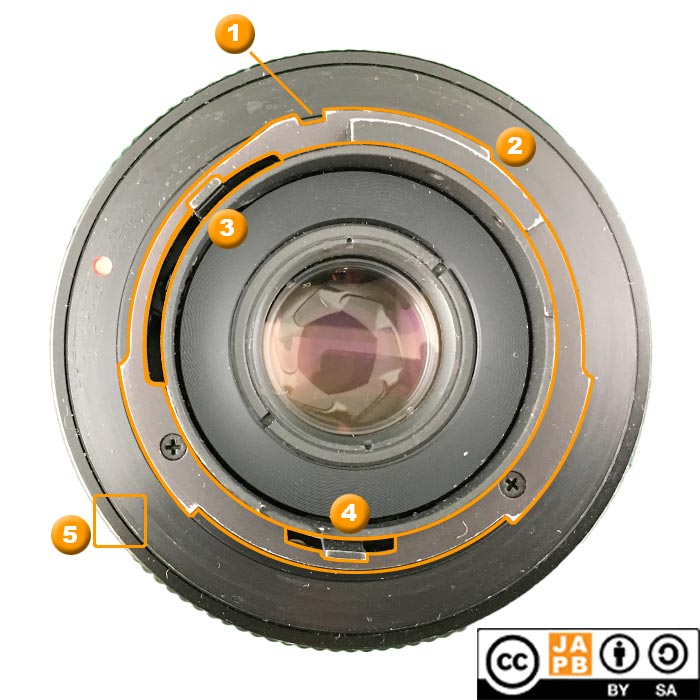
T-4/TX mount
The T-4 and TX mounts are a first and second generation product that look structurally very similar (but the TX mount offers even more controls)
Key Characteristics of Tokina T-4 lenses
[1] three-opening breech-lock mount (1 and 4 rotate together, independent of lens barrel. Hence their angle vis-a-vis the lens barrel might vary)
[2] orientation notch at the bottom of breech-lock
[3] alignment fork, rotates together with aperture ring.
[4] locking clamp with ratchet mechanism with arrows for O(pen) and L(ock). Silver tongue next to L must be pressed to unlock ratchet,
If your lens has all the elements listed above, and then some … it is most likely a TX mount lens.
Details on the Tokina T-4 mount
The Tokina T-4 mount is not strictly speaking a lens mount, but is instead an intermediate mount. For more details, see the JAPB article on the T-4 and TX mounts.
Does your lens have an obvious breech-lock locking ring, but is not one of the above? Congratulations, you have something quite unusual on your hands. Please send me a message or leave a comment.
That’s it. This is not to say that there are not other (relatively obscure) breech-mount lenses for still cameras, but they are not obvious breech-mount lenses in that their locking ring is mounted on the camera (not the lens), such as Petri FT and Praktina (for 35 mm film) or Pentacon Six and Kowa Six (medium format film)
Group 3: Bayonet lenses
Question two: Is the bayonet male or female?
Bayonet mounts can be divided into two groups, that (in accordance with common parlance in other fields) JAPB refers to as male bayonets and female bayonets. With male bayonets the lens’ mount has prongs which are inserted to corresponding openings in the camera, whereas with female bayonets the prongs are on the camera end (and the lens’ mount has the openings.)
Female bayonet mounts
Female Bayonet mounts ==> (Canon FDn, Contarex, Exakta (external), Miranda, SLK, Tamron Adaptall, Topcon UV)
Female bayonet mounts are luckily quite rare. “Luckily” not because there’s anything inherently wrong with them, but because their rarity makes identification easy. In fact (among even slightly common lens mounts) there are only Seven: Canon FDn, Carl Zeiss Contarex, Exakta’s external bayonet, Miranda Bayonet, SLK, Tamron Adaptall and TopconUV bayonet.
Canon FDn mount
The Canon FDn (new FD) mount is somewhat odd, in that it is a conversion of the breech-lock FD mount into a bayonet mount, while retaining compatibility (both backwards and forwards). Also, it is characterised by that it being a female bayonet mount (the prongs are on the camera, not the lens). These factors make it relatively easy to identify. Even so, the picture below shows the notable characteristics of the FDn mount.
Key characteristics of the mount of Canon FDn lenses
[1] Female bayonet mount with three openings.
[2] Lens release button (pops out when lens locks on body/adapter).
[3] Alignment pin.
[4] Stop-down lever.
[5] Aperture indicator lever.
[6] Bayonet activation pins (bayonet is locked until body’s or adapter’s prongs or lens cap depresses these).
Details on the Canon FDn mount:
See the JAPB article on the Canon FDn mount.
Carl Zeiss Contarex mount
Key characteristics of the Contarex-mount:
[1] Female bayonet for three bayonet prongs
[2] Locking groove at about 03:30
[3] Aperture control ring (rotates around the optical axle and operates the aperture mechanism directly)
Details on the Contarex-mount
See the JAPB article on the Contarex-mount.
Exakta (external bayonet)
The Exakta mount also offered an external bayonet (on some cameras) for mounting heavy lenses.
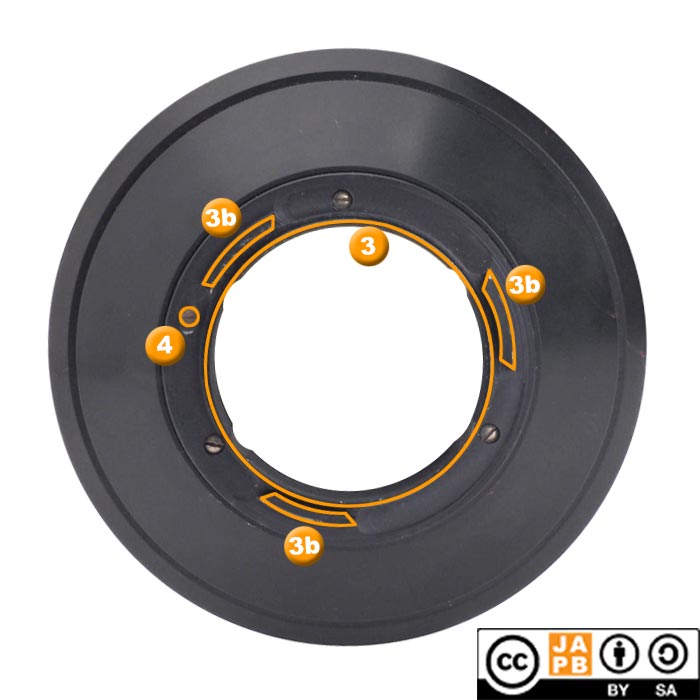
[3] throat of lens mount
[3b] clamps that latch onto external bayonet lugs
[4] Lens locking pin.
Details on the Exakta mount:
See the JAPB page on the Exakta mount.
Miranda Bayonet
The Miranda mount is in some ways quite exceptional, because (on the camera end), users could choose between two mounts – Miranda’s proprietary four-pronged female bayonet (a unique approach in itself) and a 44 mm diameter thread mount (inside of that bayonet mount). Here we will focus on the 4-pronged bayonet mount.
[1] Four-pronged female bayonet mount
[2] Aperture stop-down lever
[3] Aperture preview button (stops down lens to selected aperture)
[4] Lens release button
[5] Bayonet lock (operated by lens release button)
n.B! This is a relatively early Miranda lens, and while the basic mount configuration (elements 1,2,4,5) stayed the same throughout, later lenses omitted the aperture preview button, and added an interface for communicating selected aperture.
Details on the Miranda mount:
See the JAPB page on the Miranda lens mount(s).
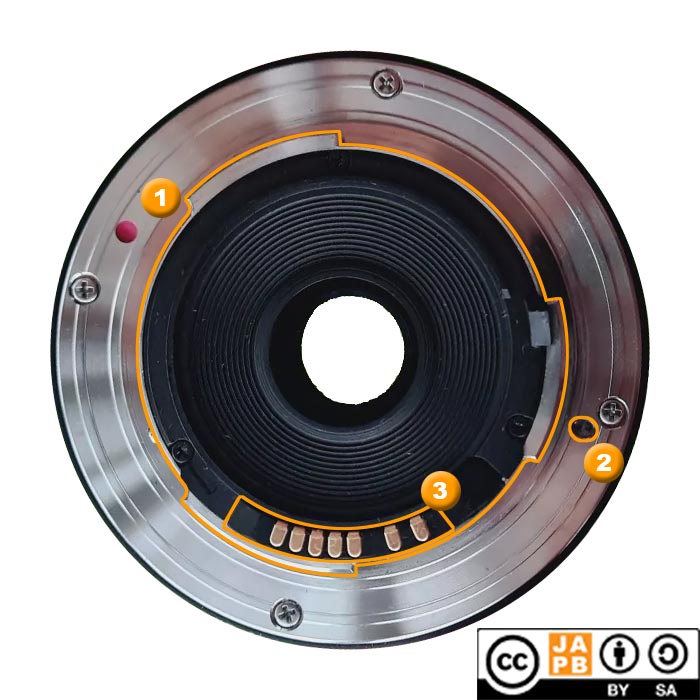
SLK bayonet
The SLK mount is a family of three closely related female bayonet mounts (specifically Bolta’s, Braun’s and King’s implementations of the SLK bayonet) designed for 1950s interchangeable lens rangefinder cameras.
Characteristics of lens mount:
[1] Three-pronged female bayonet with locking groove at 12:00
[2] Red lens release button (all BraunSLK and BoltaSLK lenses have the same, prominent red lens release button. With KingSLK lenses the button is more discreet)
[3] Aperture lever position.
[4] Rangefinder cam.
Note that the position of areas [3] and [4] are different (vis-a-vis the bayonet mount) on the KingSLK lenses.
Details on the SLK mount:
See the JAPB Page on the SLK mount.
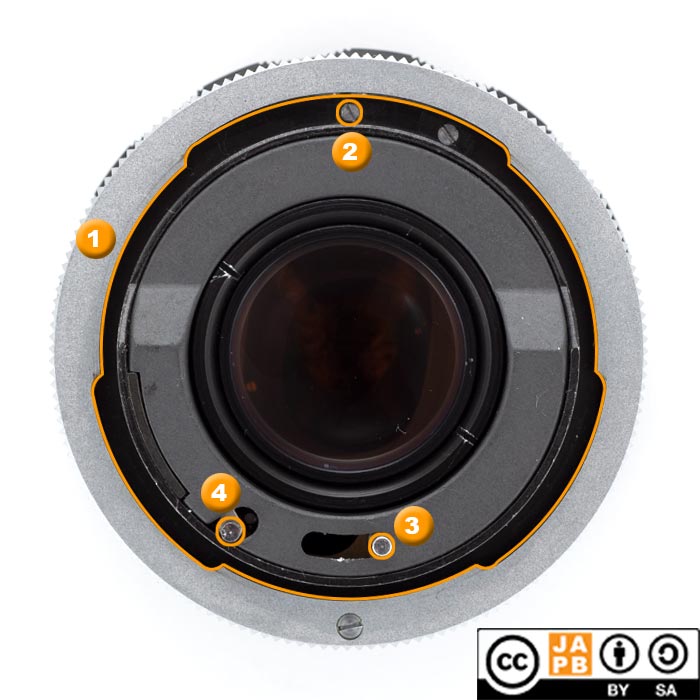
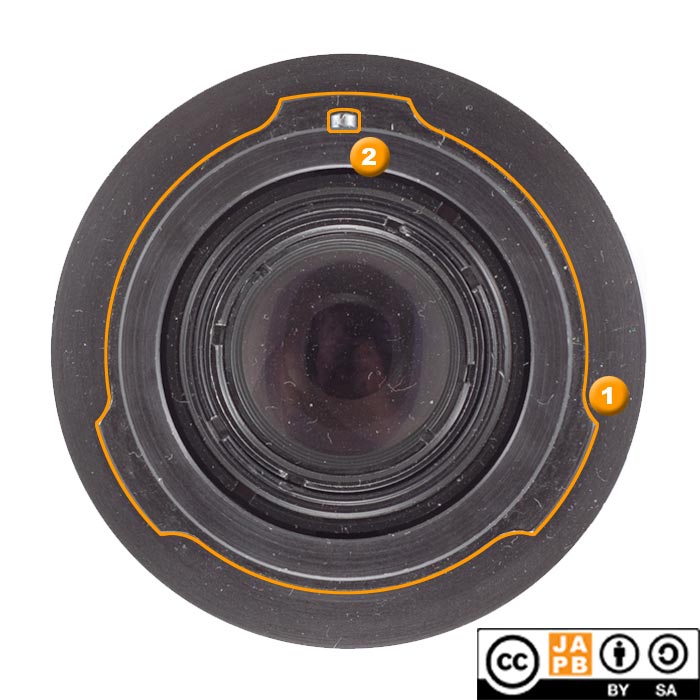
Tamron Adaptall
Key Characteristics of Tamron Adaptall lenses
[1] Female bayonet mount with three openings
[2] Adapter release lever
[3] Aperture stop-down mechanism (press to stop down lens)
[4] Adapter orientation indicator
Details on the Tamron Adaptall mount
The Tamron Adaptall (versions 1 and 2) is not strictly speaking a lens mount, but is instead an intermediate mount. For details, please view the JAPB page on the Tamron Adaptall mount.
TopconUV mount
Key characteristics of Topcon UV mount:
[1] Three-pronged female bayonet mount
[2] Orientation pin
[3] Lens release button
[4] Dual-lever aperture control system
Another identification trait of a TopconUV mount lens is that the lens entirely lack aperture controls as those controls were mounted on the body.
Details on the Topcon UV mount:
See the JAPB page on the Topcon UV mount.
Male bayonet mounts
Question 3: Is the lens secured by a locking pin, a locking notch or a locking groove?
All bayonet mounts are characterised by that they (once twisted into place) lock the lens onto the body. This locking typically is achieved by a protrusion, pin or hook in the camera, which latches onto a pin or into a hole or groove in the lens. Sometimes, the roles are reversed and the lens seems to have a pin, which might lock into a hole on the camera. Finally, sometimes the locking mechanism is not directly obvious.
A System for identifying male bayonet mounts
The placement of these pins, holes, notches or grooves is the most definite characteristic of various lens mounts and will be crucial to our method of identifying the lens.
Start by identifying whether the lens has a locking notch (a notch in one of the bayonet prongs), a locking groove (a hole or groove in the base of the lens mount), a locking pin (a pin in the lens mount which might be used for locking) or none of the above. (See picture below for examples)
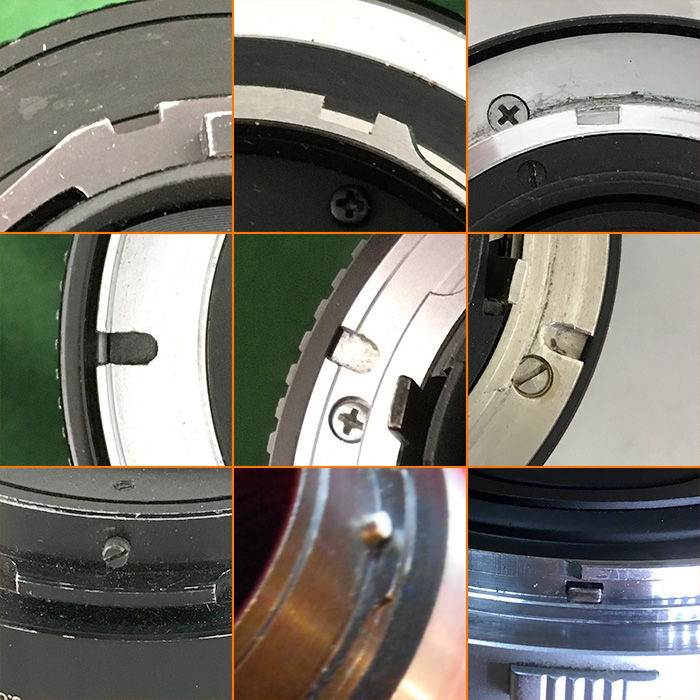
(Featured mounts (alphabetical): Contax/Yashica, Konica AR, Minolta SR, Nikon F, Olympus OM, Pentacon Six, Pentax K, Praktica B, Praktina
The next steps
But merely knowing your lens has e.g. a locking pin is not enough. Next we will have to have a look at where that locking notch/locking groove/locking pin is.
Next, put the lens face down (mount up) in front of you on the table, and orient the lens’ upside (what would in landscape mode be facing up) at 12 o’clock (away from you)3.
Now, lean forwards until you view the lens mount straight from above, and imagine a clock-face onto the lens mount and make a note of the position (at what o’clock) of the groove, notch or pin .
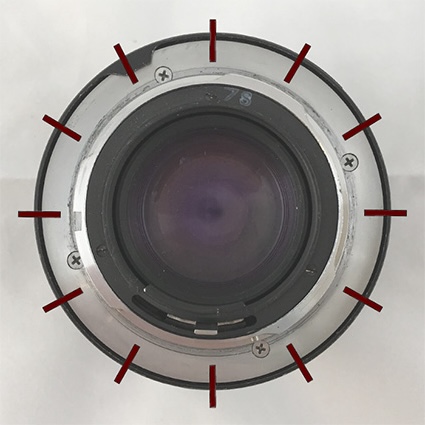
Note locking notch at ≈ 09:00
And while you’re at it, as there is a veritable plethora of bayonet mounts (legacy and modern), merely the location of the notch/groove/pin might in some cases not be enough. Therefore, it makes sense to also look at the following characteristics:
- How many prongs does the bayonet have?
- Does the mount have electronic contacts? If, then how many and where are they and of what type4?
- Does the mount have communication pins or levers5? If, then how many and where?
- Does the mount have a slot-drive apparatus (looks like a big slot-type screw head, but it rotates when you twist the lens’ focus ring)?
Male bayonet mounts that use locking pins
Lenses that use Locking pins can be relatively easily identified by looking at the location (re watch face) of the locking pin:
Locking pin at 01:30 ==> Olympus Pen F
Olympus Pen F
[1] Three-pronged bayonet with tapered prongs
[2] Aperture stop-down lever
[3] Lens release button
[4] Locking pin is hidden under bayonet prong here (at 01:30)
[5] Aperture stop-down button (for depth-of-field preview).
Details on Olympus Pen F-mount
See the JAPB article on the Olympus Pen F mount
Locking pin at 06:00 ==> Konica F
Konica F
[1] Three-pronged unsymmetrical bayonet
[2] Bayonet locking claw at 06:00 (interacts with retractable locking pin on camera body)
[3] Aperture actuator (interacts with similar on camera body)
[4] Early lenses (for Konica F camera) would have an extra lever reaching beyond the lens proper (precise location of that lever depends on set aperture)
Details on Konica F-mount
See the JAPB article on the Konica F mount.
Locking pin at 09:30 ==> Exakta or Topcon RE
Exakta
The Exakta bayonet is not only a very early lens mount (Introduced 1936), it is also a family of mounts. At the core of that family is always a symmetrical three-pronged bayonet mount:
Identifying the mount
For a bayonet mount, the Exakta-mount is very simple, but there are some quirks (we’ll get to them in a second):
[1] Three-pronged bayonet with three identical prongs, spaced 120 degrees apart
[2] Locking pin at 09:30.
And then a short introduction to some of the quirks:
- One often encounters Exakta lenses which have a pod-like construction attached to the side of the lens. While lenses that have those pods are very simple to identify, these pods started appearing on Exakta lenses only in 1956 and were never used by all manufacturers.
- The Exakta-mount was originally just based on the internal bayonet (shown above), but later versions introduced an external bayonet as well, intended for the more secure fastening of long, heavy lenses.
- The Exakta-mount started out with only a bayonet and locking mechanism, and no way to transfer information to or from the camera, while various fixes and extra features were added at later stages.
- Towards the End – as a sort of dying gasp – The Exakta RTL body was launched. While that body could use all old Exakta lenses, it also introduced its own method for stopping down the aperture, and those lenses are not quite compatible with the other Exakta cameras.
Details on the Exakta mount:
See the JAPB page on the Exakta mount.
Topcon RE
Some might say that the Topcon RE (correct name: RE.Auto-Topcor) is not a lens mount, but merely an extension of the EXA (Exakta) mount. Even so, because the Topcon RE mount is functionally quite dissimilar from typical Exakta lenses, presenting the Topcon RE mount is prudent.
[1] Three-pronged (male) bayonet. Notch at position 1 is a later addition to the mount (it is absent from most Topcon RE lenses)
[2] Locking pin at 9:30 o’clock (the ‘Exakta pin’)
[3] Second locking pin at 11:00 o’clock (the ‘Topcon RE pin’)
[4] Aperture stop-down lever
[5] Aperture indicator prong/notch (position changes with aperture ring; may be part of the aperture ring as in this example or be on the flange)
See more on the Topcon RE mount:
In JAPB’s article on the Exakta mount there is a long section devoted to the Topcon-Exakta mounts.
Locking pin at 10:30 ==> Olympus OM
Olympus OM
[1] Three-pronged bayonet mount, with tapered prongs.
[2] Locking pin (hidden beneath prong, here) at 10:30 o’clock.
[3] Lens release button. Operates locking pin [2].
[4] Aperture stop-down button (for depth-of-field preview). Pressing of button moves lever [5].
[5] Aperture stop-down lever.
[6] Aperture indicator lever (moves with aperture ring)
NOTE! A striking characteristic of the OM-system are the two opposing buttons [3] and [4]. Sadly, this characteristic (while obvious) is not 100% foolproof, as both some Olympus lenses as well as third party lenses have arrangements which outwardly differ somewhat. The only foolproof identifier is the locking pin hidden under the bayonet prong at 10:30.
Details on the Olympus OM mount:
See the JAPB page on the Olympus OM mount
Locking pin at 11:00 ==> Enna Sockel or Topcon RE
Enna Sockel
The Enna Sockel (Sockel is German for foundation) is one of the earliest intermediate mounts. There were two versions of the Enna Sockel. Version 1 supported semi-automatic aperture while version 2 supported fully automatic. Version 1 is pictured below.
Identifying the mount
The Enna Sockel -mount is very simple, but there are some quirks (see separate article):
[1] Three-pronged bayonet with three identical prongs, spaced 120 degrees apart
[2] Locking pin at 11:00 o’clock.
[3] Aperture control level.
Details on the Enna Sockel mount:
See the JAPB page on the Enna Sockel mount.
Topcon RE
Some might say that the Topcon RE (correct name: RE.Auto-Topcor) is not a lens mount, but merely an extension of the EXA (Exakta) mount. Even so, because the Topcon RE mount is functionally quite dissimilar from typical Exakta lenses, presenting the Topcon RE mount is prudent.
[1] Three-pronged (male) bayonet. Notch at position 1 is a later addition to the mount (it is absent from most Topcon RE lenses)
[2] Locking pin at 9:30 o’clock (the ‘Exakta pin’)
[3] Second locking pin at 11:00 o’clock (the ‘Topcon RE pin’)
[4] Aperture stop-down lever
[5] Aperture indicator prong/notch (position changes with aperture ring; may be part of the aperture ring as in this example or be on the flange)
See more on the Topcon RE mount:
In JAPB’s article on the Exakta mount there is a long section devoted to the Topcon-Exakta mounts.
Locking pin at 12:00 ==> Altix, Pentacon Six, Petri FT or Praktina
Altix
Key characteristics of the mount of Altix lenses:
[1] Three-pronged mount.
[2] Orientation pin at 12:00.
Note please: The Altix mount is very similar as the Praktina and Pentacon Six mount, except a miniaturised version:
Details of the Altix mount
See the JAPB page on the Altix mount
Pentacon Six
Identifying marks:
[1] Three lugs on mount (symmetrical)
[2] Orientation pin at 12:00 (on a camera, this always goes up)
[3] Aperture stop-down pin
The Pentacon Six mount is a breech-lock mount, where the breech-lock’s friction ring is on the camera’s end, meaning that (when only looking at a lens) one might mistake it for a bayonet mount.
Note please, that the Altix and Praktina mounts have identical characteristics with the Pentacon Six mount, but as the Pentacon Six mount is for a medium format camera, the Pentacon Six mount is significantly larger than that of regular 135-format film cameras.
Details on the Pentacon Six mount:
See the JAPB page on the Pentacon Six mount.
Petri FT
Key characteristics of the mount of Petri FT mount lenses
[1] Breech-lock mount with three lugs, with something resembling a locking notch at 6 o’clock
[2] Orientation pin at 12:00 (on a camera, this always goes up)
[3] Aperture stop-down lever
[4] Aperture control pin (only on FT EE lenses)
The Petri FT mount is a breech-lock mount, where the breech-lock’s friction ring is on the camera’s end, meaning that (when only looking at a lens) one might mistake it for a bayonet mount.
Details on the Petri FT mount:
See the JAPB page on the Petri FT mount.
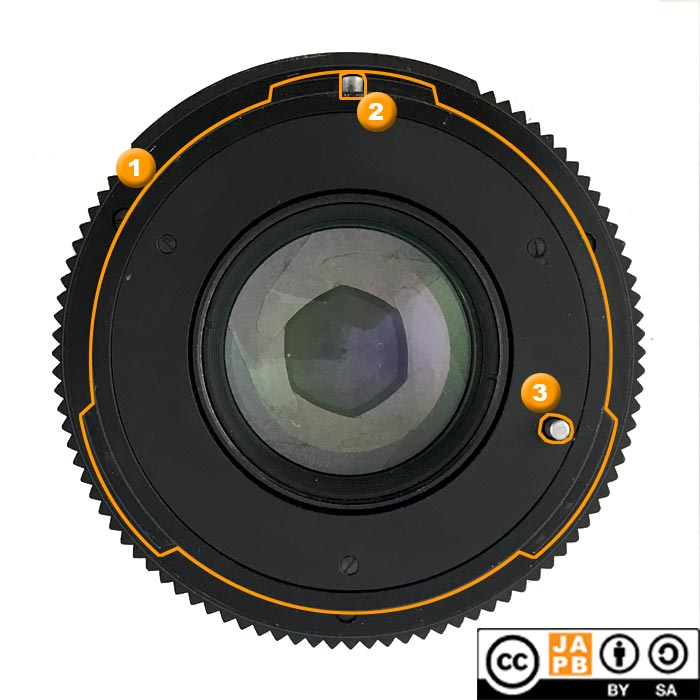
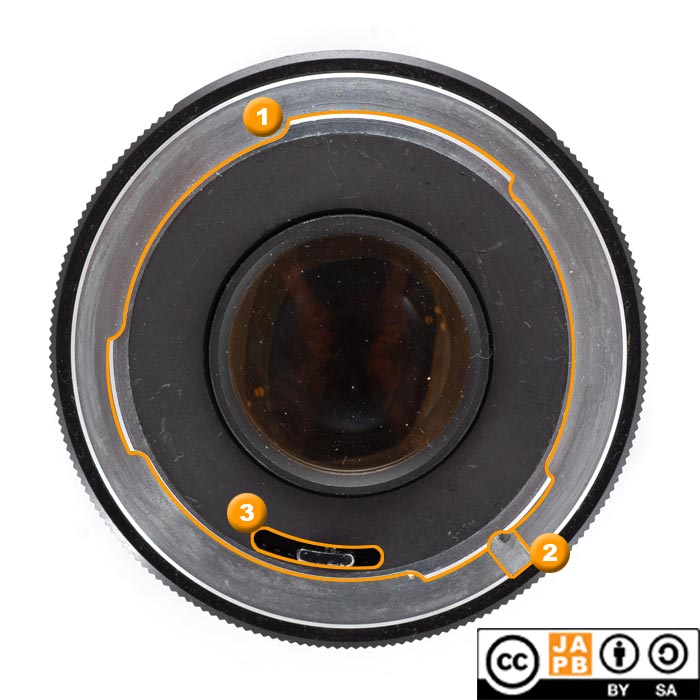
Praktina
Key characteristics of the mount of Praktina-mount lenses
[1] Breech-lock mount with three lugs
[2] Orientation pin at 12:00 (on a camera, this always goes up)
[3] Aperture stop-down pin (preset lenses will not have this).
The Praktina mount is a breech-lock mount, where the breech-lock’s friction ring is on the camera’s end, meaning that (when only looking at a lens) one might mistake it for a bayonet mount.
Note please, that the Praktina mount has identical characteristics with the Pentacon Six and Altix mounts, but they are of very unequal sizes.
Details on the Praktina mount:
See the JAPB page on the Praktina mount.
Male bayonet mounts that use locking notches
Has Locking Notch at …
Locking Notch at 00:30 ==> Minolta SR
The Minolta SR mount has four main variants. While this will likely help you identify it, please also see the JAPB article on the Minolta SR mount.
Key characteristics of the mount of Minolta SR/MC/MD lenses:
[1] Three-pronged bayonet mount, with locking notch at roughly 00:30 o’clock. (SR, MC, and MD)
[2] Aperture stop-down lever (moves with aperture ring, but is not used (?) for metering). (SR, MC, and MD)
[3] Lens-internal and not part of interface. Disregard. (visible on some lenses)
[4] Meter coupling (MC) ridge, interfaces with pin on camera to report selected aperture, used for metering. (MC and MD)
[5] Minimum aperture ridge, interfaces with pin on camera and reports lens’ minimum aperture, used for metering in shutter priority and program modes. (MD only)
Typical variations :
Firstly, while the picture above shows three (of six) bayonet prongs to be tapered, this varies in practice.
Secondly, the aperture stop-down lever is not a must. In the earliest days of the SR mount, both Minolta and third-party manufacturers offered lenses for the SR-mount that did not have an automatic aperture.
Details on the Minola SR mount:
See the JAPB article on the Minolta SR mount.
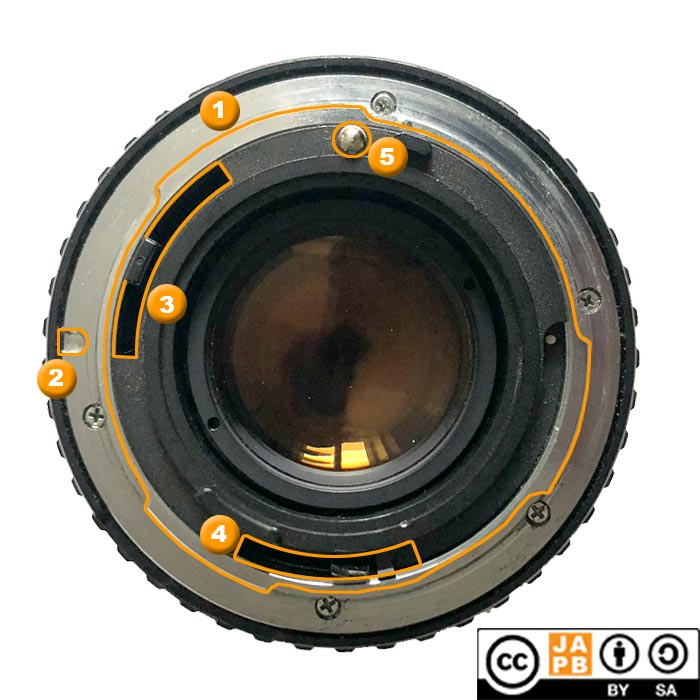
Locking Notch at 05:00 ==> Mamiya NC/CS or Yashica Pentamatic
The easiest way to spot the difference between these two is that the Mamiya NC/CS has an aperture pin while the Yashica Pentamatic has aperture lever.
Mamiya NC/CS
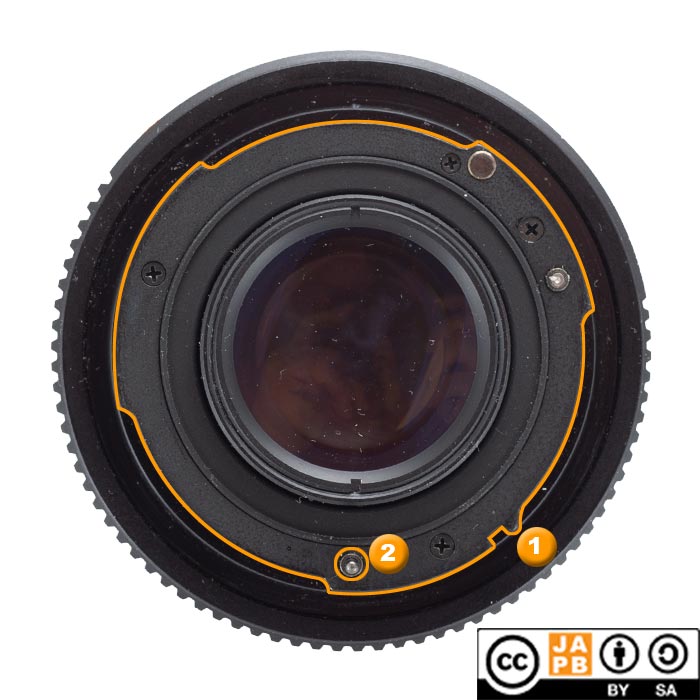
Key characteristics of the Mamiya NC/CS mount:
[1] Three-pronged male bayonet mount with locking notch at 05:00
[2] Aperture stop-down pin.
Details on the Mamiya NC/CS mount
See the JAPB article on the all Mamiya 35 mm SLR mounts.
Yashica Pentamatic
The Yashica Pentamatic mount was a short-lived (1960–≈1963) bayonet mount used by Yashica 35 mm SLRs.
Key characteristics of the mount of Yashica Pentamatic lenses:
[1] Three-pronged male bayonet. All edges tapered. Locking notch at 05:00 position.
[2] Also a locking groove at 05:00 o’clock.
[3] Aperture stop-down lever.
Details on the Yashica Pentamatic mount:
See the JAPB article on the Yashica Pentamatic mount
Locking Notch at 05:45 ==> Rollei QBM
Rollei QBM
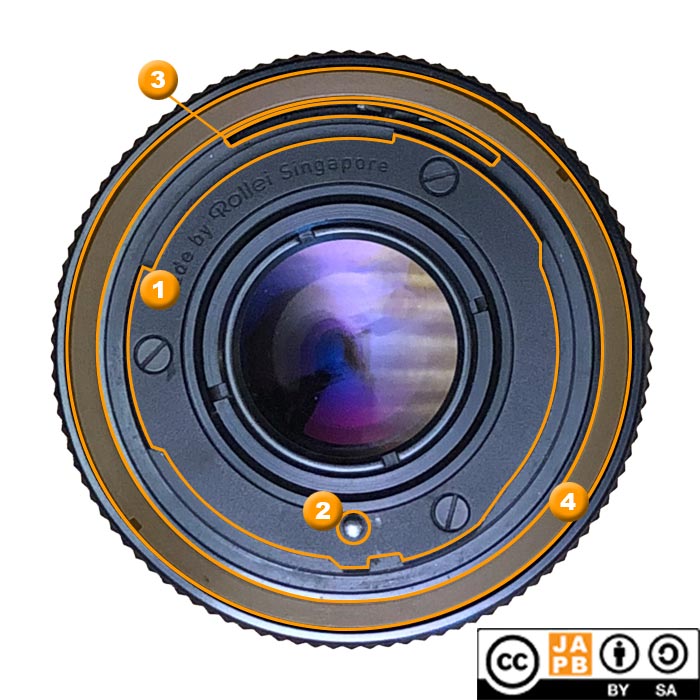
Key characteristics of the mount of Rollei QBM lenses:
[1] Three pronged male-type bayonet mount with a profusion of straight, tapered and very shallow prongs and lock notch at 5:45.
[2] Aperture stop-down pin (QBM lens versions I–IV)
[3] Aperture indicator (moves in the groove together with aperture ring, spring-loaded for backwards compatibility) (QBM lens versions II–IV)
[4] Max aperture indicator ‘step’ (a furrow going all the way around the lens mount, the depth of which is read by the camera to discern max aperture) (QBM lens version IV)
(The difference between lens versions II and III have no impact on the mount, and relate more to ergonomics)

Details on the Rollei QBM mount:
See the JAPB Page on the Rollei QBM mount.
Locking Notch at 06:00 ==> Pentax 645
The Pentax-645 family of cameras are all medium format (6cm X 4,5 cm) cameras, but can clearly be divided into three generations:
• Pentax 645 (manual focus) camera and the Pentax-A (645) lenses (1984–1997)
• Pentax 645N/645NII (autofocus) camera and the Pentax-FA (645) lenses (1997–2010)
• Pentax 645D/Z (digital, autofocus) camera and the Pentax-D FA lenses (2010–>
Each camera generation has been backwards compatible (you can use manual lenses on autofocus cameras and you can use all lenses on the digital bodies). However, there are differences between the respective mounts:
Pentax-A 645
Key characteristics of the mount of Pentax-A 645 -lenses:
[1] Three-pronged bayonet mount, with locking notch at 12:00
[2] Aperture indicator lever (communicates selected aperture to camera)
[3] Aperture stop-down
[4] Electronic contacts between 5:00 and 7:00. Whether these identify only the lens’ max. aperture or actually identify the lens is unclear to me.
Pentax-FA 645
Key characteristics of the mount of Pentax-FA 645 -lenses:
[1] Three-pronged bayonet mount, with locking notch at 06:00
[2] Aperture indicator lever (communicates selected aperture to camera)
[3] Aperture stop-down
[4] Electronic contacts between 11:00 and 01:00. Whether these identify only the lens’ max. aperture or actually identify the lens is unclear to me.
[5] Slot-drive screw for body-driven autofous.
Pentax-D FA 645 mount
(We have no high-resolution pictures of this mount. Sorry)
Details on the Pentax 645 mount:
To be added later, sorry.
Locking Notch at 07:30 ==> Mamiya Z/E
Mamiya Z/E mount
[1] Three-pronged bayonet with tapered edges and lock notch at 07:30.
[2] Aperture communication prong (interacts with camera). Location indicative as moves with aperture ring.
[3] Aperture control lever
[4] Two banks of electronic contacts. 6+4 contacts on E-class lenses; 6+5 contacts on EF-class lenses.
Details on the Mamiya Z/E-mount
See the JAPB article on the all Mamiya 35 mm SLR mounts.
Locking Notch at 08:30 ==> DKL or Zeiss Contaflex
(Two quite similar mounts. Also, neither lenses have aperture rings, but easily identifiable, because)
• DKL has two levers on roughly opposite sides of the flange that operate the aperture (Zeiss Contaflex has none)
• Zeiss never made lenses for DKL mount (but all lenses for the Contaflex mount are by Zeiss)
DKL-mount
The DKL mount is a bit of an odd duck (not a one-of-its-kind, but still far from a common mallard) in the family of interchangeable lens camera mounts. Be sure to also read the page giving details on the DKL mount to understand what makes it special (unless you’re an DKL-expert, in which case I wish you read it in order to help me extend the article).
Let’s see how to identify DKL lenses:
Key characteristics:
[1] Eccentrically shaped bayonet (note please, some DKL lenses do not share this exact shape… read on.)
[2] Locking notch at about 08:30
[3] Aperture stop-down lever (this operates the aperture stop-down and moves independently of [4])
[4] Aperture designator lever (this sets the aperture to stop down to. When this lever is moved, also lever [3] moves).
Some things are immediately apparent even from one picture. The lens mount has a very unusual shape: Instead of a barrel that has three or four prongs sticking out, this shape is … well, eccentric.
What is less apparent from a picture is that the mount is actually quite small (maximum diameter of shape highlighted above: ≈35 mm) and that all but the earliest DKL lenses lack an aperture ring (aperture was controlled on the camera).
Things get a bit more complicated by the fact that the DKL mount was not one mount, but constitutes a 7-member strong family of mounts where some of the manufacturers (Braun, Edixa, Kodak, Voigtländer) that used the DKL mount started adding proprietary obstructions to disable other manufacturers’ lenses from being mounted. Therefore, even though your lens’ mount shape might differ significantly from the shape shown above (a Kodak Retina variant), it might still be a DKL lens.
While I do repeat that you should read the DKL page, I’ll mention something positive here: Most DKL adapters are able to use all of the DKL variants successfully.
Zeiss Contaflex (aka Pro-tessar)
The Zeiss Contaflex mount looks like a lens mount, but is technically not a lens mount as it is not used to mount a lens to a camera body. Instead, it is intended to connect the front-end and back-end of a set lens. As a result, the front-ends of set lenses can neither be used nor adapted as such.
Key characteristics of the mounting interface of Zeiss Contaflex/ Pro-Tessar lens front-ends:
[1] Three-pronged male bayonet. Non-symmetrical, all inner edges tapered.
[2] Locking notch at ca 08:30 o’clock
No other interfaces.
Details on the Zeiss Contaflex / Pro-Tessar ‘lens mount’:
See the JAPB article on the Contaflex mount.
Locking Notch at 09:00 ==> Konica AR or Contax G
These two are easy to distinguish as:
• Konica AR has one lever, has no electronic contacts and has no slot-drive screw
• Contax G is not round, has electronic contacts and has a slot-drive -screw
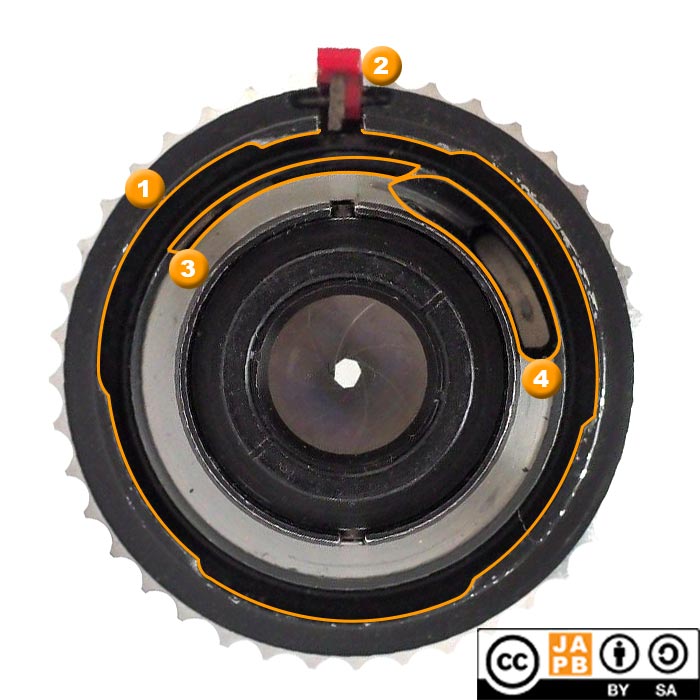
Konica AR
Key characteristics of the mount of Konica AR lenses:
[1] Locking notch at 09:00.
[2] Three bayonet prongs, all tapered on all sides.
[3] Combined stop-down lever and aperture indicator (moves with aperture ring).
Details on the Konica AR mount:
See the JAPB page on the Konica AR mount.
Contax G
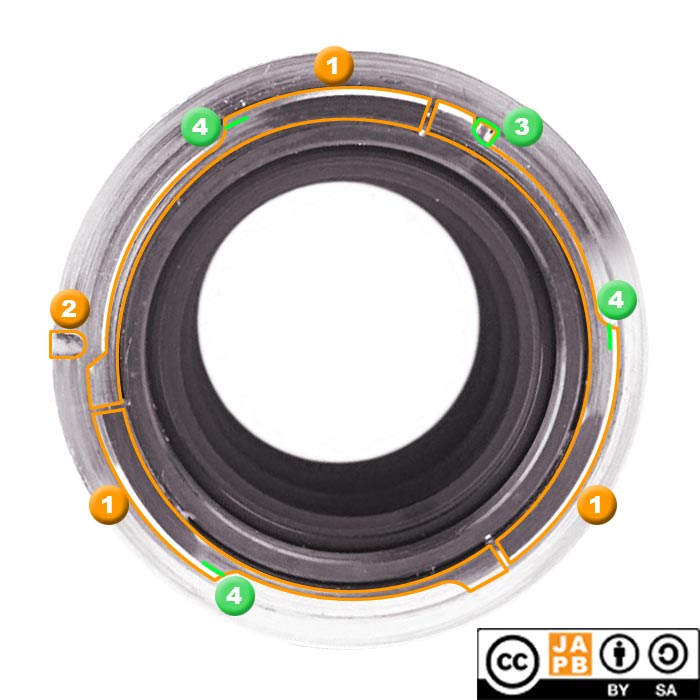
Key characteristics of the Contax G -mount:
[1] Locking notch at 09:00 (but, unusually, on the rearwards facing end of the “bayonet”, not on the flange and not on a bayonet prong)
[2] Bayonet-like construction* with four prongs
[3] Bank of electronic contacts
[4] Slot-drive screw
[5] Bulge (housing gearing for slot-drive)
[6] Pins for detecting mounting on camera (or adapter)
*While technically a breech-lock mount (you insert the lens straight into the camera, then twist a ring on the lens to mount it securely), the Contax G mount evidences a great many bayonet-like features. Not only does it seem to have what looks like an obvious four pronged bayonet construction, it also has a locking notch (although whether it should be classed as a locking notch or locking groove is debatable), which also is a typical bayonet trait. In one sense, the Contax G mount has it all (except for threads).
Details on the Contax G -mount
See the JAPB page on the Contax G -mount
Locking Notch at 10:00 ==> Kiev Automat
Kiev Automat

Key characteristics of Kiev Automat lenses:
[1] Three-pronged male bayonet mount with locking notch at 10:00
[2] Aperture control lever
Details on the Kiev Automat mount
See the JAPB article on the Kiev Automat mount
Locking Notch at 11:30 ==> Contax/Yashica or Mamiya XTL/ES
These are easy to distinguish as the Contax/Yashica mount has two levers, but the Mamiya ES mount has only one.
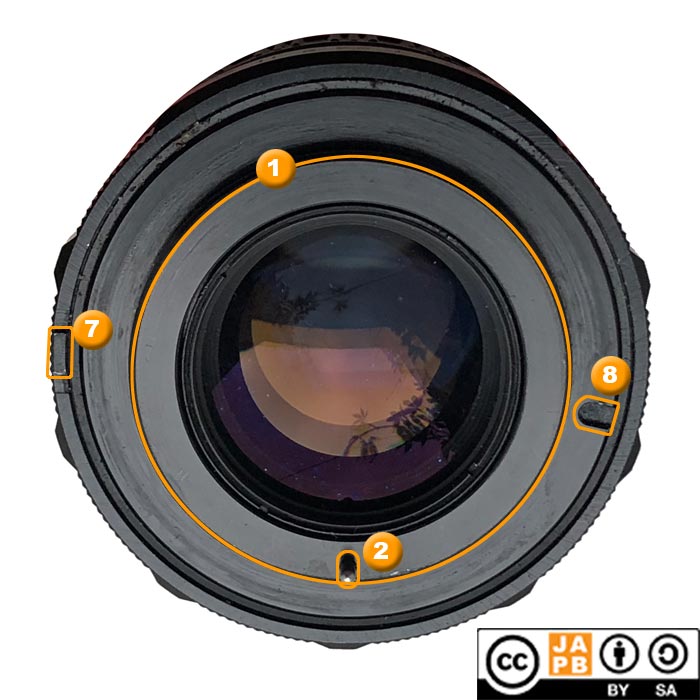
Contax/Yashica (C/Y)
The Contax / Yashica (C/Y) mount is just one of the many mounts of the film era, but due to some factors, it is highly interesting. First, let’s make sure we can identify it correctly.
Identifying the C/Y mount
[1] Locking notch at 11:30
[2] Three-pronged bayonet mount, two straight edges, three tapered edges, and one very shallow edge.
[3] Aperture indicator lever
[4] Stop-down lever
[5] Place where (if this was an MM lens) the indicator prong would be
Details on the C/Y mount:
See the JAPB page on the Contax/Yashica mount.
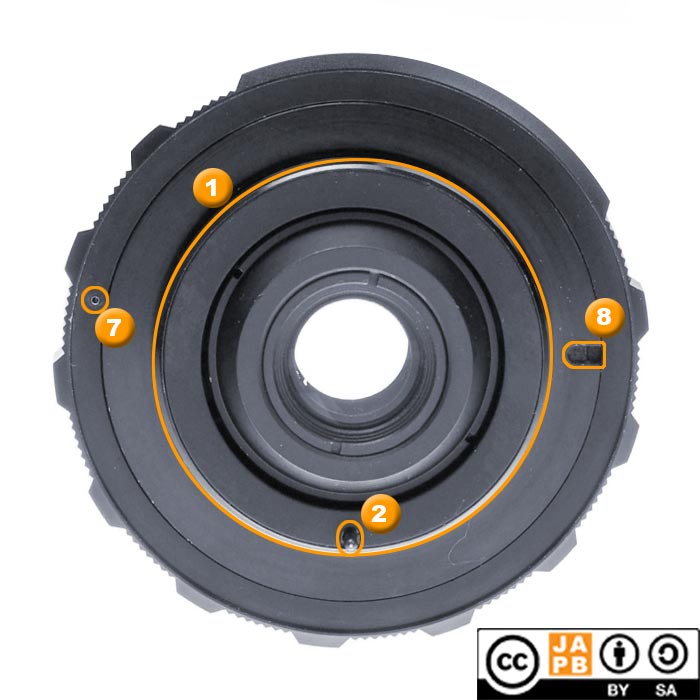
Mamiya XTL/ES mount
Characteristics:
[1] Three-pronged male bayonet with locking notch at about 11:30
[2] Aperture stop-down lever
Details on the Mamiya XTL/ES mount
See the JAPB article on the all Mamiya 35 mm SLR mounts.
Male bayonet mounts that use locking grooves
Locking groove at 01:30 ==> Agfa Ambi Silette
Agfa Ambi Silette
Key characteristics of the mount of Agfa Ambi Silette lenses:
[1] Locking groove at 01:30.
[2] rangefinder cam (moves in tandem with focusing motion).
Note please: The Ambi Silette mount is rather unusual as it (looking from straight behind) seems to not be either a bayonet, breech-lock nor thread-mount. To understand the locking mechanism of the Ambi Silette, another angle is more illuminating:
[3] locking groove that spans the circumference of lens.
Details of the Agfa Ambi Silette mount
See the JAPB article on the Ambi Silette mount.
Locking groove at 03:30 ==> Leica R
Leica R
The Leica R mount was never highly successful, but it remained in active use for more than 40 years, therefore leading to 5 distinct generations. Please see below.
1-cam lenses (1964–1968)
Key characteristics of 1-cam version of Leica R mount:
[1] Three-pronged male bayonet. Three straight edges, three tapered edges.
[2] Locking groove at 03:30
[3] Aperture stop-down lever
[4] Cam for communicating chosen aperture to camera (moves with aperture ring. Position indicative)
2-cam lenses (1968–1976) (also referred to as twin cam lenses)
Key characteristics of 2-cam version of Leica R mount:
[1] Three-pronged male bayonet. Three straight edges, three tapered edges.
[2] Locking groove at 03:30
[3] Aperture stop-down lever
[4] Cam for communicating chosen aperture to camera (moves with aperture ring. Position indicative)
[5] Second cam with precisely the same functionality as the first cam (moves with aperture ring. Position indicative)
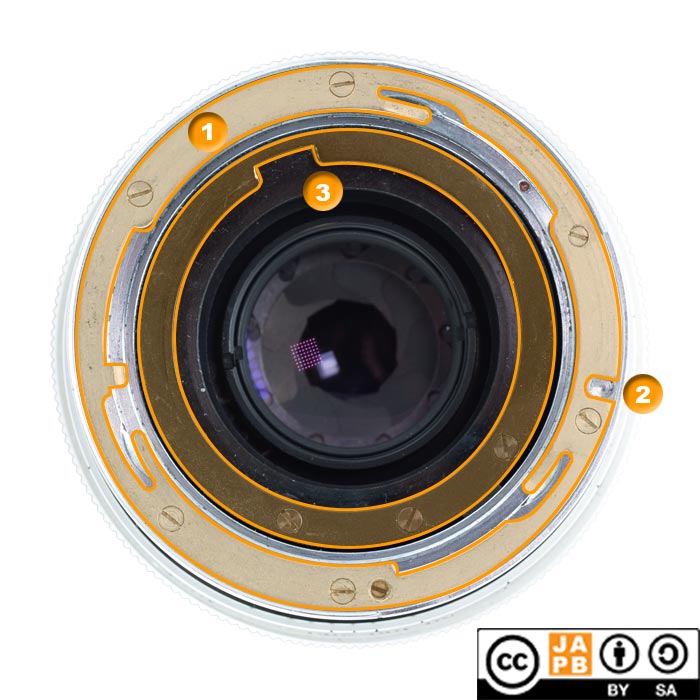
3-cam lenses (1976–1996)
Key characteristics of 3-cam version of Leica R mount:
[1] Three-pronged male bayonet. Three straight edges, three tapered edges.
[2] Locking groove at 03:30
[3] Aperture stop-down lever
[4] Cam for communicating chosen aperture to camera (moves with aperture ring. Position indicative)
[5] Second cam with precisely the same functionality as the first cam (moves with aperture ring. Position indicative), with 3rd cam right on the inside of it.
Because the third cam is barely visible when looking down on the lens (it is black, it is thin), please see image below for details on 3rd cam.
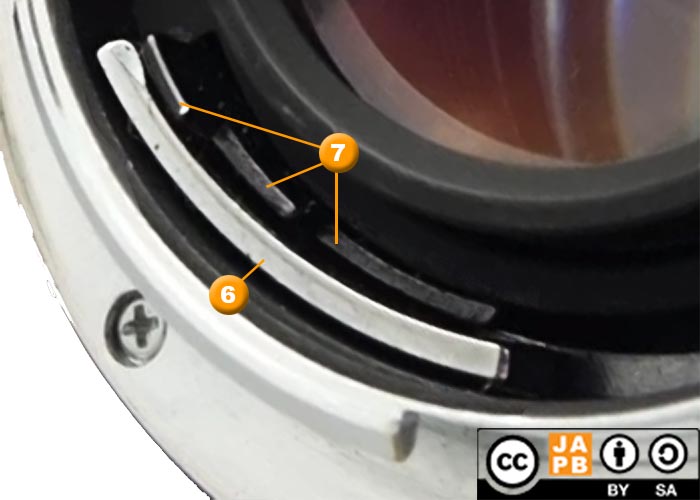
[6] 2nd cam
[5] 3rd cam
R-only lenses (1986–2009)
So called because by removing the 1st and 2nd cam, these only worked on the Leica R3–R9 cameras (Not Leicaflex, Leicaflex SL or SL2).
Key characteristics of R-only version of Leica R mount:
[1] Three-pronged male bayonet. Three straight edges, three tapered edges.
[2] Locking groove at 03:30
[3] Aperture stop-down lever
[4] 3rd cam as on previous version.
ROM lenses (1996–2009)
Key characteristics of ROM version of Leica R mount:
[1] Three-pronged male bayonet. Three straight edges, three tapered edges.
[2] Locking groove at 03:30
[3] Aperture stop-down lever
[4] 3rd cam as on previous version.
[5] Bank of 9 electronic contacts between 11:00 and 01:00
Details on the Leica R mount:
For further details, please see the JAPB article on the Leica R mount.
Locking groove at 03:45 ==> Pentax K, Praktica B or Sigma SA
Pentax K
The Pentax K -mount is likely the bayonet mount with the greatest number of variations (8 or more, depending on how you count). The illustrations below will help identifying (almost) all variations of the Pentax K mount, but if you want further confirmation, please see the detailed JAPB article on the Pentax K mount.
K, KA, KAF, KAF2, KA2, KAF3 and KAF4 variants
Key characteristics of the mount of Pentax K -lenses:
[1] Locking groove at roughly 03:45 o’clock
[2] Three-pronged bayonet mount, four edges tapered (two straight)
[3] Stop-down lever (stops down diaphragm)
[4] Aperture indicator lever (moves with aperture ring when there is one)
[5] Electronic contacts at 04:00 to 5:30 (number varies)
[6] One more electronic contact at 05:45
[7] Slot-drive screw at 07:30
[8] Two electronic contacts between 06:30 and 07:00 (electricity for power-zoom / in-lens AF)
| K, KF or K-R -mount (see below) | KA -mount | KAF -mount | KAF2 -mount | KA2 -mount | KAF3 -mount | KAF4 -mount | |
| [1] locking groove | YES | YES | YES | YES | YES | YES | YES |
| [2] bayonet shape | SAME | SAME | SAME | SAME | SAME | SAME | SAME |
| [3] stop-down lever | YES | YES | YES | YES | YES | YES | NO |
| [4] aperture indicator | YES | YES | YES | YES | YES | YES | NO |
| [5] electronic contacts at 04:00 to 5:30 | NO | YES | YES | YES | YES | YES | YES |
| [6] added electronic contact | NO | NO | YES | YES | YES | YES | YES |
| [7] slot-drive screw | NO | NO | YES | YES | NO | NO | NO |
| [8] electronic power contacts | NO | NO | NO | YES | NO | YES | YES |
Details on KF variant
The Pentax KF mount was used in one body and lens in 1981 in what was Pentax’ first attempt at an autofocus system.
Key characteristics of the Pentax KF –mount:
[1] Three-pronged bayonet mount, four edges tapered (two straight)
[2] Locking groove at roughly 03:45 o’clock
[3] Stop-down lever
[4] Aperture indicator lever
[5] Five electronic contacts for operating autofocus between 06:30–08:00.
(1–4 are identical to the Pentax K mount whereas the electronic contacts are differently placed compared to the Pentax KA mount)
Details on K–R variant
The K-R variant is the result of Ricoh’s 1984 independent attempt to replicate what is essentially the functionality of the Pentax KA mount. It is noteworthy for being somewhat incompatible with Pentax autofocus cameras.
Key characteristics of the Pentax/Ricoh K-R mount:
[1] Three-pronged bayonet mount, four edges tapered (two straight)
[2] Locking groove at roughly 03:45 o’clock
[3] Stop-down lever
[4] Aperture indicator lever
[5] ‘Ricoh Pin’ for communicating about the lens’ aperture range.
[6] Cutout6
Details on the Pentax K mount
See the JAPB page on the Pentax K mount.
Praktica B
Key characteristics of the mount of Praktica B lenses:
[1] Locking groove at roughly 03:45 o’clock.
[2] Three-pronged bayonet mount, 5 edges tapered (one straight)
[3] Stop-down lever
[4] (spring-loaded) Electronic contacts at 7:30 to 8:30 (always just three).
Details on the Praktica B mount:
See the JAPB page on the Praktica B mount.
Sigma SA
Key characteristics of the mount of Sigma SA lenses:
[1] Three-pronged bayonet mount, 3 edges tapered, 3 straight
[2] Locking groove at roughly 03:45.
[3] Bank of electronic contacts, grouped in 5 + 2 (early lenses) or 7+2 (late lenses)
Details on the Sigma SA mount:
See the JAPB page on the Sigma SA mount.
Locking groove at 04:00 ==> Sony E, Sony FE
Warning: This is work-in progress.
Sony E and Sony FE
The Sony E mount is also known as the NEX mount and the Sony FE mount is a Full-frame variant of that mount.
To be added later, sorry.
If you want to support this page, be in touch and send pictures of lens mounts.
Locking groove at 04:30 ==> Fujifilm G, Fujifilm X, L mount or Mamiya 6
Fujifilm G
You might also see this referred to as ‘Fujifilm GFX’ (that’s the name of the line of cameras that uses this mount) or ‘Fujifilm GF’ (which is the name of the Fuji lenses for this mount).

Key characteristics of Fujifilm G mount:
[1] Three-pronged male bayonet. All edges straight
[2] Locking groove at 04:30
[3] 11 electronic contacts (spring-loaded at the camera-end) between 05:00 and 07:00.
(There are fully manual Fujifilm G lenses that do not offer electronic contacts)
Details on the Fujifilm G mount:
See the JAPB article on the Fujifilm G mount
Fujifilm X
Do not confuse the Fujifilm X mount (for contemporary, APS-C mirrorless cameras) with the Fujica X (1970s-80s, full frame SLR film camera mount).
[1] Three-pronged male bayonet. All edges straight.
[2] Locking groove at 04:30
[3] 10 electronic contacts (spring-loaded at the camera-end) between 04:30 and 07:30.
(There are fully manual Fujifilm X lenses that do not offer electronic contacts)
Details on the Fujifilm X mount:
See the JAPB article on the Fujifilm X mount
L Mount
Key characteristics of L mount:
[1] Four-pronged male bayonet.
[2] Locking groove at 04:30
[3] 10 electronic contacts (spring-loaded at the camera-end) between 11:00 and 01:00.
Mamiya 6
Key characteristics of Mamiya 6 mount:
[1] Three-pronged male bayonet
[2] Locking groove at 04:30
[3] 8 electronic contacts (spring-loaded at the camera-end) between 05:00 and 07:00.
[4] Rangefinder cam (moves forward/backward when changing focus)
[5] Leaf shutter tensioning lever
Details on the Mamiya 6 mount:
The Mamiya 6 mount is used by the Mamiya 6 medium format interchangeable lens rangefinder camera. More details to be added later.
Locking groove at 05:00 ==> Yashica Pentamatic
Yashica Pentamatic
The Yashica Pentamatic mount was a short-lived (1960–≈1963) bayonet mount used by Yashica 35 mm SLRs.
Key characteristics of the mount of Yashica Pentamatic lenses:
[1] Three-pronged male bayonet. All edges tapered. Locking notch at 05:00 position.
[2] Locking groove at 05:00 o’clock.
[3] Dual-purpose aperture stop-down and aperture indicator lever.
Details on the Yashica Pentamatic mount:
See the JAPB article on the Yashica Pentamatic mount
Locking Groove at 07:30 ==> Yashica AF
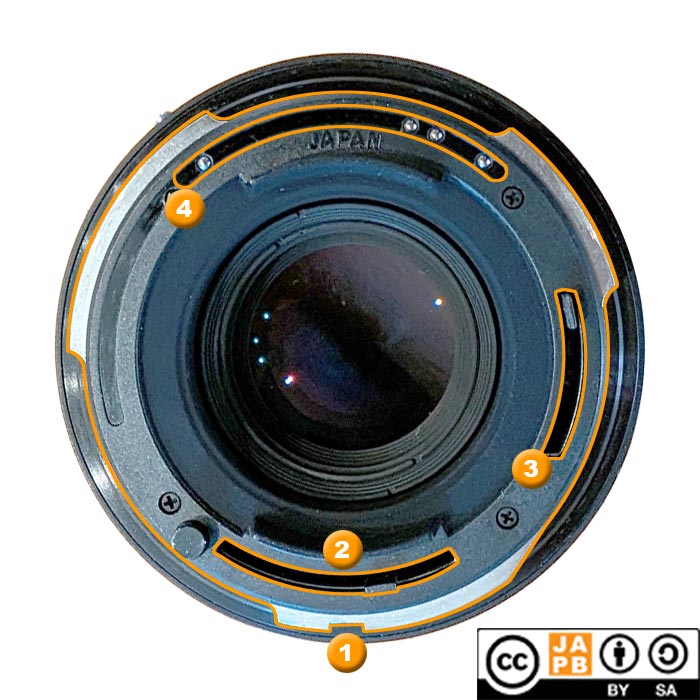
Yashica AF (aka Yashica 230 or Yashica/Kyocera)
Key characteristics of the mount of Yashica AF lenses:
[1] Three-pronged male bayonet. All edges tapered.
[2] Locking groove at roughly 07:30 o’clock.
[3] Slot-drive screw at roughly 05:30 position
[4] Stop-down lever
[5] Electronic contacts between 10:00 and 12:00 (5 on regular AF lenses; 10 on power zoom lenses).
[not visible] Yashica AF lenses lack an aperture ring.
Details on the Yashica AF mount:
See the JAPB page on the Yashica AF mount.
Locking Groove at 09:00 (altogether 10 mounts)
This is very usual arrangement, used by more than 10 mounts. That said, there are subtle differences, that allow conclusive identification. Please see below:
Locking groove at 09:00 and 4 bayonet prongs ==> Nikon Z or Contax G
Nikon Z or Contax G
• Nikon Z has 11 electronic contacts between 11:00 and 01:00, has locking groove in base of mount (on the flange, no slot drive screw.
• Contax G has electronic contacts between 04:00 and 06:00, has locking groove on rearmost end of bayonet (not on the flange), has slot-drive screw at 06:30.
Nikon Z
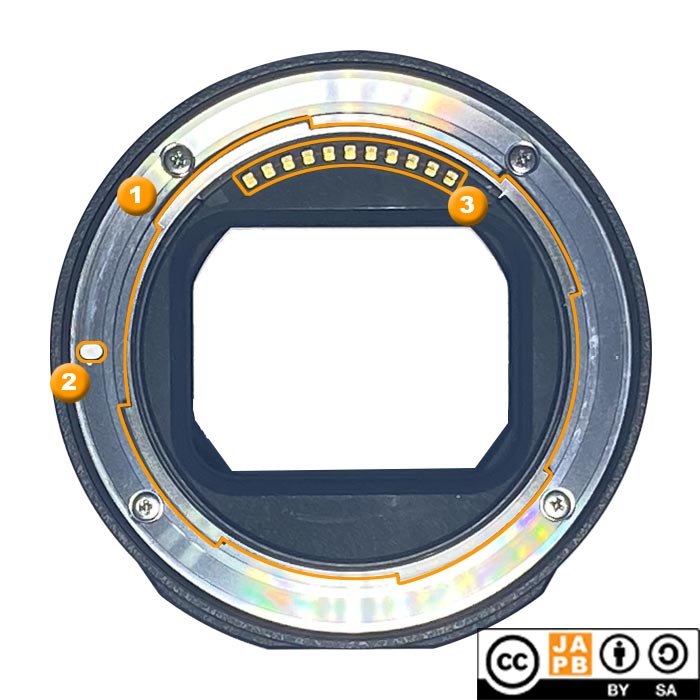
[1] Four-pronged male bayonet. All edges straight.
[2] Locking groove on mount at 09:00.
[3] Bank of 11 electronic contacts between 11:00 and 01:00 (spring-loaded at the camera-end).
See also the JAPB article on the Nikon Z mount
Contax G
Key characteristics of the Contax G -mount:
[1] Locking notch at 09:00 (but, unusually, on the rearwards facing end of the “bayonet”, not on the flange and not on a bayonet prong)
[2] Bayonet-like construction* with four prongs
[3] Bank of electronic contacts
[4] Slot-drive screw
[5] Bulge (housing gearing for slot-drive)
[6] Pins for detecting mounting on camera (or adapter)
*While technically a breech-lock mount (you insert the lens straight into the camera, then twist a ring on the lens to mount it securely), the Contax G mount evidences a great many bayonet-like features. Not only does it seem to have what looks like an obvious four pronged bayonet construction, it also has a locking notch (although whether it should be classed as a locking notch or locking groove is debatable), which also is a typical bayonet trait. In one sense, the Contax G mount has it all (except for threads).
Details on the Contax G -mount
See the JAPB page on the Contax G -mount
Locking groove at 09:00 and 3 bayonet prongs and no electronic contacts: Fujica X Rectaflex or pre-AF Nikon F (Pre-Ai, Ai and Ai-s)
Fujica X, Rectaflex or Nikon F (pre-AF)
• The Fujica X has 2 levers while the Nikon F has one lever and the Rectaflex has no levers, pins or anything else inside the bayonet.
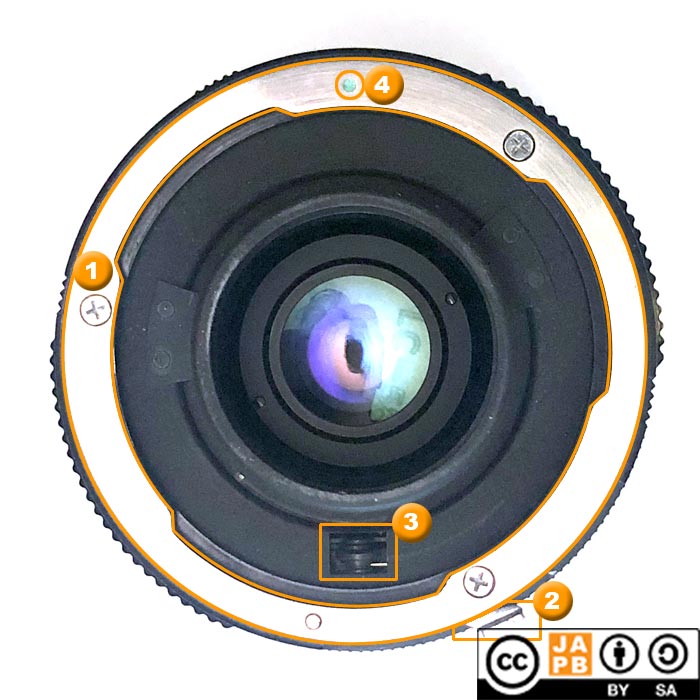
Fujica X
[1] Three-pronged bayonet mount
[2] Locking groove at 3 o’clock (on base of flange)
[3] Aperture indicator lever (moves with aperture ring)
[4] Aperture stop-down lever
[5] Metallic protrusion at 6 o’clock (function unknown, but is characteristic of Fujica X lenses)
Details on Fujica X mount:
See the JAPB article on the Fujica X mount.
Nikon F – Pre-AI
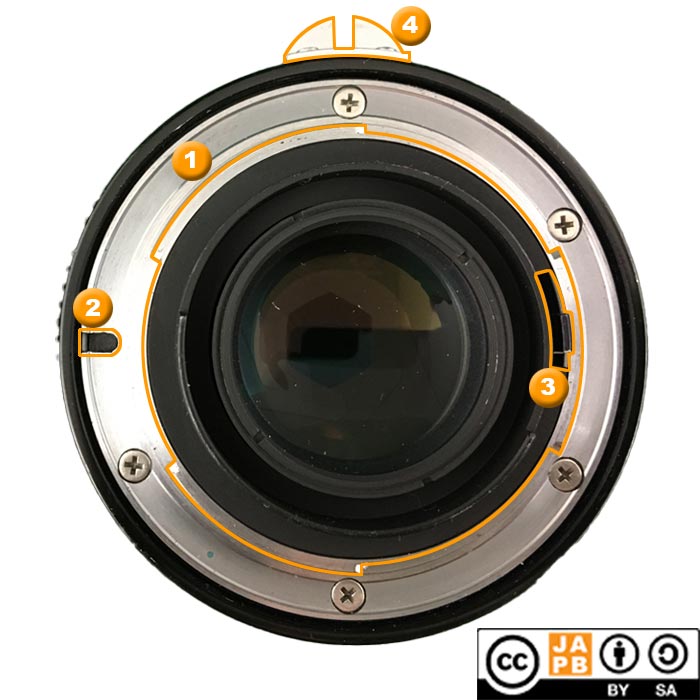
Identifying characteristics:
[1] Three-pronged bayonet with straight edges.
[2] locking groove at 09:00
[3] aperture stop-down lever
[4] “Rabbit ears” for communicating selected aperture to camera body.
Note: the fact that the rabbit ears are at 12:00 in this picture is coincidental, as the position of the rabbit ears change according to the selected aperture.
Nikon F – AI (‘automatic indexing’)
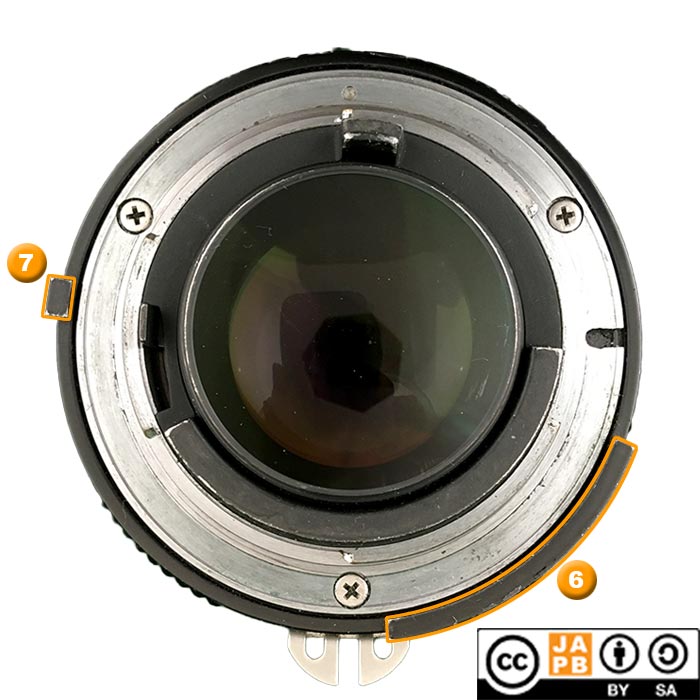
The main characteristics of Pre-Ai-lenses are still there, but the base of the aperture ring has been trimmed back to make way for two extensions:
[6] The AI tab (that interacts with almost all SLRs and dSLRs to communicate the selected aperture)
[7] Another tab intended for a functionality that was never used.
Nikon F – AI-s
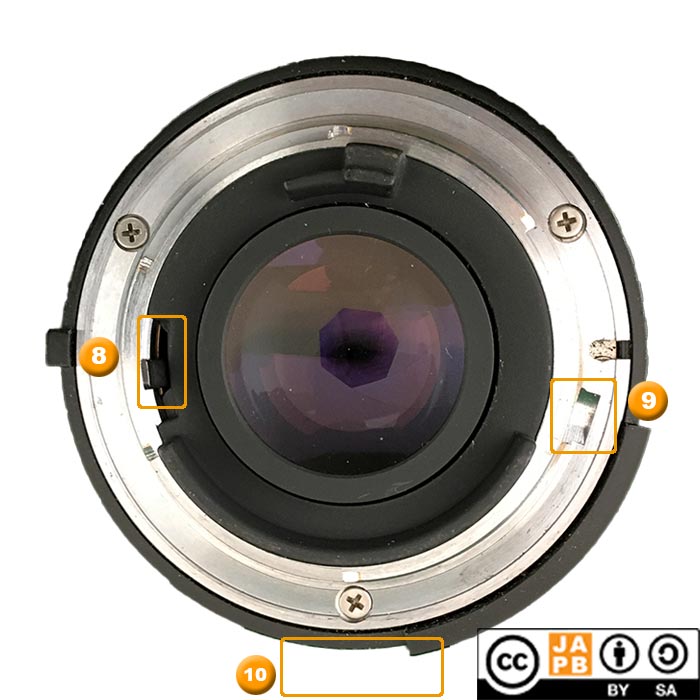
The change from Ai to Ai-s was necessary to implement functionality pertaining to increased automation. You can read a detailed explanation of all the changes here.
Again, all the previous characteristics of the Nikon F mount are there, but:
[8] The key change going from Ai to Ai-s has to do with how the aperture lever is calibrated and is not outwardly visible, but
[9] This little notch exists to tell your camera (and you) that you’re dealing with an Ai-s lens.
[10] After launch of the Ai-s lenses, some lenses started losing their rabbit ears while others retained them.
Details on the Nikon F mount:
See the JAPB article on the Nikon F mount.
Rectaflex
The Rectaflex camera & system was an early and significant, but short-lived SLR system. Thanks for the imagery Matteo.
Identifying characteristics:
[1] Three-pronged bayonet with rounded edges.
[2] locking groove at 09:00
[3] Stopping screw
[4] Some lenses have narrow cutouts in one edge of the bayonet prong, likely to increase tolerances.
Details on the Rectaflex mount:
Sorry, not quite there yet.
Locking groove at 09:00 and 3 bayonet prongs and a slot-drive screw: Minolta A/Sony A (Classic, RS and Xi), Nikon F (AF/AF-D), Olympus OM Autofocus/powerfocus
Nikon F (AF/AF-D)
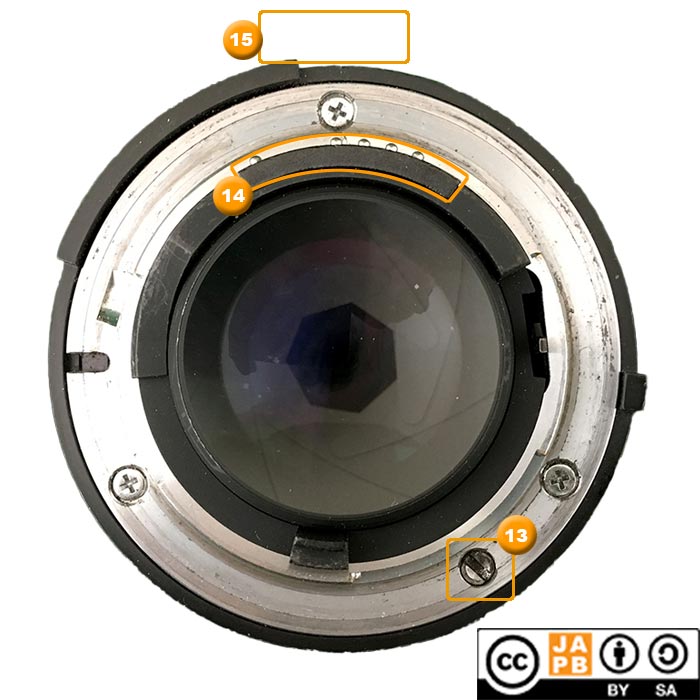
The following characteristics are new (among AF/AF-D lenses compared to Ai-s lenses):
[12] Slot head for body-driven autofocus at 05:00.
[13] (spring-loaded) Electronic contacts
[14] Rabbit ears gone (no AF lenses have them as factory installed)
Details on the Nikon F mount:
See the JAPB article on the Nikon F mount.
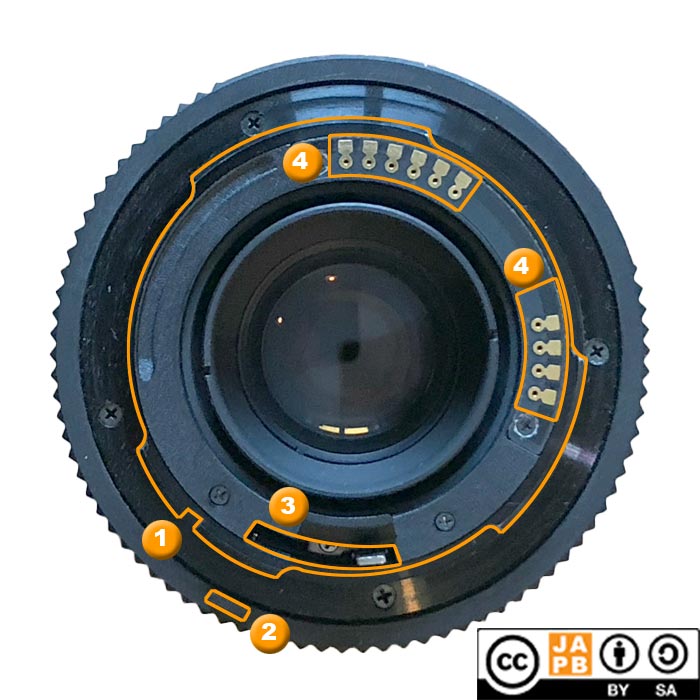
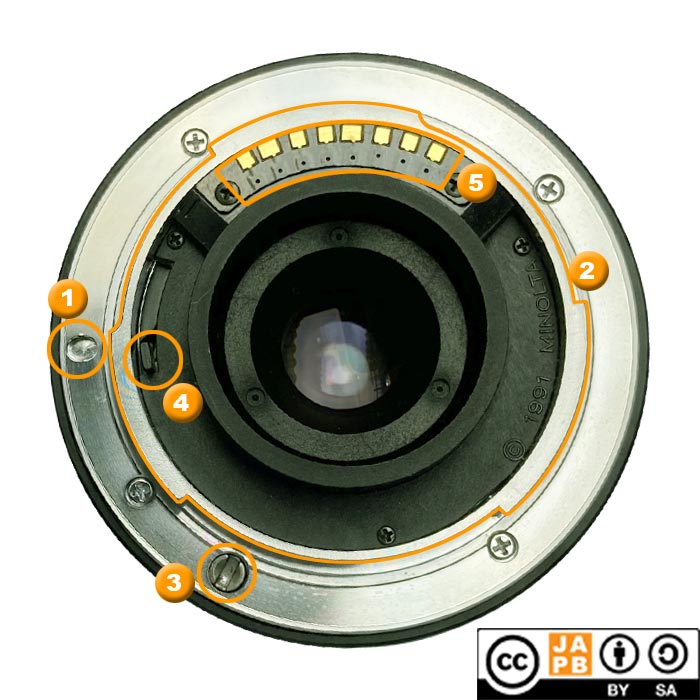
Minolta A / Sony A (Classic and RS lenses)
Key characteristics of the ‘classic’ and ‘RS’ Minolta A / Sony A mount:
[1] Locking groove at 09:00
[2] Three-pronged bayonet
[3] Slot-drive screw at 07:00
[4] Aperture stop-down lever (on some lenses)
[5] 5 electronic contacts (spring-loaded at the camera end)
Minolta A / Sony A (Xi -variant (1991))
In a short-lived experiment, Minolta in 1991 introduced a series of lenses with power zoom functionality. These are known as Xi series lenses.
Key characteristics of the Xi Minolta A / Sony A mount:
[1] Locking groove at 09:00.
[2] Three-pronged bayonet
[3] Slot-drive screw
[4] Aperture stop-down lever (on some lenses)
[5] 8 electronic contacts (spring-loaded on the camera-end)
Details on the Minolta A / Sony A mount:
See the JAPB article on the Minolta A / Sony A mount.
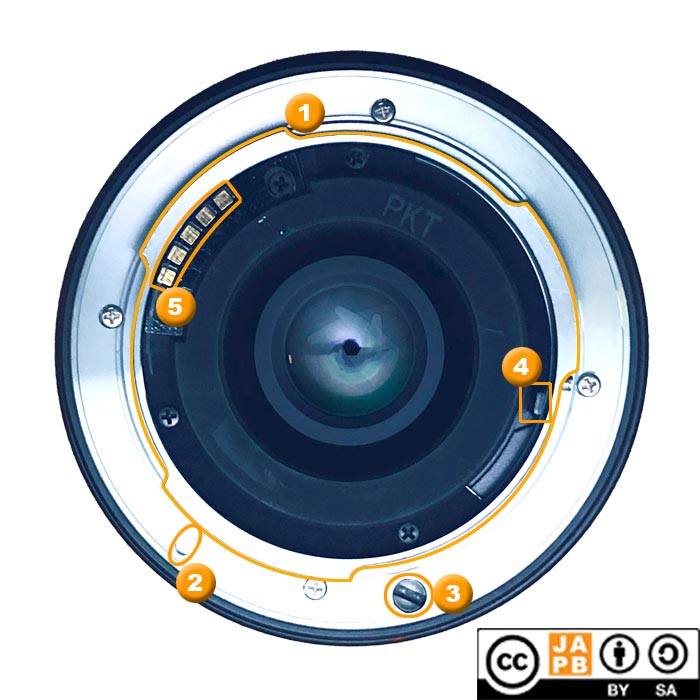
Olympus OM Autofocus and Powerfocus lenses
Olympus First line of autofocus lenses (1986-1991) use a modification of the Olympus OM mount.
[1] Three-pronged bayonet mount, with tapered prongs.
[2] Slot-drive screw at 7:00.
[3] Three spring-loaded electronic contacts between 11:00 and 12:00 (Autofocus lenses only)
[4] Aperture stop-down lever.
[5] Locking groove at 9:00 o’clock
[not visible] Lenses lack both aperture and focus rings.
Details on the Olympus OM AF/PF mount:
Some details are available as part of the JAPB page on the Olympus OM mount.
Locking groove at 09:00 and 3 bayonet prongs and electronic contacts, but no levers or slot-drive screws ==> Canon EF and Canon RF, Four Thirds, MFT, Minolta A / Sony A, Nikon F or Nikon 1
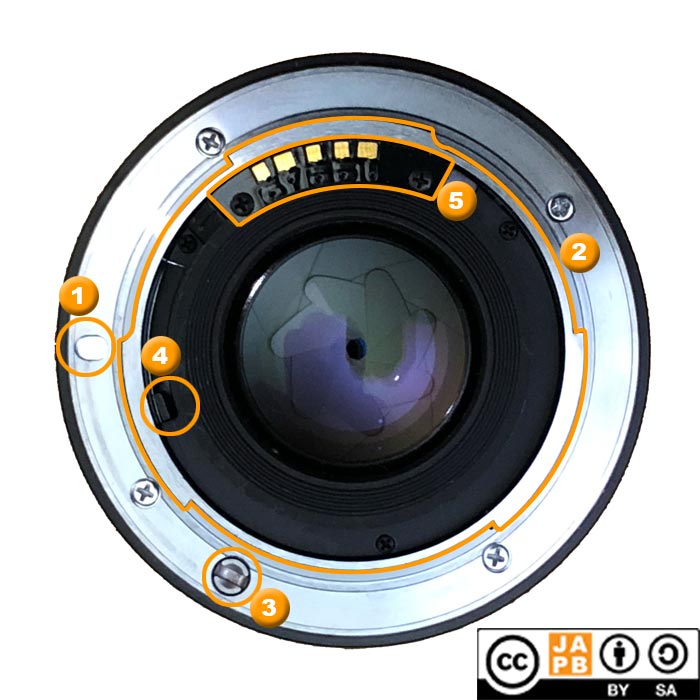
Canon EF (7 contacts)
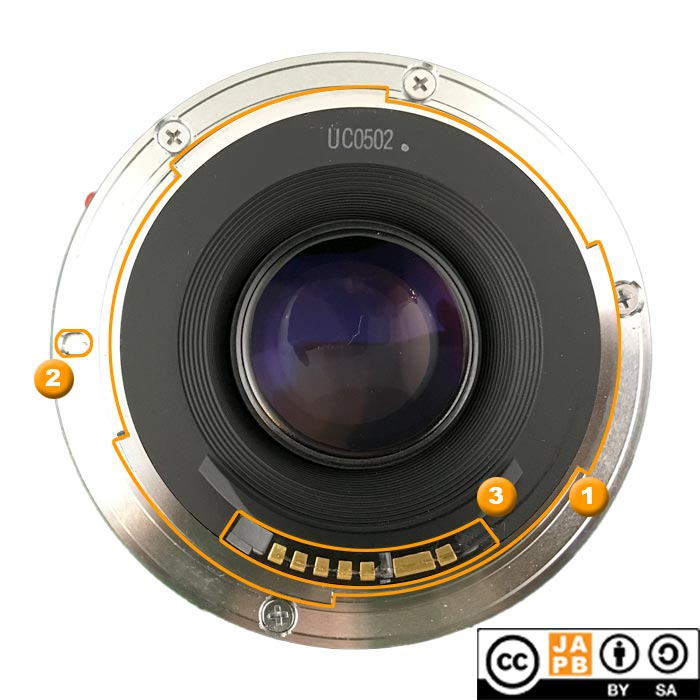
Key characteristics of the mount of Canon EF lenses:
[1] Locking groove at 09:00.
[2] Three unsymmetrical bayonet prongs, all with straight edges.
[3] Electronic contacts between 05:00 and 07:00.
The inscription at 12:00 is not a serial number, but can instead be used to identify manufacture location and date. This lens having been manufactured at Canon’s Utsunomiya (U) factory in may (05) 1988 (C). On more modern (starting 2008) lenses, the syntax of this code has changed (but its purpose remains). See more here.
Details of the Canon EF mount
See the JAPB page on the Canon EF mount (family)
Minolta A / Sony A (8 contacts)
Xi -variant (1991)
In a short-lived experiment, Minolta in 1991 introduced a series of lenses with power zoom functionality. These are known as Xi series lenses.
Key characteristics of the Xi Minolta A / Sony A mount:
[1] Locking groove at 09:00.
[2] Three-pronged bayonet
[3] Slot-drive screw
[4] Aperture stop-down lever (on some lenses)
[5] 8 electronic contacts (spring-loaded on the camera-end)
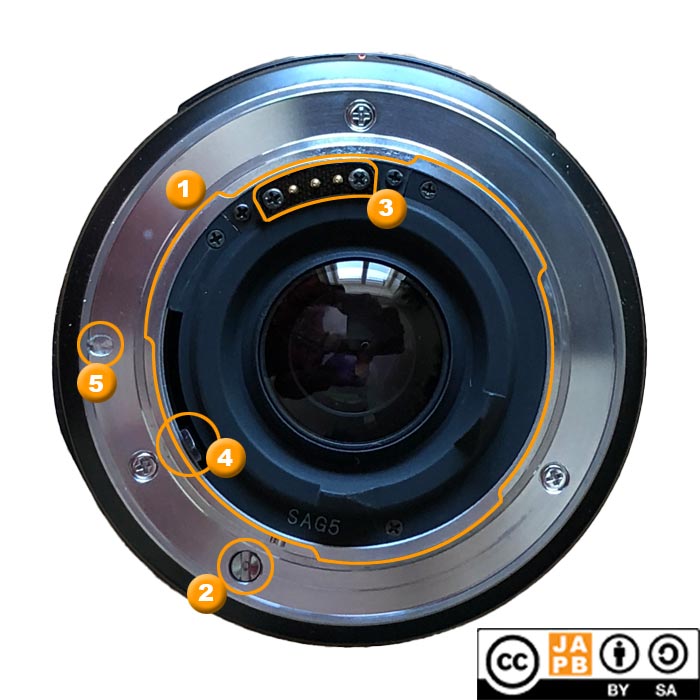
SSM/SAM (and DT) variants (2003->)
Since the introduction of in-lens focus motors, many new Minolta/Sony A lenses mounts have corresponded to:
Key characteristics of the SSM/SAM Minolta A / Sony A mount:
[1] Three-pronged bayonet (heavier/more premium lenses had a metal bayonet)
[2] Locking groove at 09:00.
[3] 8 electronic contacts (spring-loaded on the camera-end)
[4] Aperture stop-down lever (on some lenses)
Further details on the Minolta A mount
See the JAPB article on the Minolta A mount.
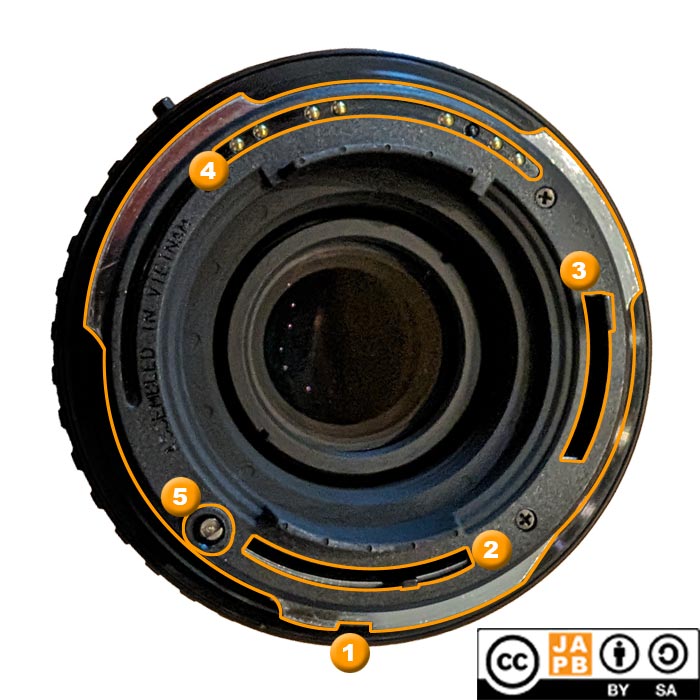
Nikon F – AF-S and AF-P variants (8 or 10 contacts)
The AF-S and AF-P subtypes of the Nikon F mount are among the latest variants of the venerable Nikon F mount.

[15] Enlarged console for electronic contacts, here with 8 contacts. Some later lenses have up to 10 electronic contacts.
Details on the Nikon F mount:
See the JAPB article on the Nikon F mount.
Four Thirds mount (9 contacts)
The Four Thirds mount was a dSLR mount introduced by Olympus in 2003, and later adopted also by Panasonic. The Four Thirds mount was discontinued in favour of the Micro Four Thirds mount in 2010.

[1] Three-pronged bayonet. All edges tapered.
[2] Locking groove at 09:00.
[3] 9 electronic contacts (spring-loaded at the camera-end) between 05:00–07:00.
Details on the Four Thirds mount:
See the JAPB article on the Four thirds mount.
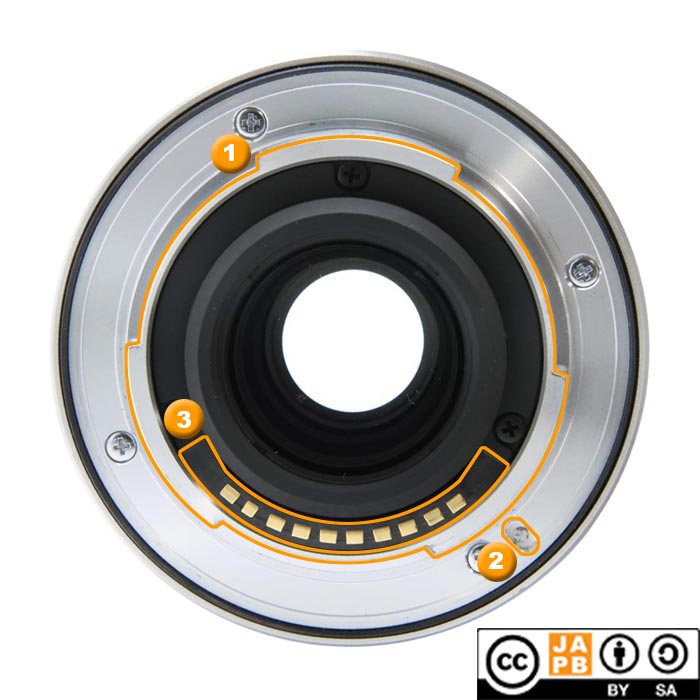
Micro Four Thirds mount (11 contacts)
The Micro four thirds (also MFT) is a multi-company lens mount for mirrorless cameras and the successor of the Four Thirds dSLR mount.
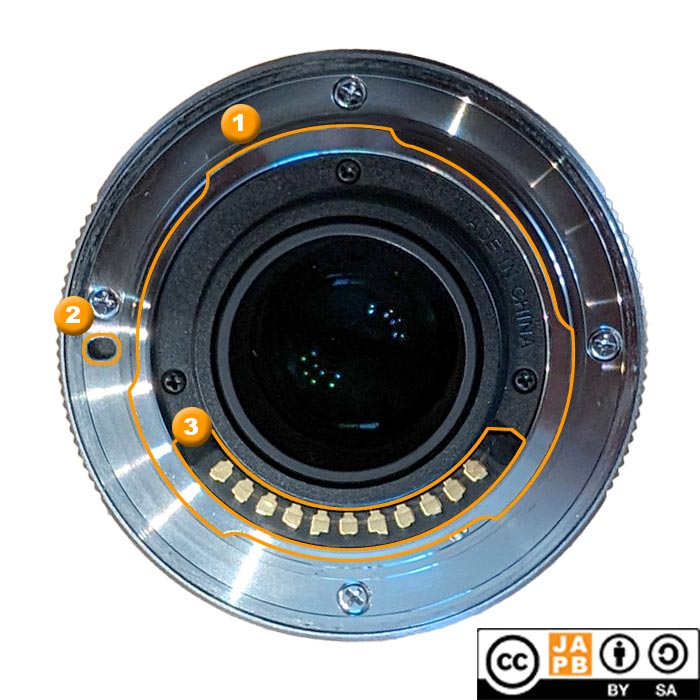
Key characteristics of the micro four thirds/MFT mount:
[1] Three-pronged bayonet. All edges tapered.
[2] Locking groove at 09:00.
[3] 11 electronic contacts (spring-loaded at the camera-end) between 04:30–07:30.
Details on the Micro Four Thirds mount:
See the JAPB article on the Micro Four Thirds mount.
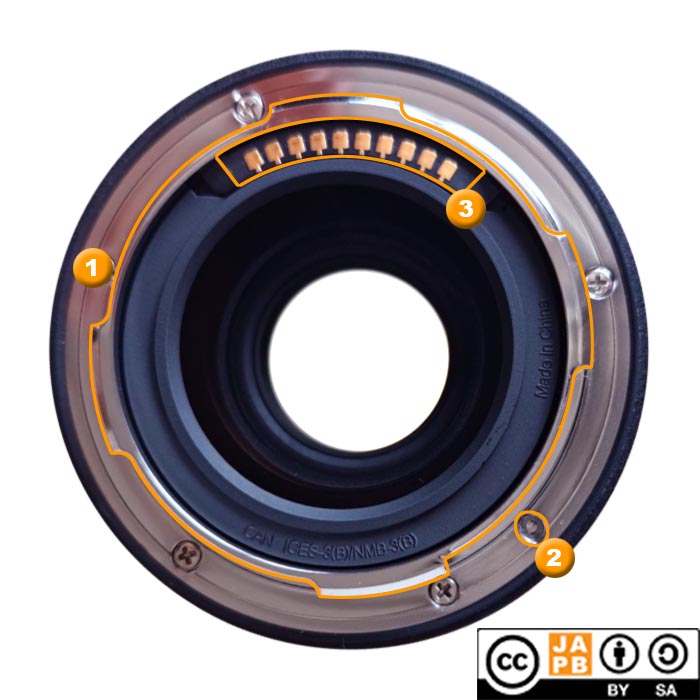
Canon RF mount (12 contacts)
Canon RF refers to the new mount Canon has adopted for its new line of mirrorless camera bodies. Due both to the existence of a previous mirrorless lens mount (EF-M) and the fact that RF more commonly refers to “rangefinder”, there is some risk of confusion.
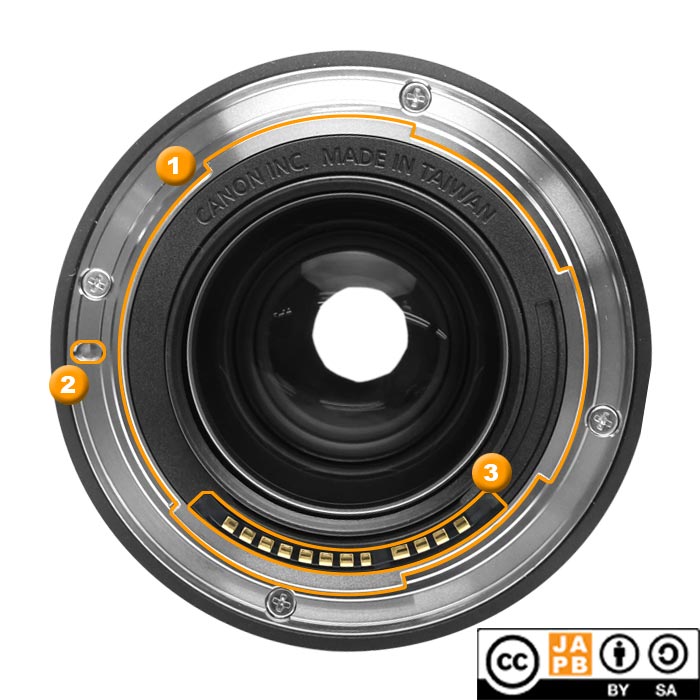
[1] Three-pronged male bayonet mount. All edges straight.
[2] Locking groove at 09:00
[3] Bank of 12 electronic contacts between 05:00 and 07:00 (Note: The Canon Rf mount’s electronic contacts are tiered with the 8 on the left sticking further back than the 4 on the right).
Note that the electronic contacts are strictly speaking optional and that they often are missing in manual-only lenses.
In the meantime, please see the JAPB article on the Canon RF mount.
Nikon 1 mount (12 contacts)
The Nikon 1 mount was used by Nikon’s first generation of mirrorless cameras.
[1] Three-pronged male bayonet mount
[2] Locking groove at 09:00
[3] Bank of 12 electronic contacts between 04:30 and 07:30
Details on the Nikon 1 mount:
See the JAPB article on the Nikon 1 mount.
What if your lens has neither a locking pin, notch or groove (or you could not find it)?
Don’t despair. Firstly, there are some lens mounts that really show none of the traditional locking systems, such as the Pentax 110 mount and the Konica F mount or the onetwo-of-a-kind Contax/Kiev mount (and its Japanese twin the Nikon S mount).
Also, there are some where the locking system is very well hidden, such as the Olympus OM and Olympus PEN F.
Konica F mount
[1] Three-pronged unsymmetrical bayonet
[2] Bayonet locking claw at 06:00 (interacts with retractable locking pin on camera body)
[3] Aperture actuator (interacts with similar on camera body)
[4] Early (For Konica F camera) lenses would have an extra lever reaching beyond the lens proper (precise location of that lever depends on set aperture)
Details on Konica F-mount
See the JAPB article on the Konica F mount.
Pentax-110 mount
[1] Two-pronged bayonet mount.
No communication pins or levers;
No grooves notches or lock pins;
No aperture control, only a focus ring.
One more thing: The picture belies a central characteristic of the Pentax-110 mount: its size. As the Pentax-110 mount was used by the eponymous camera, which in turn used 110-size film cassettes, the optics were amazingly small. The measurements of the 24mm f/2.8 (the system’s normal lens) were: 14 mm long; 29 mm diameter; 11 grams (!). See below for a picture of this lens mount with a calliper for scale:
Details on the Pentax 110 mount:
To be added later, sorry.
Olympus OM mount
[1] Three-pronged bayonet mount, with tapered prongs.
[2] Locking pin (hidden beneath prong, here) at 10:30 o’clock.
[3] Lens release button. Operates locking pin [2].
[4] Aperture stop-down button (for depth-of-field preview). Pressing of button moves lever [5].
[5] Aperture stop-down lever.
[6] Aperture indicator lever (moves with aperture ring)
NOTE! A striking characteristic of the OM-system are the two opposing buttons [3] and [4]. Sadly, this characteristic (while obvious) is not 100% foolproof, as both some Olympus lenses as well as third party lenses have arrangements which outwardly differ somewhat. The only foolproof identifier is the locking pin hidden under the bayonet prong at 10:30.
Details on the Olympus OM mount:
See the JAPB page on the Olympus OM mount.
Olympus PEN F mount
[1] Three-pronged bayonet with tapered prongs
[2] Aperture stop-down lever
[3] Lens release button
[4] Locking pin is hidden under bayonet prong here (at 01:30)
[5] Aperture stop-down button (for depth-of-field preview).
Details on Olympus PEN F-mount
See the JAPB article on the Olympus Pen F mount.
Contax / Kiev mount
The Contax / Kiev -mount is relatively hard to identify using the logic otherwise used on this page, because
a) the Contax / Kiev – mount is actually two mounts.
b) the inner mount rotates (hence, lenses have no ‘up’) and the inner bayonet’s prongs are not very visible.
Explaining the Contax / Kiev mount is easiest if we start by looking at the camera-end of the mount:
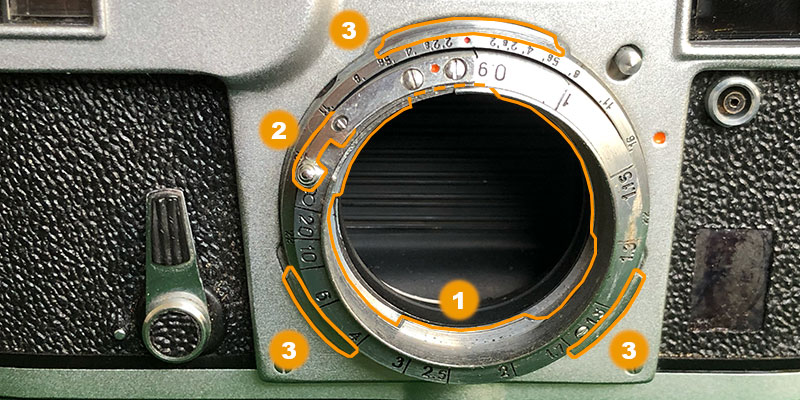
[1] Inner bayonet (three prongs), partly obscured.
[2] Inner bayonet hold-down clamp
[3] Outer bayonet (three-pronged)
The inner bayonet on a Contax / Kiev camera is intended to rotate in its entirety (including the lens), whereas the outer bayonet is stationary. The rotation of the inner mount is coupled to the Contax / Kiev camera’s rangefinder (see distance scale on outer end of inner mount).
Only lenses that have ≈ 50 mm in focal length can be used on the inner mount so that the range finding works. Wider and narrower lenses can be used on the outer mount, and outer mount lenses have a tube that extends into the inner mount to and engages with (but does not latch onto) the inner bayonet prongs, thereby activating the rangefinder. (Once you know this, you’ll also understand better why the inner and outer bayonets on lenses look like they do.)
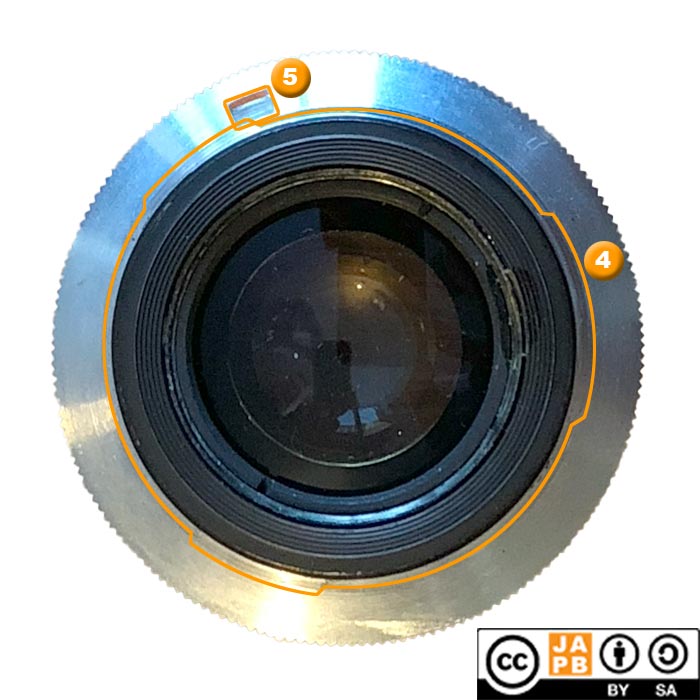
Please note, as the Contax / Kiev inner bayonet rotates, lenses have no real up of down.
[4] Three-pronged bayonet (engages with three-pronged inner bayonet (1))
[5] Inner bayonet lock pin (locks with inner bayonet hold-down clamp (2))
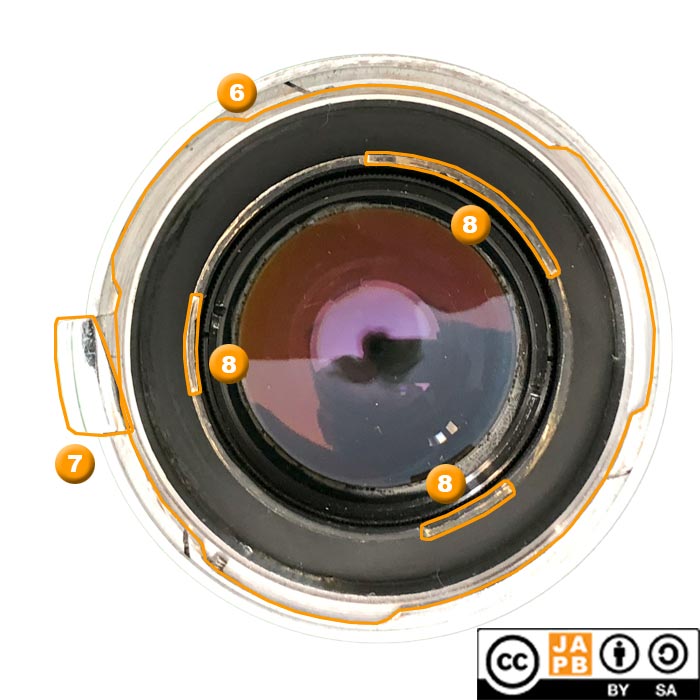
(Lens’ upside again at 12:00)
[6] Three-pronged bayonet (clamps onto outer bayonet)
[7] Outer bayonet release clamp
[8] Inner tube (engages with rangefinder mechanism).
Whereas the outer bayonet mount is entirely stationary, the inner tube [8] rotates when the lens is focused, thereby facilitating rangefinder coupling.
Details on the Contax / Kiev mount:
See the JAPB page on the Contax / Kiev mount.
Nikon S mount
The Nikon S mount is outwardly indistinguishable from the Contax/Kiev mount.
See also the JAPB article on the Nikon S mount.
Thanks to…
Thanks to the following individuals who have collaborated in this guide:
• Ahmed V for donating a picture of the Minolta A (Xi) mount.
• Andreas D for his knowledge and pictures on the Leica R mount.
• Anton G for donating images for Mamiya 6, Pentax-A 645, Pentax-FA 645, Agfa Ambi Silette, Minolta A (SAM) and helping decipher the functionality of the mount.
• George A A for sending me a photograph of his external Exakta mount Telemegor and of his Fujifilm G and Fujifilm X lenses.
• Gerjan v. Oosten for elucidating some of the specifics of the Pentax/Takumar extension of the M42 mount.
• Heidi M for details and pictures of obscure Pentax K mount lenses.
• José M for pictures of the L-mount and Nikon 1 mount.
• Kari J for lending me his Contax G lenses and adapters.
• Lucy J for sending me a picture of her Olympus Four Thirds zoom.
• Matteo for imagery and information on the Rectaflex mount.
• Robbie D for trying to convince me to add a Canon RF camera to my lineup.
Version history
Sept.2020: Added EXA mount
Oct.2020: Added Icarex BM mount
Feb.2022: Added Topcon UV mount
Mar.2022: Restructured entire article, added DKL mount, Fujica X, Konica F, Pentax-110 and Contax / Kiev mounts
Apr.2022: Added Pentacon Six, Praktina and Petri FT mount
May 2022: Added Olympus OM Autofocus/Powerfocus, Mamiya Z, Topcon RE and Miranda mount
Sept.2022: Added Minolta A mount
Dec.2022: Added Yashica AF mount
Jan.2023: Added Rollei QBM mount
Feb.2023: Added Tamron Adaptall mount
Aug.2023: Added Canon R and Zeiss Pro-Tessar mount
Jan.2024: Added Yashica Pentamatic mount
Mar.2024: Added Tamron Adapt-a-matic and Tokina T-4 mounts
Jun.2024: Improved illustrations.
Jun.2024: Added Mamiya CS and Mamiya ES mounts
Aug.2024: Added Agfa Ambi Silette, Mamiya 6, Micro Four Thirds, Pentax 645 mounts
Nov.2024: Added Kiev Automat mount
Feb.2025: Added SLK mount
Mar.2025: Added Enna Sockel mount
May.2025: Added Altix, Canon RF, Diax, Four Thirds, Fujifilm G, Fujifilm X, L mount, Leica R and Nikon 1 mounts. Restructured the entire article
Jun.2025: Improved section on Pentax K mount.
Aug.2025: Added Rectaflex mount.
Footnotes
- Currently Wikipedia lists 108 lens mounts, and I know of several that are not listed. ↩︎
- If you cannot measure the thread pitch, try very gingerly screwing the lens into a M42 adapter (or camera) – if it fits, it’s M42. If it jams part-way (don’t use force!), it’s probably a T-mount. If you feel apprehensive toward such a direct experiment, you can also use a lens (back) cap from an M42 lens, but remember that the plastic may have worn, thus giving a false positive. ↩︎
- Note please: JAPB used to orient all images with the lens’ natural ‘up’ at 6 o’clock because we deemed that to be more reliable in terms of making sure that the lenses are oriented precisely, but this lead to some confusion (as most of image places a lens’ natural up … well … up. ↩︎
- One notable characteristic about electronic contacts: When lenses have electronic contacts, these need to be in solid contact with their counterparts on the camera body. Typically, this is assured through that the electronic contacts on either the camera body or on the lens are spring-loaded (pushed outward by a spring, which allows the contact to withdraw when coming into contact with their counterparts).
In some mounts, that spring-loading takes place in the body and in others at the lens-end, making this another useful characteristic. Subsequently, I will refer to electronic contacts as ‘spring-loaded’ if their spring-loading is on the lens (not on the body). ↩︎ - Some Terminology:
• A pin is a control apparatus that moves in/out (e.g. Aperture pin in M42 auto lens).
• A lever moves (or is designed to move) sideways.
– Some communication levers are used to communicate (to the body) the lens’ selected aperture (they move when you twist the aperture control ring).
– Some communication levers are used to communicate (to the lens) that the lens should stop down to the aperture selected on the aperture control ring.
– Some communication levers are dual-function.
• A cam is an area that moves in/out to communicate from lens to camera. Most often these are used for communicating focusing distance (for rangefinders) but are sometimes also used to communicate selected aperture. ↩︎ - It seems this cutout was an added feature on the Ricoh Rikenon P lenses, but I have found no indication of that it would ever be used. ↩︎
I have a Coleman-Dynamic Optics 50mm f2.8 lens, which
was part of a lot I purchased. I can find nothing at all on
that company, but the mount appears to be an exa mount.
Pretty small lens, similar in size to Jupiter lens. I’m wondering
if you have ever heard of that company and might know
anything about them
Hi B.Lee.
I was pretty sure I had encountered the name Coleman-Dynamic Optics once before, and indeed, I found a mention of a lens with exactly the specifications you mention: https://photobutmore.de/exakta/zeiss/exatessar/ (bottom of page).
I also found some discussion on the origins of that lens (especially whether the lens was Japanese or not), but very little conclusive.
Further, I do not know whether the company that manufactured/branded your lens is in anyway related to the contemporary Coleman Optics (https://www.colemanoptics.com/) which sells binoculars and telescopes (and other stuff). If you feel like it, you could try contacting Coleman Optics and asking, but don’t hold too high hopes.
Hi!
I can send you photos of:
– Agfa Ambi Silette mount (not listed yet)
– Praktina breech lock in all different versions (no aperature coupling, semi-auto and auto-aperature, the later two have the pins on different locations)
– Pentax 645 in both manual (A) and autofocus (FA) versions
– micro four thirds
– Mamiya 6
(for Minolta SR you have probably enough, but I have all version SR/MC/MD as well, same for Minolta A mount, both screw-AF and lens internal focus)
Cheers!
Let me know if you are interested, and where to send it to…
Hanimex call their version of the 47mm adapter mount “H-Mount” I have a number of lenses with this adapter provision, some on CS (M42) and some in Nikon (Hanimex 300mm mirror lenses). None of the mirror lenses will focus to infinity using the Nikon F adapter. They have all been to pieces to remove dirt, fungus and haze so at some stage, I guess they have been reassembled incorrectly (wrong start on the helicoid? ) Tokina made a range of lenses with H-Mount including Vemar, Cunor and Lentar , all of which are presets.