Pekka Buttler, Dec 2022
This article is part of the JAPB series on Exposure, use the following links to navigate:
• Introduction to Exposure
• The components of exposure (and their side-effects) [you are here]
• Working with Exposure (in practice)
• Various approaches to exposure automation
exposure | ɪkˈspəʊʒə, ɛkˈspəʊʒə |
Every exposure of every picture ever taken is the product of three metrics:
• aperture,
• shutter speed and
• ISO (a.k.a. sensitivity).
Although we don’t want you to run for the hills, screaming at this early stage, the brutal fact is that you cannot hope to master exposure without a grasp of these three metrics.
So, we’ll start by using metaphor: Filling a glass of water.
When you want to fill a glass of water under the tap, you have three metrics of importance: the size (capacity) of the glass, the flow volume of water coming out of the tap, and the duration of time the glass is under the tap.
If water pressure is low (only a trickle comes out of the tap), you either need to leave the tap running for a long time or need to take a smaller glass; If you’re standing under the Niagara Falls, you need to be really quick (and might still need to take a bigger glass).
So basically, if you want to fill the glass to the brim (but not over), all you need is optimise the relationships between flow volume (aperture), the time the glass is exposed to that flow (shutter speed) and the size of the glass (ISO).
All right, I admit I’ve over-simplified it a bit: in photography ‘flow volume’ is the product of the both the size of the aperture and the actual amount of light in the lens’ field-of-view, but the principle holds.
But the real complication in photography is twofold. Firstly, the units of measurement might seem counter-intuitive, even non-sensical: Why is the aperture becoming smaller when the numbers get bigger? Isn’t it confusing that shutter speeds get shorter as the numbers get bigger? And why are the scales so different? WHY DO THESE NUMBERS MAKE NO SENSE !? 🤯
Secondly, when you change any of the factors (aperture, shutter speed, ISO) in the exposure equation, you will incur side-effects which will significantly affect aspects (other than exposure) of your final picture: higher ISO leads to added noise; a larger aperture leads to a narrower depth of field; a longer shutter speed leads to increased motion blur. Therefore, not only are you trying to work out a combination of these three which produce the kind of exposure you want, you are trying to balance them out so that the combination serves your picture.
But let’s start by looking at the numbers and why they seem to make little sense.
Those gobbledygook units
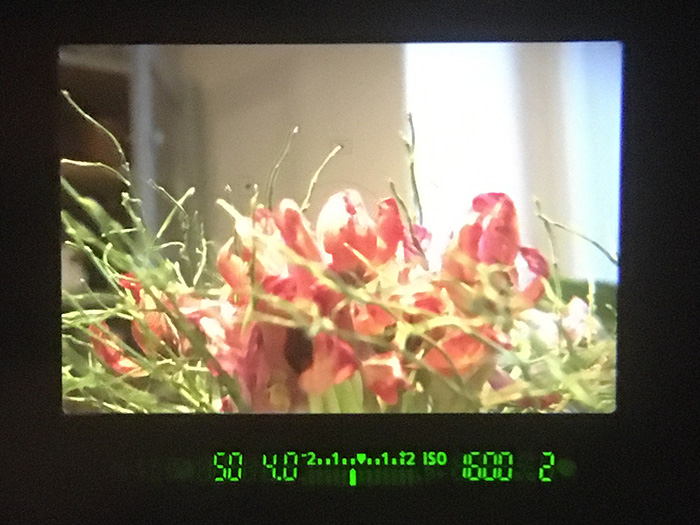
(L-to-R: Shutter speed [50], aperture [4.0], exposure compensation indicator, ISO [1600], buffer capacity[2])
You might already be at the point where you so instinctively understand the significance of all those numbers in the LCD below the picture in the optical viewfinder that you no longer think about how nonsensical the numbers are, or you might be one of those who look at those numbers with a terrifying unease and an indistinct feeling of wrongness.
Because – let’s face it – we’ve turned these numbers (literally) on their heads, and we’ve done this such a long time ago, that no-one really remembers.
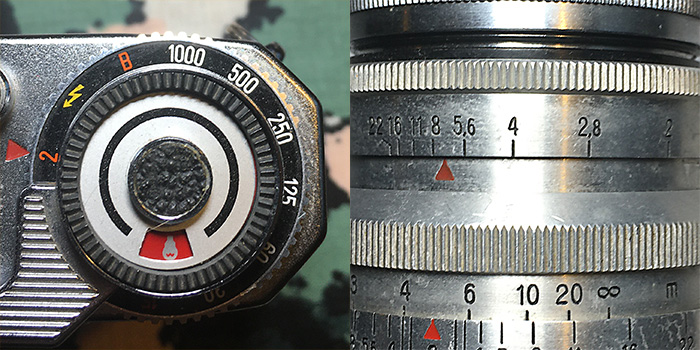
Right: Aperture selection ring of Carl Zeiss Jena Biotar 58 mm f/2 (ca. 1949)
Shutter speeds
These numbers (seen, printed) on your shutter speed dial are not the whole number, but are instead denominators! 250 is not twice 125, because 250 is actually 1/250. Therefore 1/250 is not double but half of 1/125.
| Your camera says | … | 1000 | 500 | 250 | 125 | 60 | 30 | 15 | 8 | 4 | 2 | 1″ | 2″ | 4″ | … |
| Your shutter speed is (sec’s) | … | 1/1000 | 1/500 | 1/250 | 1/125 | 1/60 | 1/30 | 1/15 | 1/8 | 1/4 | 1/2 | 1 | 2 | 4 | … |
Granted, there are good reasons for abbreviating these numbers: it would take up a lot of space if every number would have to be prefixed with “1/”, and it would necessitate some extra digits in your camera’s LCD. Even so, this still leads to that the numbers regularly used on cameras are inverted (1/x ==> x), for the largest part of the shutter speed range.
But for human cognitive faculties, this throws up a couple of complications: When we see a number with a lot of digits, we instinctively assume they are big numbers and represent big things and long times, while they really imply shorter times. Also humans (at least those not trained in sciences) tend to think in linear scales (as in 1, 2, 3, 4 … 7, 8, 9 …) and not in exponential scales (as in 1, 2, 4, 8 … 64, 128, 256 …), which contrives to make shutter speed numbers confusing. Even so, shutter speeds are still easier to grasp than apertures…
Aperture
The same goes for aperture (in that we’re actually talking about denominators), but here there’s a further twist: The actual numbers (1,4 … 2 … 2,8 … 4 … 5,6 …) seem to make even less sense.
Again, they actually make sense, but one must understand the logic. Let’s start by really looking at the aperture:
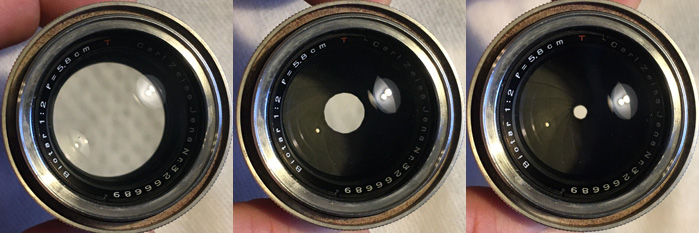
(Left to right: at f/2; at f/5,6; at f/16)
Remember, the purpose of a controllable aperture (don’t be fooled: aperture is just a fancy word for ‘opening’) is to be able to control the amount of light passing through the lens. Technically this is typically done by means of an adjustable diaphragm using thin metal sheets (called ‘blades’), but this is beside the point.
The aperture is noted as f/x (e.g. f/2), and in this ‘f’ stands for the focal length and x for the diameter of the apparent opening. In the case of this lens (which has a focal length of 58 mm), when it is full open, the apparent diameter of the opening is 29 mm. Thus its maximum aperture is 29mm or f/2.
But that is the opening’s diameter, not its area (which is where the light actually passes through). With the formula of a circle’s area being A = πr2 (Area = Pi times the radius squared) and the radius being half the diameter it is obvious that the area of the aperture is proportional to the square of its diameter. Hence, when you square all the full-stop aperture values, you get result like below:
| f/x | 1 | 1,4 | 2 | 2,8 | 4 | 5,6 | 8 | 11 | 16 | 22 | 32 |
| f/x2 | 1 | 1,96 | 4 | 7,84 | 16 | 31,36 | 64 | 121 | 256 | 484 | 1024 |
Although every second value (1,96; 7,84 …) might confuse you, what you actually have here is again the classic exponential progression (1, 2, 4, 8, …) where every number is double the preceding. In fact – again – what we have here is a case of abbreviation which might confuse you (f/1,4 is actually f/1,414213…. Given the relationship between aperture diameter and aperture area, the aperture scale actually makes more sense if you look at it as:

The important part is that every step from one full aperture value (say f/8) to the next (f/11) halves the area of the aperture (through which light passes), while a step back (f/5,6) doubles the area. Thus these steps also (depending on the direction) also halve or double the amount of light passed through.
So what we have are two scales, where every step to the right doubles the amount of light passing to the film/sensor and every step to the left halves the amount of light passing to the sensor:
| Shutter speed | <-Less light | 1/1000 | 1/500 | 1/250 | 1/125 | 1/60 | 1/30 | 1/15 | 1/8 | 1/4 | 1/2 | 1 | 2 | More light -> |
| aperture | <-Less light | … | 32 | 22 | 16 | 11 | 8 | 5,6 | 4 | 2,8 | 2 | 1,4 | 1 | More light -> |
ISO (sensitivity)
Finally, there is also the third scale: ISO.
Mind you, in the age of film, changing ISO was not trivial, as you typically had to eject the current film and insert a new one in order to be able to change ISO (technically, it was often referred to as ASA or DIN or even GOST). But today, in the age of digital photography, changing ISO is (or could be) just as easy as changing aperture or shutter speed.
I find it noteworthy, that while early dSLR’s still worked akin to film (yes, you could change ISO on the fly, but the setting was buried deep within the camera’s menus) subsequent design iterations have made changing ISO increasingly easy: first by offering a dedicated button for changing ISO, to implementing auto-ISO (which automatically adjusts ISO to achieve a suitable combination of shutter speed and aperture). Today’s dSLR’s and mirrorless cameras mostly treat ISO as just another characteristic to be manipulated – just as simply as aperture or shutter speed.
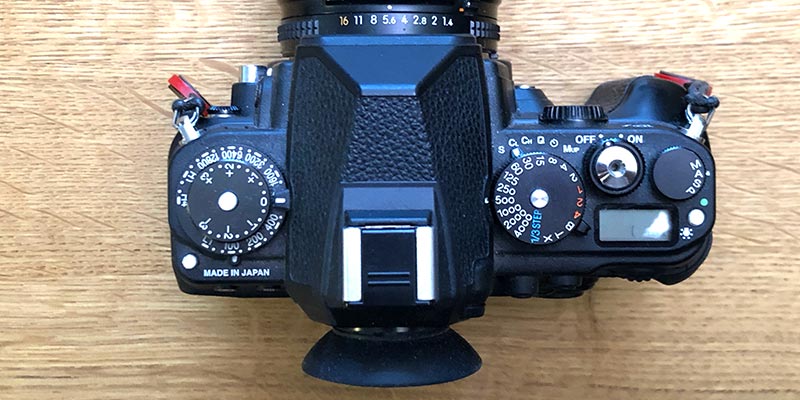
• ISO selection dial
• Exposure compensation dial
• Aperture ring (on lens)
• Shutter speed dial
• Metering mode (M/A/S/P) dial
This has had a profound effect especially on Shutter priority and Aperture priority auto-exposure as we have moved from an exposure triangle (aperture-shutter speed-ISO) …
– where one aspect was defined to suit the photographer’s need (e.g. aperture), one aspect was hard to change (ISO) and one aspect that tried its damnedest to compensate (shutter speed) …
– to an approach where the photographer predetermines one metric (e.g. aperture) and the two other values are automatically juggled to make ends meet.
While shutter speed (the amount of time a film/sensor is exposed) and aperture (apparent area of light-conducting opening) are real metrics, ISO (short for International Organization for Standardization) is just a convention. ISO 100 is simply defined as the sensitivity needed to turn a specific amount of light, photographed by a specific lens-camera combination into a balanced exposure, and all other ISO values are multiples of ISO 100. Again – while you may find films (or settings in your camera’s ISO’s) offering intermediate values – the scale for ISO is exponential:
| … | ISO 25 | ISO 50 | ISO 100 | ISO 200 | ISO 400 | ISO 800 | ISO 1600 | ISO 3200 | ISO 6400 | … |
Side note: If you wonder why I mention ISO 25, (you may never have seen your camera offer such a low number), the reason is to emphasise that we’re dealing with a scale defined by convention. Besides, not too long ago (early 1970s) even ISO 400 was considered an extremely sensitivity. Back then ISO 50 and ISO 64 films were very much the pro’s choice, while even less sensitive films were still in widespread use. But the point of this article is not to offer a history lesson.Instead, the point is to emphasise that there is no such thing as a ‘normal’ ISO.
Yes, ISO 25 is today about as rare as a f/1.0 lens, but neither are so rare that omitting to mention them is justifiable. Moreover, while many cameras offer ISO 100 as their lowest ISO, that does not mean that they would necessarily be any more “natural” than any other ISO-value, or that higher ISO’s would somehow be artificial or ‘boosted’. In all probability most digital sensors need to compute for every ISO, as having to manufacture pixels that by nature would be equivalent to any specific ISO (e.g. ISO 100) would hugely complicate the sensor design process.
In any case, with high ISO performance (acceptable noise levels) constantly improving, adjusting ISO to facilitate the desired exposure is becoming increasingly practicable. That said, while some of the least noise affected models currently (early 2021) offer ISO 100 to ISO 6400 as a usable range (thereby offering the photographer increased leeway) this seemingly immense range nevertheless equates only to 7 stops. It’s that exponential scale again.
Stop? Stop what?
You cannot spend any length of time with photographers, without hearing about stops. T-stops, f-stops, half-stops … stops here and stops there. Don’t let all that mumbo-jumbo fool you, a ‘stop’ is just a step – specifically a step on any of the elements of exposure (aperture, shutter speed, ISO) by which you either double or halve the amount of light constituting the final image. f/2 to f/2.8 is one stop, ISO 1600 to ISO 200 is three stops. 1/1000 s is 6 stops quicker than 1/15 s. Also the term ‘stop down’ refers to not using a lens at its maximum aperture.
Obviously, a step that doubles (or halves) the amount of light passed to the film/sensor is quite a big step. Most camera and lens manufacturers started relatively early to divide these stops into half-stops. Lately, almost every interchangeable lens camera is able to work with one-third stops, and while this fine-grained approach obviously gives photographers more precise control of their apparatus, it does increase the proliferation of gobbledygookish numerology.
The “side-effects” of changing the equation
Given that basically all modern cameras have some approach (often too many) to automate exposure, one could ask “Why do I need to understand exposure, given that my camera can juggle all the settings to make the picture come out right?”
And to be honest, most photographers will make do with a combination of full auto and a smatter of themed programs. But if the photographer thinks they might have a better idea of what the picture should look like (than Canon/Nikon/Pentax/Sony/Fuji/Olympus/etc. automatic exposure system), then fathoming exposure is crucial.
This is especially relevant not only because the photographer might disagree on what is the desirable level of overall brightness in a shot, but because each of the three elements of the exposure triangle also have effects beyond the brightness of the exposure.
Aperture – a crucial factor
As already mentioned, aperture (the size of the lens’ opening) is one of two factors determining how much light reaches the sensor (the other being shutter speed). That in itself is by no means trivial, but the size of a lens’ aperture has two other highly significant effects on the resulting picture: Depth-of-field and sharpness.
Depth-of-field and its relation to aperture
Depth-of field (or DOF) refers to the range of distances (from the film plane) which are relatively in focus. A narrow depth-of-field leads to that only objects at the focus distance are sharp, whereas a wide depth-of-field means that a significant slice in front and behind the focus distance are also relatively in focus.
Technically, depth-of-field is defined by only three factors: the focusing distance, the focal length used, and the aperture used (some also include the resolution of the sensor/film in this equation, but the impact of resolution is purely technical). Thus, assuming you’re not about to change the lens, or the object you’re focusing on, depth-of-field is defined solely by the lens’ selected aperture. Herein, the wider the aperture, the narrower the depth of field. Hence, if you’re taking a classic portrait and you want the face to be in focus but the background blurred, you will want to have a relatively narrow depth-of-field (==>larger aperture), whereas when you’re shooting classic landscape with most of the landscape to be in focus, you want a wider depth-of-field (==> smaller aperture). In practice, you will however need to consider whether you want to go for the extreme values (wide-open portrait/maximally closed down landscape), because the aperture setting also affects sharpness.
(If you think you’re ready for a twist, look up the JAPB article on field curvature).
Sharpness (and how aperture effects it)
Yes, the aperture’s setting also affects sharpness (btw, look here for an in-depth discussion of what sharpness actually is), but whereas the relationship between aperture and depth-of-field is determined by how optics work, the relationship between aperture and sharpness is partially coincidental.
Interestingly, sharpness is typically lower at both ends of the aperture range: At the higher end (larger f/-numbers; narrower aperture) sharpness falls due to diffraction, leading to that (as long as sharpness is desired above all else) the smallest apertures (biggest aperture numbers) are best avoided.
On the other hand, at the wider-open end of the spectrum, lenses tend to be less sharp because most of lenses’ optical flaws (e.g. chromatic aberrations, spherical aberration, astigmatism etc.) are exacerbated at the widest apertures. This is the ‘coincidental’ part because while diffraction is unavoidable, lenses being obviously soft wide open is mostly a result of design priorities: it is possible to design bright lenses which are sharp wide open, but such lenses tend to weigh a ton and cost even more.
Shutter speed: stop. motion.
Your shutter speed defines how long a period of the changing, moving universe outside of your camera you are trying to cram into one static image on your film/sensor. Therefore, while aperture affects pictures no matter what is pictured, the same is not exactly true for shutter speed, as shutter speed is less of a consideration for static scenes shot on a tripod. Basically, the photographer who wishes to create a sharp, static image has to deal with two types of motion: camera shake and (object) motion blur.
Camera shake
Camera shake (most relevant when shooting handheld) is a result of you not being able to hold the camera and lens perfectly still. While the amount of shake you have to deal with is dependent also on handholding technique, the effect camera shake has on your pictures is accentuated by focal length – the narrower the lens’ field of view, the more obvious camera shake becomes in the final picture.
The basic rule is that (assuming your handholding technique is not too shoddy) your shutter speed would need to be quicker than 1/f (f being your lens’ focal length). Thus for a standard lens 1/60 s should do, while a 200 mm tele lens would need ca. 1/250 s. Somewhat problematically, this rule comes from the age of film, and does not guarantee pixel-perfect results on high-resolution digital cameras. For instance, my experience of the Sony a7R (36 MP, no stabilisation) says you practically have to aim for a shutter speed of 1 per (f times 2). Obviously image stabilisation (either in camera or lens-based) as well as a monopod can help immensely, while a sturdy tripod mounted on an unmoving fundament in conjunction with either a remote or on self-timer generally eliminates camera shake (even then you might have to deal with mirror slap and shutter shock).
Motion blur
Object motion obviously can become a problem whenever there are moving objects in the frame, that the photographer desires to freeze. While there are no simple rules of thumb to guarantee pixel-perfect results, the usable range of shutter speeds for capturing motion start from about 1/250 s while some moving objects may necessitate as much as 1/4000 s.
Think on this: Your camera is steady as a rock, and the scene you’re trying to capture is similarly unchanging. Except for the bird flying across the sky. If – during the time the shutter is open – that bird manages to move even by a few pixels, then the bird will not be pin-sharp. You’ll still make out it was a bird and which way it was flying, but it will not be sharp. Hence, assuming your sensor produces an image of 6000 by 4000 pixels, and the object moves fast enough to pass through the entire frame (6000 pixels) in one second, your shutter speed needs to be 1/8000 s for the movement not to produce blurred pixels. In all but the brightest settings, reaching these kinds of shutter speeds necessitates some serious tweaking of aperture and ISO.
Alternatively, your photography may try to even out motion by using long shutter speeds, obfuscating waves on a body of water until all you’re left with is a silky, even surface; or merging the tribulations of a rapid or waterfall. In such cases you will aim for very long shutter speeds (tens, even hundreds of seconds) and will again have to push the other factors (aperture, ISO) or even use ND filters (see later).
Importantly, the absolute speed of the moving object (a racing car/a fighter jet) is not as important as its relative motion (relative to the frame). Hence, even slow-moving object when photographed at close range might pose significant challenges. Pictured below (x3) is a battery operated locomotive that needs 10 seconds to travel a metre in absolute terms, that is ≈ 0,36 km/h or ≈0,23 mph.

(ACR default, Crop & resize)
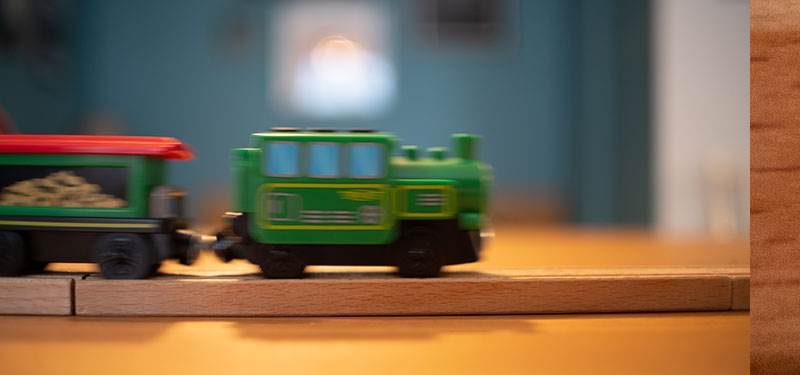
(ACR default, Crop & resize)

(ACR default, Crop & resize)
In each of these three pictures, the shutter speed used has been (between pictures) been raised by two stops (1/5–>1/20->1/80) and – to keep the exposure balanced – this has been compensated by raising the ISO by two stops (ISO200–>ISO800->ISO3200)
Three things become obvious by looking at these pictures:
1) the relationship between motion blur and shutter speed (faster speeds-> less motion blur)
2) 1/80 s is not enough to undo motion blur, even with such a slow-moving object
3) looking at the 1:1 excerpt on the right, you can clearly see a significant increase in noise. (which is what we’ll get to next)
ISO: dynamic range and noise
First, while some refer to ISO as ‘sensitivity’, that is today somewhat misleading. Yes, back in the age of film, you made film more light-sensitive by using bigger photo-reactive particles. Hence, you got film stock which could be used in lower light, but produced grainier images. Today, when you raise your camera’s ISO, your sensor’s photosites are not getting magically bigger (granted: that would be nice), instead, the signal generated by each photsite gets amplified. We’ll refer to this amplification as boosting. Moreover, the higher the ISO, the more it gets boosted. So far so good, but the problem with such indiscriminate boosting is twofold.
Noise
Firstly, as any half-baked photographer can tell you, boosting leads to a noisy image. Except that this is actually not true.
A noisy image is due to a low signal-to-noise ratio. Signal is the stuff you want (such as the shot of the has-been movie star staggering out the backdoor of the bar), while noise is all that which is always there. Correct: there’s always noise. Some noise stems from the randomness of photons themselves, some from the sensor electronics (photsites), some from the minuscule wiring needed to get data from the photosites onwards etc. These sources of noise are referred to as ‘upstream read noise’. While some of these noise-sources are camera-independent (random photons), most noise is generated by the camera itself.
The problem with high-ISO photography is not so much the noise the camera generates (that noise is there, even in a photo of a sunny beach), but that there is very little in the way of signal (remember: you’re in a dark back alley). Moreover, as the paparazzi needs the subject to be identifiable they use high ISO to boost the brightness. Problematically, when boosting signal and noise are boosted just as much, thus making the noise clearly visible. To say it another way, when you photograph the same scenery with a ‘normal’ ISO and a ‘high’ ISO, the visible noise in the high-ISO picture is not so much due to stronger boosting but due to the fact that your sensor received less signal (see image below).
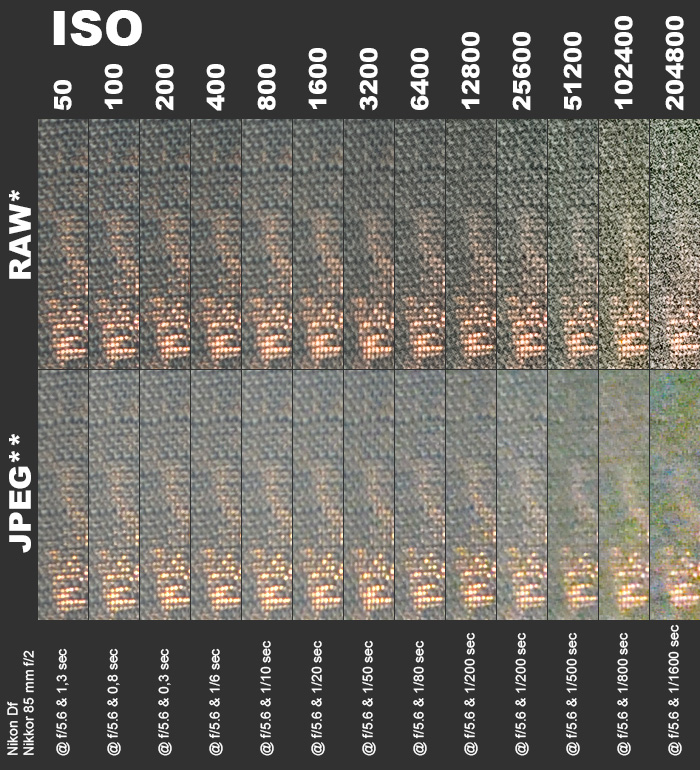
* 14-bit NEF, ACR default
** JPEG High, NR Normal, SOOC
If you have the stomach for more details, I recommend you look here and here.
Beyond that, it’s hard for me to say more, because what will actually happen (e.g. is noise at ISO 3200 prohibitive?) depends a lot on the camera you use. For instance, the Nikon Df (which shares the Nikon D4’s 16 MPix ‘full-frame’ sensor) is well known for being very good in dealing with ‘high-ISO noise’. Therefore, on the Df, I would not say that ISO 3200 is in the no-go-zone. On another camera, the picture might be significantly different (worse, or better).
Therefore, it is highly recommended that a photographer acquaint themselves with their camera’s noise profile, so that they know what part of the ISO range is actually usable.
Dynamic range (and the loss of it)
But noise is not the only downside to boosting. The other issue with boosting is the loss of dynamic range.
Before discussing the loss of dynamic range, let’s have a look at what dynamic range is: In laymen’s terms, dynamic range is the length of distance between what the camera’s sensor perceives of as pure black and pure white. A camera’s dynamic range is measured in stops (doublings). Which means that a camera with 12 stops of dynamic range offers 212 = 4096 shades of grey between pure black and pure white, while a camera with 14 stops of dynamic range offers 214 = 16384 shades of grey. DR-values of some current cameras are reproduced below:
| Make & Model | Max. dynamic Range |
| Canon 5D MkIV | 13,6 EVs |
| Canon R5 | 14,6 EVs |
| Leica SL | 13,4 EVs |
| Nikon Z7 | 14,6 EVs |
| Nikon D850 | 14,8 EVs |
| Olympus OM-D E-M1 MkII | 12,8 EVs |
| Olympus OM-D E-M5 MkII | 12,4 EVs |
| Panasonic Lumix DC-S1 | 14,5 EVs |
| Panasonic Lumix DC-GH5 | 13,0 EVs |
| Pentax K-1 | 14,6 EVs |
| Pentax K-3 II | 13,6 EVs |
| Sony a7R IV | 14,8 EVs |
| Sony A6500 | 13,7 EVs |
To put these number into perspective: While these differences might seem small, remember that we’re again dealing with an exponential scale: a camera with 14 EVs worth of dynamic range offers double the shades of grays than does a camera with 13 EVs of dynamic range. Also, a healthy human eye typically manages close to 20 EVs worth of dynamic range. We are therefore still far distant from digital sensors being able to beat the human eye in this sport.
Now that you know what dynamic range is, let’s inspect why higher ISOs are detrimental to dynamic range: Again, think of every photosite on your sensor as a waterglass. At base ISO (typically the lowest ISO) each glass will record as full when it is full to the brim. These values are then converted into bits (how many depends on your camera), which are used to make up whatever image you’ve just captured. What happens when you boost ISO is that every value read from all the photosites/glasses is boosted: if ISO was raised by one stop, boosting doubles each value, when raised by two stops, quadrupled and so on…
Obviously, one thing that happens is that higher values are clipped. If at double base ISO half a glass is interpreted as if it was full, then every photosite that is more than half full will be read as if it was full. Considering that you’ll probably use higher ISOs because of a comparative lack of light, clipping will not be a categorical issue. In order to minimise clipping, some cameras do not blindly boost all values equally (say by x8), instead compressing values in order to retain differences in shades of grey. Moreover, the clipping of some highlights may well be a price worth paying for raising the overall illumination of a scene.
The wider problem however is, that when values are boosted the sensor quickly runs out of latitude. Consider the numbers: to be able to produce a dynamic range of 13 EVs, the sensor needs to be able to render 8192 shades of luminance. This is easy as long as the photosites gather that many photons before they register as full, but as the sensor’s intake is progressively boosted, satisfying this demand becomes increasingly challenging. If, for instance, the glass is full at 80 000 (216,29)electrons, you have some leeway (until roughly ISO 1250) before the only way to maintain 13 EVs is by interpolating new in-between values to make up for all the discarded details. Even though much of what a Bayer-type sensor does is interpolation, such gimmickry cannot avoid higher ISO’s taking a toll on dynamic range. Again, a loss of dynamic range may be a price worth paying for making an otherwise unworkable exposure work, but it does point to a trade-off worth being aware of: Past a specific point raising ISO comes with a significant cost.
If you’re not utterly averse to reading techno-speak, I can recommend these sources to add to your reading list: Roger Clark’s no-nonsense site, and this detailed article on PhotoPXL.
Sensor physics and noise
Oh, and one more thing. I mentioned – in passing – the Bayer type sensor earlier. If you’ve never heard of the Bayer type sensor before, the reason is not that you’ve never encountered one. The Bayer-type sensor is without a doubt the dominant type of digital imaging sensor, and it’s based on that every photosite of a sensor actually captures only one color: red, green or blue. The camera’s processor (downstream) does some magic tricks to guess its way to what colour each photosite would actually have captured (had it been able to sense all colors, instead of just the relative intensity of red, green or blue). This introduces a massive quirk in that upstream noise actually is a mess of color – further exacerbated by the upstream amplification (boosting). Most of this never shows up in your prints, so you’re excused for not knowing this but all noise is coloured (the NR algorithm inherent in all in-camera JPEG’s tries hard to remove colour noise, and unless you shoot RAW and regularly tweak the noise reduction sliders in your RAW converter, you will likewise not have an inkling.). But one part of the “real problem” in effective noise reduction algorithms is that they have to try to preserve neighbouring pixels’ colour information while trying to eliminate as much colour noise as feasible.
Neither I have hard-core access to what the sensor actually records (the best I can do is RAW), but I can illustrate the issue with one of those RAW files:
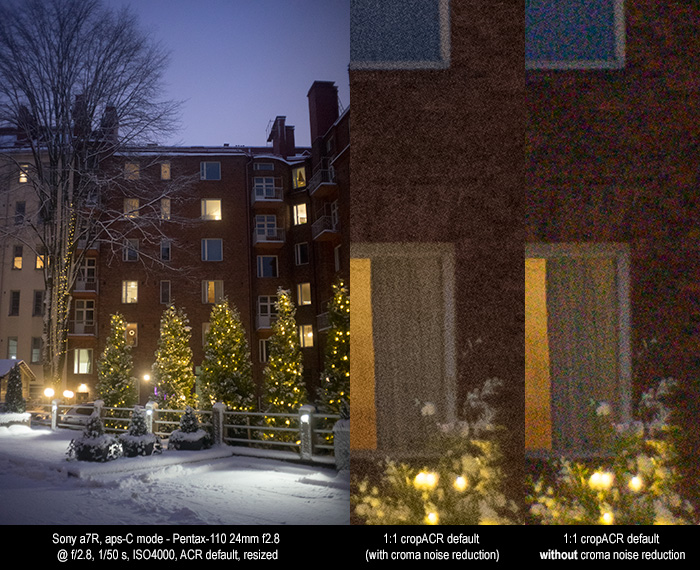
This shot was taken in late twilight in a Helsinki backyard. My main point was trying to ascertain whether the Sony a7R (in aps-C crop mode) coupled with a Pentax-110 lens produces usable results (better than expected), but it is a useful illustration for colour noise as well. On the left you have a thumbnail resize of the entire scene (ACR default), then two 1:1 crops: first with default ACR conversion (which reduces chroma noise), and then a second 1:1 crop that is otherwise identical, except that the chroma noise reduction slider was set to 0. As you can see in the right-hand crop, a significant portion of all noise is made up from – correct – red, green and blue pixels.
Related articles:
• Introduction to Exposure
• Working with Exposure (in practice)
• Various approaches to exposure automation