Pekka Buttler, May 2021
Introduction
This article is part of a JAPB series of articles on the optical flaws of lenses and you can find the index of the series here.
In the simplest terms, chromatic aberrations (CA’s) are aberrations that affect colors (are chromatic). In photography parlance, however, not all colour-related issues with lenses are classed as chromatic aberrations. Other color-raleted aberrations, which are covered in their own articles, are colour casts (partial or uniform) as well as some atypical ghosts. This article will however cover only two types of chromatic aberrations, namely longitudinal chromatic aberrations and lateral chromatic aberrations.
Again, I refer to these as chromatic aberrations, because these are usually indicated when writing about “chromatic aberrations”. Even so, there is a lot of imprecise, bad and even ignorant information out there on the interweb, so don’t be surprised if this article goes a bit against what you thought was the case.
Let’s start with an illustration showing some classic chromatic aberrations:
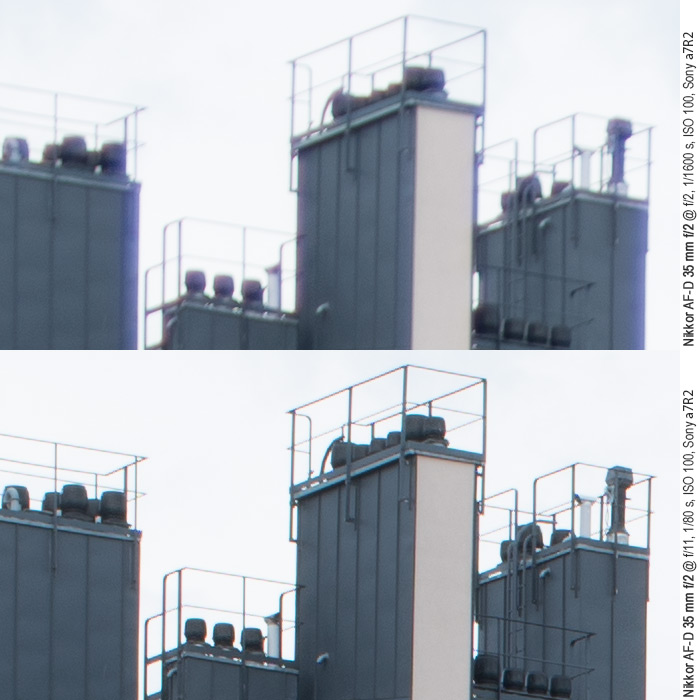
The pictures above are taken within minutes of each other, and the only change is a closing down of the aperture (and longer shutter speed). Obviously, with the above image being a wide-open shot, it suffers not only from CA’s, but also from wide-open artefacts that have a significant effect on detail and contrast. But what causes those hideous violet casts?
What are chromatic aberrations ?
Theory warning
Most will have a recollection of a school physics lesson where the teacher shoots plain white light onto a prism and produces a rainbow pattern (something like the picture below). While that lesson was meant to show that ‘white’ light actually is a product of a wide range of coloured light come together, it also is relevant here, because that rainbow pattern is produced by that different wavelengths (colours) of light are bent (‘refracted’) differently when encountering a optical interface layer (such as between air and glass).
This same effect is liable to happen inside photographic lenses, and considering that photographic lenses are made up of dozens of air-glass interfaces, the potential for rainbows is massive. That is why lens engineers started very early to try to minimise these kinds of issues. Try, because as lens elements exist to refract (bend) light, spectral separation is not entirely avoidable. Today, lens engineers make ample use of so called achromatic doublets (combinations of suitable convex and concave; flint and crown glass lens elements cemented into one), as well as more exotic glass blends in order to control CA’s, but in the age of legacy lenses lens designers had somewhat more limited tools.

Above is a simplified example of how a lens element bends different wavelengths. As typical, I’ve exaggerated some effects to highlight how they manifest. It important to note, that the focal plane (in other words: focusing distance) vis-a-vis the motif has a significant effect on how the CA’s manifest.
Incidentally, this is why it makes sense to talk about chromatic aberrations (plural), because a lens’ tendency to separate the spectrum leads to two somewhat different phenomena: lateral (a.k.a. transverse) chromatic aberration and longitudinal (a.k.a. axial) chromatic aberration. Discussing these both is important because they manifest very differently and can be addressed/prevented in different ways.
Lateral/transverse chromatic aberration
is caused by that the different ‘colours’ of light are magnified differently by the various lens elements. In practice, this means that Lateral CA’s are the more pronounced the farther you go from the optical axis (Lateral CA’s do not occur in the image centre), and are symmetrical around the optical axis (if you have green/purple fringes in one corner, you would have purple/green fringes in the opposite corner. This type of chromatic aberration is caused by the various refractive indexes of the lens elements, and cannot be addressed by closing down (although closing down may narrow and intensify the band of fringing). On the other hand, most photo editing softwares readily correct these issues (and many cameras already do so by default).
Longitudinal/axial chromatic aberration
is caused by that different wavelengths are not only magnified but also focused differently. For instance, blue light is refracted more strongly, and is therefore focused in front of green, which is in turn focused in front of red. Therefore you might see high-contrast transitions objects in the focal plane are very nicely defined, but objects behind the focal plane are haloed in a greenish hue, while objects in front of the focal plane are haloed in magenta/violet (the combination of red + blue). Longitudinal CA’s are quirky in three ways.
• Firstly, these can reliably only be corrected within the lenses, typically through the use of achromatic doublets (suitable combinations of convex and concave; flint and crown lens elements) or low-dispersion lens elements.
• Secondly, unlike Lateral CA’s that typically become bad only once you travel a fair bit from the optical axis, Longitudinal CA’s affect the entire image area.
• Thirdly, Longitudinal CA’s are basically out-of-focus transition artefacts (They only occur behind or in front of the focal plane). This means several things: For instance, that if you have a lens with a perfectly (or decently) level focal plane and only test the lens by shooting a newspaper or brick wall, you will never see Longitudinal CA’s, even though they may plague the lens IRL. It also means that you can ‘push’ Longitudinal CA’s farther away by increasing your lens’ depth-of-field (stopping down), but they do not really go away.
N.B! Personally, after having studied many photography sites, I must say that their representation of CA’s is often both simplistic and flawed. Whether this is due to a lack of understanding or laziness I can only guess.
Diagnosing CA’s:
First, diagnosing CA’s (determining whether you’re dealing with longitudinal or lateral CA’s) is not always entirely possible. That said, there are a number of rules of thumb:
• If you have CA-like colour casts around objects in the centre of an image taken at wide apertures, you’re dealing with longitudinal CA’s (Lateral CA’s do not occur in the image centre).
• If the CA can be eliminated entirely by stopping down to a medium aperture (e.g. f/4–f/8), you’re dealing with longitudinal CA’s.
• If the CA is not eliminated even by stopping down past medium apertures (e.g. f/8–f/11), then you’re dealing with lateral CA’s.
• If the CA occurs in the image edge/corner, and shows a clearly symmetric pairing of casts (green towards image centre, magenta towards the corner), then you’re probably dealing with lateral CA’s.
Let’s look at some examples:
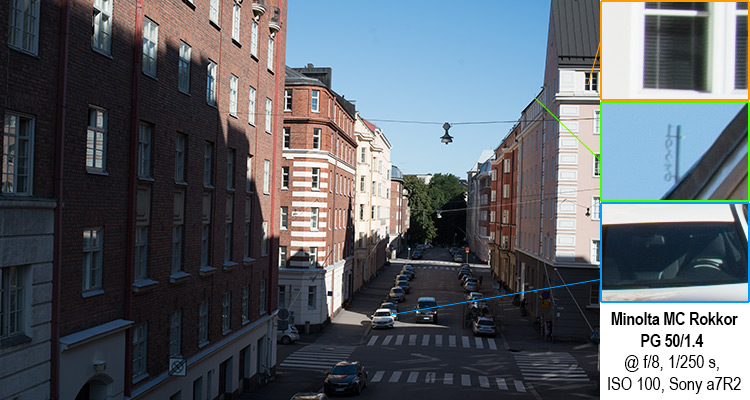
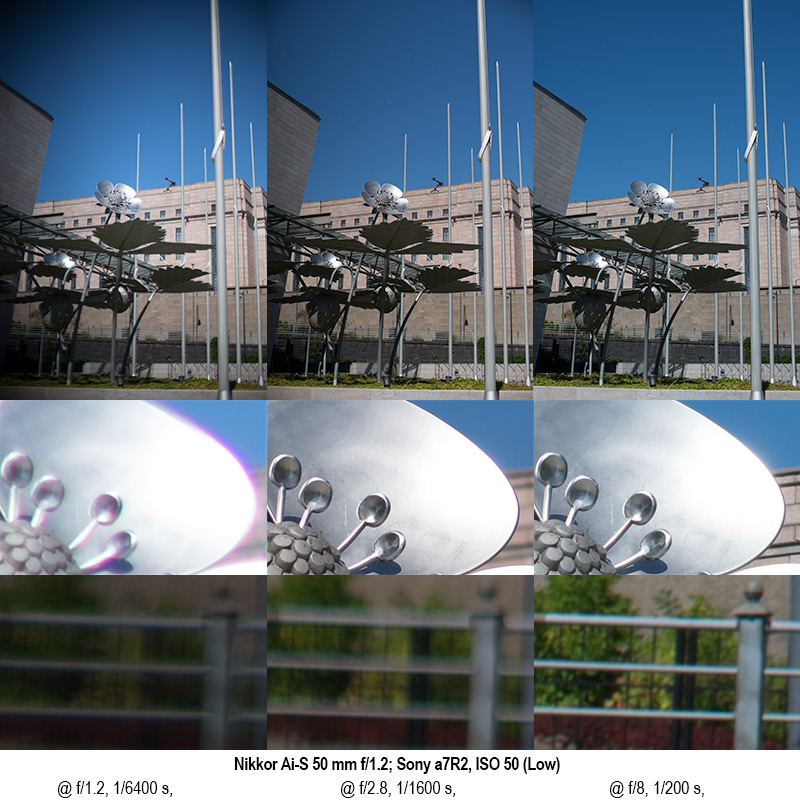
(Motif: Statue in front of the parliament annex, with old parliament building in background. Helsinki)
Correcting chromatic aberrations?
Correcting longitudinal chromatic aberrations
Firstly, there is no easy way to correct longitudinal chromatic aberrations in post-production. The best way to combat longitudinal CA’s is to try to avoid them as far as possible by always stopping down when shooting wide open is not crucial.
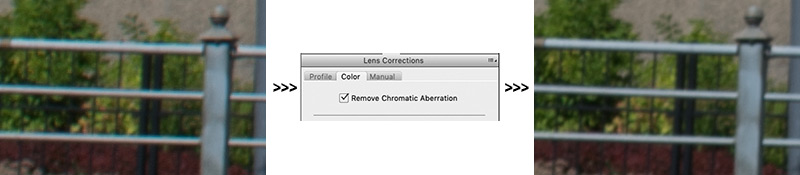
Correcting lateral chromatic aberrations
Lateral CA’s on the other hand are fairly easy to correct. Today many digital cameras do this by default, and if not (such as when the camera has no idea what lens is mounted) most photo editors have a built-in tool for correcting obvious lateral CA’s. These tools are also exceedingly easy to use, once you’ve found the correct checkbox.
Is correcting CA’s worth it?
Sorry. Let me rephrase. Granted, those purple and green fringes look bad when you pixel peep. They look quite hideous in fact, and – as I’ve said elsewhere – those coloured fringes are merely the tip of the CA-iceberg, in that they are the most visible expression of that different coloured light rays do not meet up perfectly on your sensor/film. Therefore, when you have an image showing strong colour fringes at harsh transitions, the same optics that produces those colour fringes will also negatively effect definition and contrast in lower-contrast regions. In effect, clearly visible CA’s are a telltale of a lens not managing to align different-coloured rays.
So, if an image shows buckets and buckets of lateral CA-inducided fringing, allowing the photo editor to remove chromatic aberrations may in fact have a discernible impact on overall sharpness and contrast (even where no colour fringes are visible).
On the other hand, our modern propensity to pixel peep exacerbates these issues, or – more exactly – makes us think the issues are bigger than they are. Take – for example – the topmost image on this page (the wide-open Nikkor AF-D 35/2 shot). That uncropped image has a resolution of 7952×5304 pixels, and while those broad bands of purple fringing look quite nasty in the 1:1 crop, the image needs to be printed to at least 50 centimetres wide before those purple fringes actually become visible to the naked eye. Moreover, to have the purple fringes look as large in a print as they look in the crop at the beginning of the page, the print would need to be almost 2 meters wide. Besides: Who shoots landscapes, especially well-lit landscapes (the subjects being well lit are basically a prerequisite for this caliber of high-contrast transitions) in broad daylight wide open? Not someone aiming for a clean image.