Pekka Buttler, Dec 2022
This article is part of the JAPB series on Exposure, use the following links to navigate:
• Introduction to Exposure
• The components of exposure (and their side-effects)
• Working with Exposure (in practice) [you are here]
• Various approaches to exposure automation
Maybe, we did not scare you away with the previous part that covered the basic theory regarding exposure (and trade-offs inherent to working with exposure). That’s good, because quite frankly, if you want to venture outside automatic exposure, you need to have some grasp of the basics.
But given that every picture (how bright or dark ever) is an exposure, lets next look at different types of exposure. Also, lets start by grabbing the bull by the horns and have a look at what a “correct” exposure is supposed to be.
“Correct” exposure
Gotcha! There is no such thing as an objective and commonly accepted measure of correct exposure. Whatever exposure (bright or dark) you feel suits the kind of expression you’re looking for is good. So you want to accentuate how bright the white nights were, why not set exposure so that the picture shows a bit more light than you remember? So you want to express how dark and dank that day in November was, why not tweak the exposure to suit your needs?
Unless you’re aiming for absolute documentary photography, your desire as artist to express whatever you want to convey overrides all other values. Therefore, if someone says they think you’ve not exposed a photo “correctly”, they are actually saying one of three things:
• They don’t get what feeling you’re trying to convey and thus judge your image based on their own precepts
• They do get (or, at least, think they do) the feeling you’re trying to convey, but disagree with you on your implementation.
• They’re fixated on a very technical approach to exposure.
The first reason is tricky, because – if that’s a common reaction – you might want to take pause: Why does your audience not get the feeling you’re trying to convey? Should you make it more clear? Depending on how you answer these questions, you might want to take note and adjust your photography, but you should also ask yourself whether other’s opinions should matter to you? Some artists have never bowed to convention, and while obstinacy may be a recipe for (artistic) oblivion, it may also pay off handsomely: Many revered artists (e.g. Dali, Mozart, Pollock, Adams or von Trier) started out by telling convention to get stuffed.
The second is a chance to learn – especially if you can ask your critics for tips. If you agree with these tips, you might be able to progress, but if you disagree, you again have to choose between blazing your own trails (hoping someone will choose to follow you) or bowing to the majority opinion.
Finally, with the third option, there are some things you need to consider, because there is a very precise and seemingly objective approach to exposure, that – although it does not fit artistic/expressive photography and although it is often quite impossible to achieve, nevertheless is a relatively popular (by which I mean: widely followed) approach to exposure: setting exposure to avoiding ‘blown highlights’ and ‘crushed shadows’. In other words, a ‘balanced exposure’
Balanced exposure.
Highlights are – quite simply – the brightest areas in your picture, and these are referred to as ‘blown’ when they are so bright that they white – as white as it gets. Thinking again of our (earlier) water-glass analogy: whenever your exposure (of certain parts of the frame) have led to those glasses overflowing, then the highlights are blown. Blown highlights can be especially troublesome in post-production, because it might be impossible to adjust them to recover meaningful detail. Crushed shadows are – obviously – the same but opposite: Shadows that are utterly black and have lost all shadow detail and offer no real avenue for authentic recovery of shadow detail.
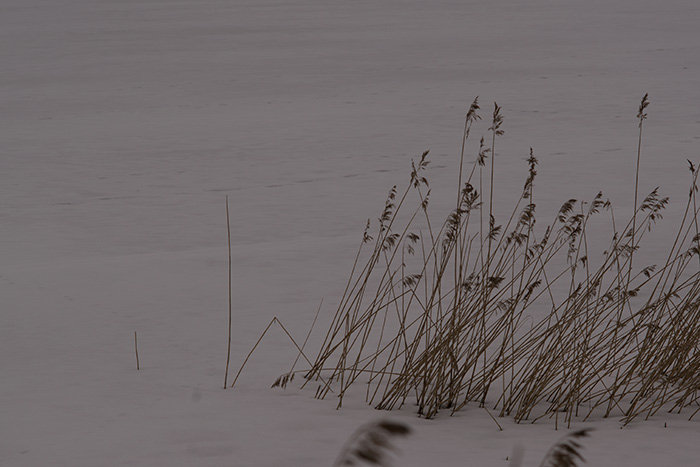
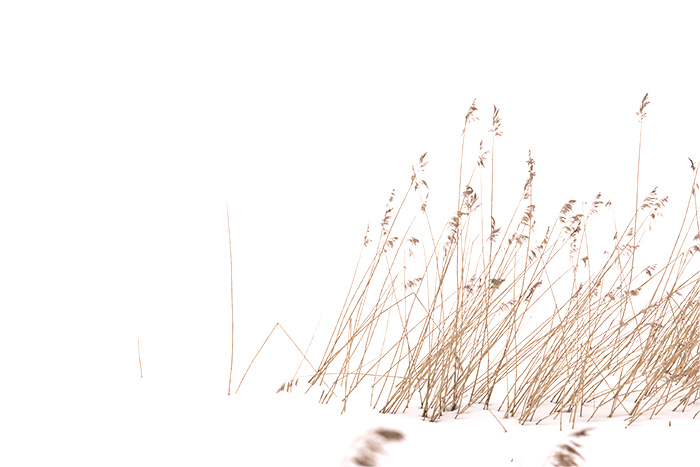
There are objective, good reasons for aiming to expose for avoiding blown highlights and crushed shadows, namely the idea that one should always expose for maximum detail. This idea is based on that one can always decide to throw away detail in post (or in the lab), whereas – once detail is lost in exposure – that detail cannot be re-created. The four images below show first, a (reasonably), balanced exposure, followed by three variants that discard detail. The opposite would not work, as once detail is lost, it cannot be recovered.
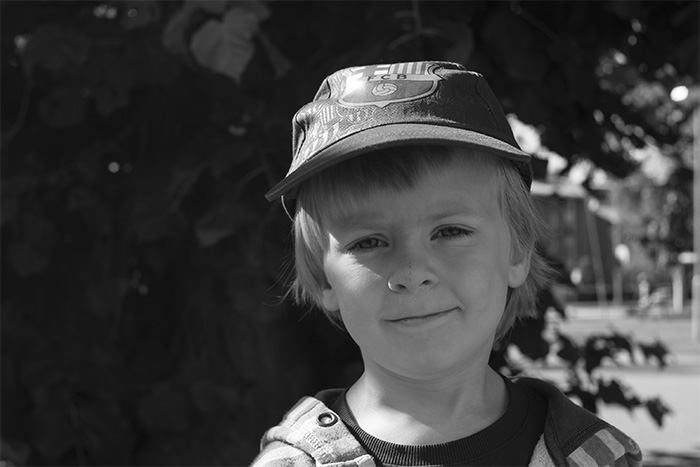


Depending on your sensitivities, you favourite (of the four above) may or may not be the same as mine (or the person’s next to you), but the point is, that it often makes sense to shoot in such a way that the exposure avoids unnecessary blowing and crushing, while letting your artistic flair run wild in post-production.
On the other hand, should you be working with film, or should you (already when shooting) be convinced that a specific exposure is what you’re aiming for, then there is little reason to let yourself be confined by the straightjacket of “balanced exposures”, especially as – when you get down to it – balanced does not mean that you utterly avoid blowing and crushing, simply that you balance the blowing with the crushing.
Remember what was stated earlier: Even the best modern cameras have an effective dynamic range of around 15 EV’s (215 shades of whatever), which is quite paltry compared with a healthy eye’s ability to resolve 20 EV’s worth of shades. Again, 20 EV’s is not a third more than 15 EV’s, but 32 times more. moreover, even 20 EV’s is far short of the number of shades of illumination you could find in the real world.
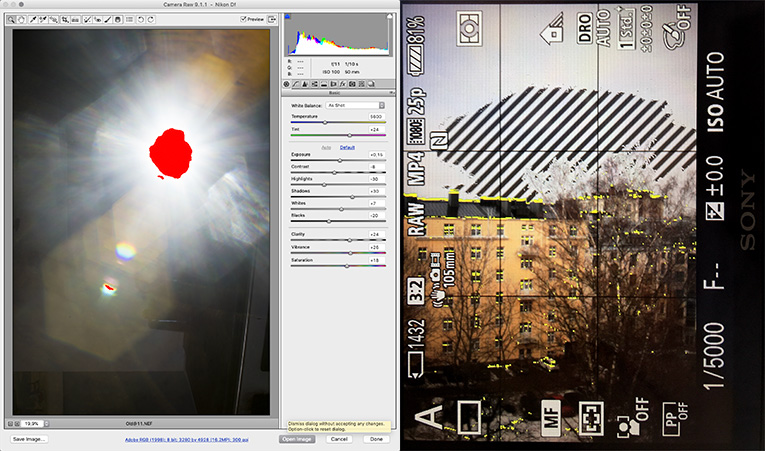
Right: Zebra stripes warning of risk of overexposure on Sony a7R2.
Modern post-processing software (and even some mirrorless cameras’ systems) have special tools to warn you of blown highlights and crushed shadows, and many post-production softwares even do some advanced wizardry to guesstimate data (shades of bright or dark) where there was none.
Therefore, while there are lifelines to grasp after even the photographer has inadvertently exposed the shot in such a way that detail has been lost, it surely is better to – if possible – avoid such issues before pulling the trigger.
High-key and low-key exposure
Besides the classic case of aiming for a balanced exposure, there are two distinct modes of photography that fly in the face of the maxim of aiming for a balanced exposure: high-key exposure and low-key exposure.
The point of both high-key and low-key exposures is that while you expose your main subject in a relatively balanced fashion, you deliberately blow (high-key) or crush (low-key) the background. Sometimes, you will encounter suitable situations in available light -photography, but low-key and high-key exposures also lend themselves well for studio work. Classic high&low-key exposures are very popular in portraiture and product photography.

In many ways, the point of high&low-key photography is the same as when you use a shallow depth of field to separate an object (e.g. a face) from a background: you offer a lot of detail where you want the viewer’s attention to go, and try to make the background as uninteresting as possible.
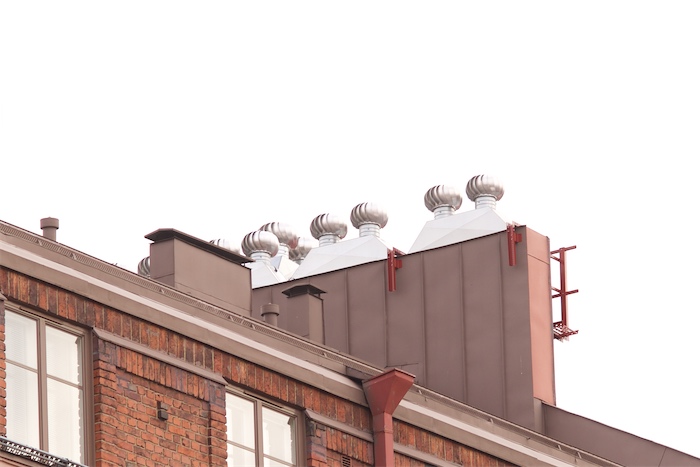
Sometimes also you will encounter such high-contrast situations that a balanced exposure would only the the worst of both worlds. Especially in bright, overcast conditions the sky is often so bright that trying to not blow the sky would only result in the main subject becoming too dark. In such cases, setting the exposure for the subject (and disregarding the blown background) may be both necessary and make for a striking image. Some examples below.
In case you’re interested in how to do high&low-key exposures, there are basically three ways to approach the task. The one you choose largely depends on the tools available to you and their capabilities.
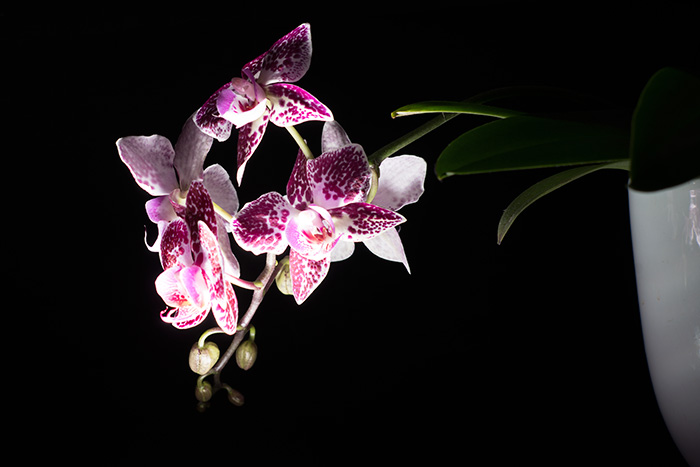
1) If you have off-camera lights (either LED-panels or flash-guns/speedlites with remotes), you can use those to accentuate your object/subject agains a dark background (low-key), or brightly illuminating a light background while using a fill-flash on your object/subject to make sure you have more than just a silhouette (high-key). Both methods create the massive difference in brightness you need to pull it off. Use either a flash-meter or experiment your way to a suitable exposure.
Please note: Without manual exposure mode you won’t get far. Looking at the low-key example above (Orchid), the difference between available light (f/2.8, 1/4 sec, ISO 3200) and the low-key exposure with flash (f/8, 1/100, ISO 200) is ≈12 stops, thus being far outside of what you could reach with exposure compensation (See article on exposure automation).
2) In available light photography, place your subject so as to maximise the naturally occurring lighting differential, use bright/dark backgrounds to your advantage. Meter for the object/subject either using your camera’s spot metering mode or a hand-held meter or (if you have neither), experiment your way to settings in manual exposure mode (or use exposure compensation).
3) If you are unable to direct your object/subject or change your point-of view sufficiently to change the background, just meter for the object/subject and disregard the background.
In available light high/low-key photography, spot metering or full manual exposure are your friends, but in a pinch, even exposure compensation may help significantly. The pictures below were taken on a relatively bright overcast day, and the difference between the full-auto (centre weighted) exposure and the spot metered exposure fits within the 3 stops of latitude the typical exposure compensation system offers.
Remember, it is not utterly crucial to reduce the background to an even canvas or black or white. Firstly, you could use any coloured background as long as it works well with the colour of your photo’s object/subject, but the point is to not give anything in the background a chance to draw the viewer’s attention away from where you want it to be.
In summary
What is a correct exposure? That’s for you to decide. While there are good (technical) reasons for always aiming for a balanced (avoiding blown highlights and crushed shadows) exposure while shooting, what you want the result to be like (especially after post-production) is for you (and only you) to decide.
Related articles:
• Introduction to Exposure
• The components of exposure (and their side-effects)
• Various approaches to exposure automation