Pekka Buttler, Dec 2022
This article is part of the JAPB series on Exposure, use the following links to navigate:
• Introduction to Exposure
• The components of exposure (and their side-effects)
• Working with Exposure (in practice)
• Various approaches to exposure automation [you are here]
exposure | ɪkˈspəʊʒə, ɛkˈspəʊʒə |
There used to be a time when cameras could not measure the amount of light they had to work with, and back then every photographer learned how to a) estimate the amount of available light, and b) set their camera’s exposure (shutter speed and aperture) in such a way as to get a decently exposed shot. Or if they did not learn, they had a lot of wasted film and missed opportunities on their hands.
While exposure automation has significantly improved the keeper rate of all photographers (especially amateurs, but also pros have benefited), the prevalence of exposure automation has led to that many photographers today do not really understand exposure.
The tool introduced to make getting a good exposure more likely and make photographers more responsive has led to that subsequent generations of photographers have rarely ventured out of the green zone, the safe zone.
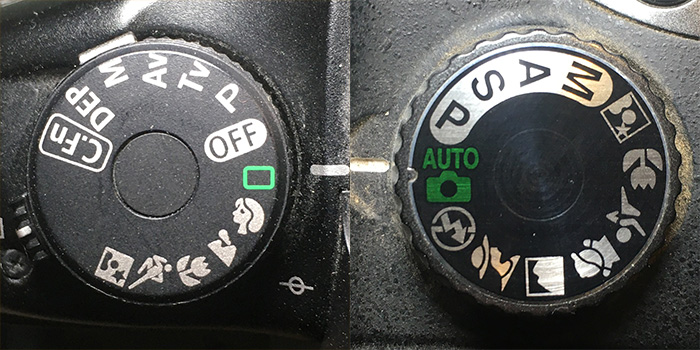
Left: Canon EOS 30 (film)
Right: Nikon D60 (digital)
And the reason is perfectly understandable, because if the novice who has noticed that green gives decent results, and that all the other options lead to less predictably decent results, few have the time, energy or daring to venture beyond the safety of full auto and themed shooting modes into the realm of the acronyms P A S and (most terrifying of all:) M (Or, in Canon-lingo: P, Av, Tv and M).
This part of the JAPB guide on Exposure will have a closer look at those other options on the mode dials available, because understanding what they actually are and what they can do will benefit your photography and – just maybe – help people move beyond full auto.
If you have not yet read part 1 (the Components of Exposure (and their side-effects) of this series, now would be a time to revisit that part.
A brief history of Auto Exposure (AE)
The age of heuristics
Today basically every camera – from the one in your smartphone to the most expensive pro camera – has a method for automating the calculation of exposure, but that was not always so. Up until the late 1960’s most cameras expected the photographer to select one of a number of modes (e.g. ‘sunny’, ‘overcast’, ‘indoor’) or physically set a combination of shutter speed and aperture. To cope, photographers learned a number of rules of thumb (such as the ‘sunny 16’ rule), but for amateurs a ‘good’ exposure tended to be anything where the resulting image allowed the viewer to discern what the image was intended to convey. Unless you had a light meter.
The age of pocket light meters
Early on, separate light meters (initially based simply on utilising the photvoltaic effect) came on the market, thereby helping photographers gain some more exposure accuracy. Mind you, while such meters could (with some degree of certainty) tell you the settings suitable for your camera, you still had to enter those setting manually.

(manufactured in “U.S. Zone Germany” (!))
Integrated (but uncoupled) light meters
In the meantime camera manufacturers started integrating these simple light meters into their cameras, but this marriage was never trouble-free. Firstly, these light meters did not measure through the lens and could therefore neither account for the angle of view of the lens that was used, Secondly, there was no automation: the photographer still had to read the meter’s result and set the camera accordingly.
Early (uncoupled) through-the-lens (TTL) metering
A significant improvement came when interchangeable lens cameras started using TTL (through-the lens) metering. These systems measured the available light passing through the lens and then used some contraption to display whether the light was suitable for the photographer’s settings. Importantly, most such systems were uncoupled, in other words: while they measured light TTL, they had no clue of the settings (aperture, film sensitivity or shutter speed) the camera was set to fire at. Often these systems were optional accessories.
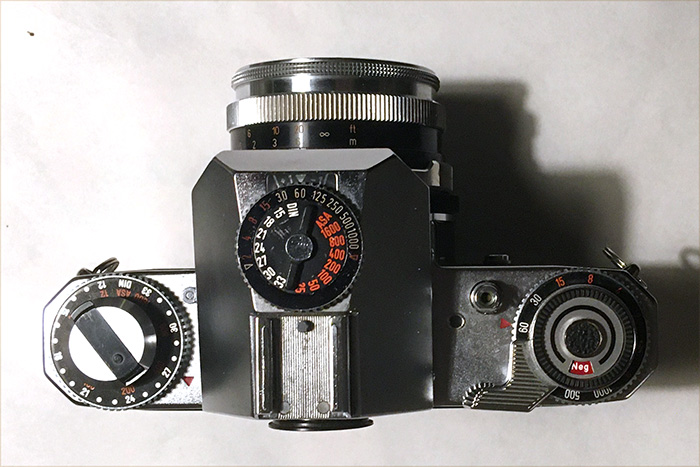
The film sensitivity dial on the camera’s left has no function except to remind the photographer what film they last set it to.
Match-needle metering
Another significant improvement came with so called ‘match-needle’ metering. In this system a camera would (through-the-lens) measure available light, read the selected shutter speed and aperture and film sensitivity and display two needles at the edge of the viewfinder: one needle for what the light was good for and another for what the current settings necessitated. The photographer was then to tweak their settings (aperture and shutter speed) until the needles matched up. While this sounds somewhat cumbersome, one quickly gets a hang of it.
In effect (because your left hand was holding the lens), this typically lead either to camera manufacturer’s moving the shutter speed selection to the lens mount (e.g. Olympus OM-1, Topcon Uni, Nikon Nikkormat FTx) or a tendency for the photographer to try to adjust their exposure only by tweaking the aperture ring (that was situated on the lens)
The advent of exposure automation
Only at the beginning of the 1960’s did interchangeable lens cameras with through-the-lens metering and automated exposure appear on the market. The Topcon RE super (1963) is generally seen as the first of its kind, but was soon followed by a number of cameras that offered automated exposure. Even so, the earlier match-needle systems stayed on the market for a considerable time, partially because pro’s were adamant that automating exposure was the doom of real photography.
But what kind of auto exposure? Given that the film’s sensitivity was whatever it was (one did not expect the photographer to swap films unless needed), there are basically two characteristics that an automatic exposure system could juggle: It could either take the aperture as given and adjust the shutter speed accordingly (aperture priority) or take the shutter speed as given and adjust the aperture accordingly (shutter priority). Mind you, as we’ve already discussed in part one of the series, neither alternative is devoid of significant implications.
Most manufacturers went with whatever their lens mount allowed: The fundamental question in this was whether the lens mount’s arrangement allowed the camera to precisely operate the lens’ aperture. If the camera could not (with high precision) set the aperture to whatever value its automation suggested, camera brands tended towards aperture priority; if the camera could set the aperture with precision, camera brands tended towards shutter priority.
Therefore, for example, Nikon initially went with aperture priority (the Nikon F lens mount progressed to precise control of the aperture only after Ai-s lenses were introduced in 1981) and Konica went with shutter priority. Only once both could be manipulated precisely, did program auto (and its many variants) enter the picture.
Different approaches to Automatic Exposure
Aperture priority
Aperture priority means that the photographer decides what aperture to use, and the camera then tries to find a shutter speed to make the exposure work.
Aperture priority makes perfect sense when the photographer considers depth of field (shallow or very deep) or maximum sharpness (avoiding shooting wide open or closed down beyond the diffraction threshold) to be the most critical aspect of their photography.
Since the advent of digital photography and the ability of digital cameras to change their sensitivity on the fly (auto-ISO) the camera may tweak a combination of shutter speed and ISO to make the exposure work.
Shutter priority
The same applies (except the other way around to shutter priority: The photographer selects a shutter speed and camera finds an aperture (or aperture-ISO combination) to make the exposure work.
Shutter priority is the way to go when depth-of-field is secondary to making sure your shutter is open a short enough time to avoid subject motion or camera shake.
Program auto
Both aperture- and shutter priority have limitations in they did not (alone) offer sufficient latitude. A bright, sunny scene could have 12 stops more light (meaning 212 times more light) than a candlelit dinner, and for the photographer to capture both with a decent exposure they could ot rely on aperture priority or shutter priority alone (as either offered only 6–8 stops latitude). Instead, they still needed to know what they were doing…
Program auto (or simply “program”) was introduced to take that weight off the photographer’s shoulders. Program auto works thanks to the camera’s ability to direct both aperture and shutter speed in order to find a workable combination that will lead to a balanced exposure.
But – unless the balanced exposure could only be achieved at either end of aperture or shutter speed’s latitude, there typically were several alternative balanced exposures – alternative exposures that produced a similarly illuminated image, but – as repeatedly noted – did differ in implications.
Hence, while all the following combinations of aperture and shutter speed lead to an overall similarly exposed picture…
• f/1.4; 1/500 s
• f/2; 1/250 s
• f/2.8; 1/125 s
• f/4; 1/60 s
• f/5.6; 1/30 s
• f/8; 1/15 s
• f/11; 1/8 s
• f/16; 1/4 s
, we now know that the resulting images are nowhere near equal. The typical way in which program auto systems dealt with this was by– depending on the amount of light available – always suggest one generally “safe” combination (e.g. the Canon AE-1 Program would in this situation have chosen f/4 and 1/60 s).
The name “program” was likely the result of that the logic by which a camera (in various illuminations) chose its combination of aperture and shutter speed was based on programming. From there it was an easy step to develop program auto into its current form where:
a) depending on the metered illumination, the camera always suggests one pair of aperture and shutter speed (based on its programming, but
b) the photographer can then use arrow buttons or a dial to choose between equivalent-exposure alternatives.
Themed auto modes
Unless you’re carrying a pro or semi-pro camera (or an older camera), your camera will likely be offering you a list of auto-exposure alternatives that are generally referred to as themed auto modes.
Some of these themed auto modes simply are alternative programs.
For instance a ‘portrait mode’ will always tend towards suggesting a wider aperture (hence: shallower DOF; hence more subject separation), while a ‘landscape mode’ will always suggest smaller apertures (hence: deeper DOF), while a sports mode will always aim for for faster (shorter) shutter speeds.
That said, modern cameras will typically also implement other changes in themed auto modes (such as different color profiles, different WB, AF modes etc.)
Also that much-derided Full Auto mode (the green thing I was ranting about) is nothing more than a themed auto mode, except that it is themed to be as safe as possible in as many situations as possible.
Admittedly, in Live View and on mirrorless cameras, some cameras will – in full auto – actually analyse the image and select a theme based on what the camera finds.
Metering modes
Before we round off, some words on metering, because automatic exposure relies extensively on metering. Today basically all cameras that offer metering, do so based on the actual light-path (TTL), but the method or pattern by which they do so differ extensively. And let’s start with the simplest:
Spot metering
Spot metering is so called, because it meters the exposure for the entire image based on a relatively small spot – typically less than 10% of the entire image area. In the case of dSLR’s (outside of live view), that spot is by necessity in the centre of the frame, but in live view and on mirrorless cameras, that spot can be moved around (assuming that the software allows for it).
Spot metering is crucial if you want to expose the entire image for a specific subject (e.g. a face or a product against a white background. Typically any camera that offers spot metering also offers a button for AE lock (Spot-meter on subject, press AE lock (hence locking the exposure values), reframe at will).
The potential issue with spot metering is that if the photographer does not realise that metering is in spot mode, their results will be all over the place.
Average metering
Average metering works like spot metering, except it meters on (almost) the entire frame. Average metering works brilliantly as long as there are not massive differences in illumination between different parts of the frame, but the risk is that it will fail to expose for those crucial subject points. Hence, and as cameras have developed, Average metering has largely disappeared.
Centre-weighted metering
Centre-weighted metering is a combination of Average metering (in that it considers the entire frame) and spot metering (in that it gives more significance to the centre area). While it does offer a kind-of best-of-both-worlds recipe, it still depends on that the money subject is in the centre-area.
Matrix metering
Matrix metering is the name Nikon coined for this metering pattern (Canon calls it ‘evaluative’ and Sony calls it ‘smart’).
Regular (see above) metering patterns are predicated on metering so that it aims for a luminosity roughly equal to 18% grey (within the area that it meters), this can lead to significant issues in situations where the entire frame is very bright (think: a downhill skier blazing down a piste in brilliant sunshine). Aiming for 18% grey as point of balance would in such situations only lead to dirty snow and an underexposed skier.
Matrix metering – instead of simply, somewhat dumbly, aiming for 18% grey – tries to be smart, it evaluates the illumination that it senses, and runs the numbers through a matrix of values for possible exposure situations. This does not mean that Matrix metering would be infallible, but it at least tries to think of exposure as a photographer would.
Exposure compensation
Related articles:
• Introduction to Exposure
• The components of exposure (and their side-effects)
• Working with Exposure (in practice)
• EV tables