Pekka Buttler, December 2022
(NOTE! While this is a stand-alone article, it also gives background to the JAPB article series on Exposure)
EV = Exposure value
Exposure Value (EV) is a number summarising Aperture, Shutter speed and Sensitivity (ISO). The EV is calculated using the following formula:
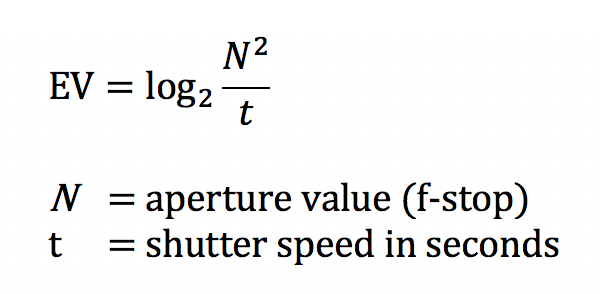
Given that this formula is not simple (not everyone can calculates squares and few can calculate base 2 logarithms in our head, and base 2 logarithms are not available on all scientific calculators), most either use a table (see an example below) or compute the EV based on a simple rule of thumb:
EV tables
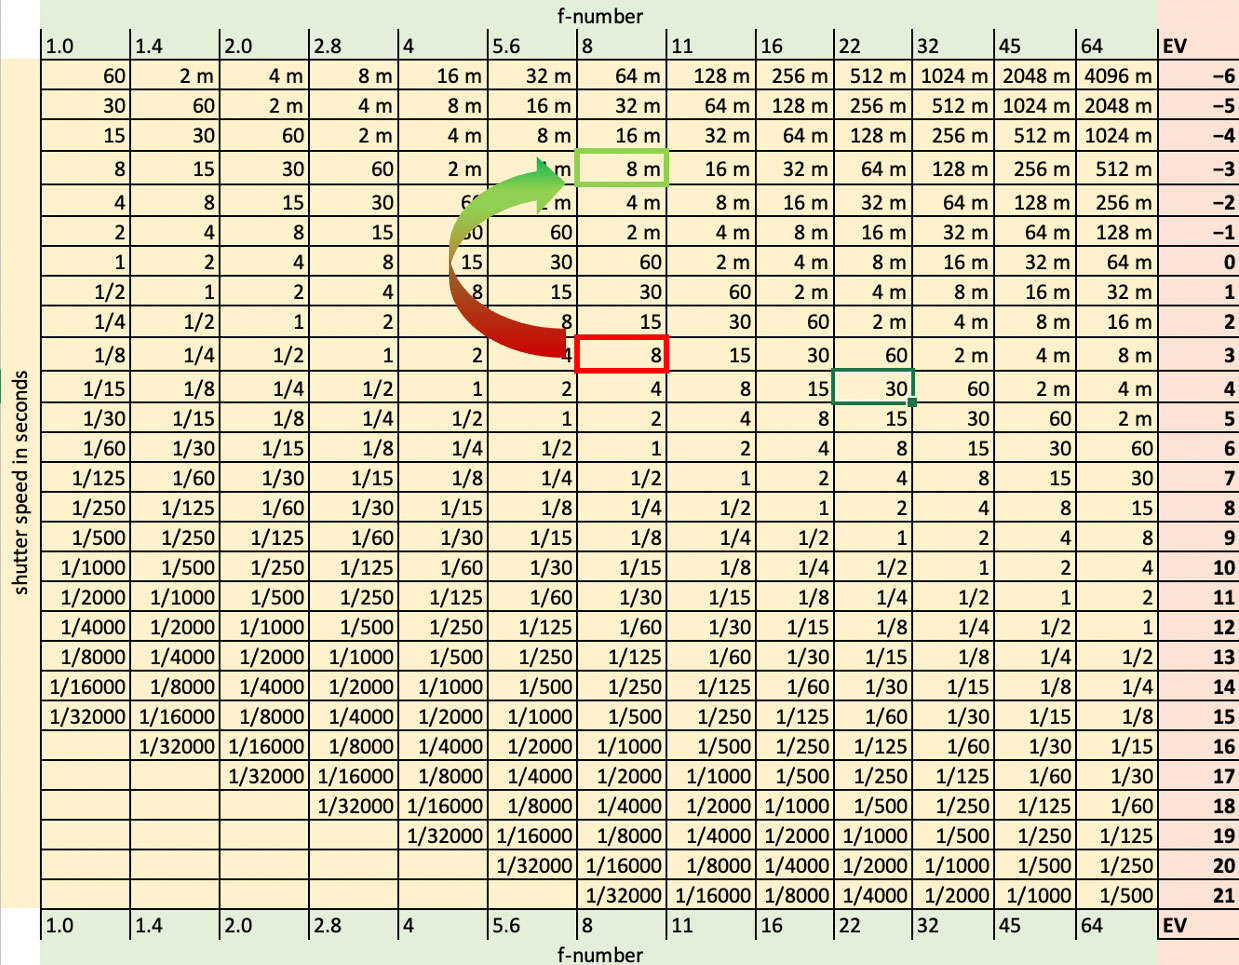
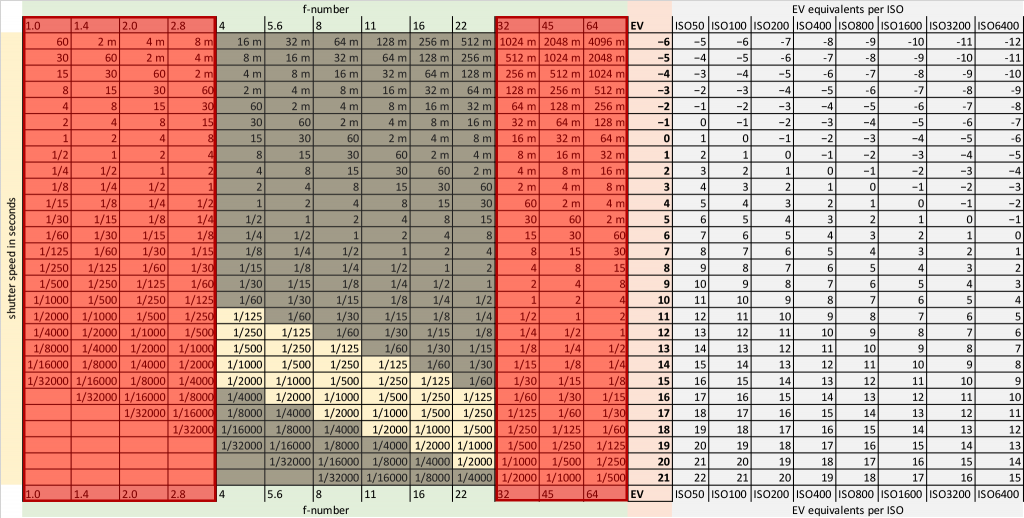
How to use a table like this? Firstly, this table only encompasses full stops (aperture, shutter and sensitivity), but if you have enough space, nothing hinders you from building a more detailed table.
Step one, find an aperture.
Say you’re working with an aperture of f/4, so you start by finding ‘4’ in the cells shaded light green. Found it? Good.
Step two, find a shutter speed.
Assume you’re shooting at 1/30s, so you start by going down (or up) the column where you found your f/4. Once you’ve found the 1/30 cell in the f/4 column, you’re half way there.
Step three, find your EV.
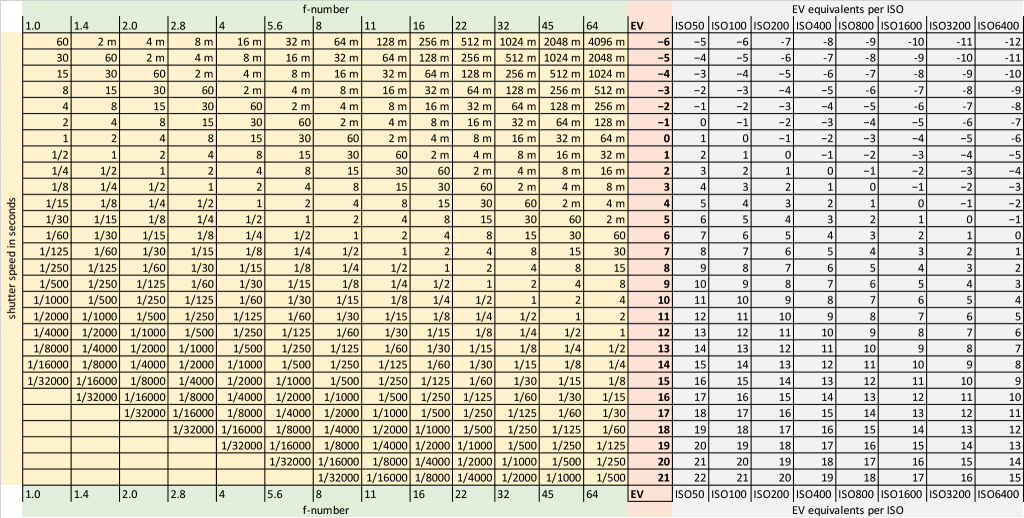
Imagine you’re shooting at ISO400. Starting from the cell you found, you go straight along the same line to the right. First you will encounter a pink-shaded column. Here you find the number ‘9’. Forget it for now. Continue into the grey-shaded columns – here in the fourth column (headlined ISO400), you find the value ‘7’. Voilá, this is your ISO-aware Exposure value.
Now you may be thinking “Okay, cool. But what’s in it for me?”
Several things
Using EV tables
Firstly, assuming you’re shooting film (where changing sensitivity is not trivial) or simply like a specific sensitivity, the table helps you find alternative Aperture-Shutter speed combinations.
Earlier, in step 2 where you had found your combination of aperture (f/4) and shutter speed (1/30s) (Cell with red text in picture above), the entire line (here shaded darker) represents all the combinations of aperture and shutter speed leading to equal exposures.
This means, that f/4 and 1/30s results in the same exposure as f/5.6 and 1/15s or f/2 and 1/125 or any other combination along that line (as long as it is supported by your camera and lens). If your camera body supports some form of exposure automation, it will be using a similar table to determine exposure:
• If your camera is in shutter priority (and you’ve set it to e.g. 1/125) it will seek an aperture value that satisfies the lighting conditions (in this case f/2);
• if it’s in aperture priority and you want to use your fast fifty wide open (f/1.4) it will find a shutter speed give you a correct exposure (1/250s);
• if it offers ‘program’ automation it will either select one of the values along that darker shaded line of values (potentially based on what it knows about the lens), or will allow you to choose along the line.
Mind you, while the exposures will be equivalent, the pictures will not be identical as opening up the aperture (smaller f-numbers) leads to shallower depth-of field, and longer shutter speeds increase motion blur etc…
Secondly, it allows for you to visualise the effect of changing ISO (or installing a film with a different sensitivity).
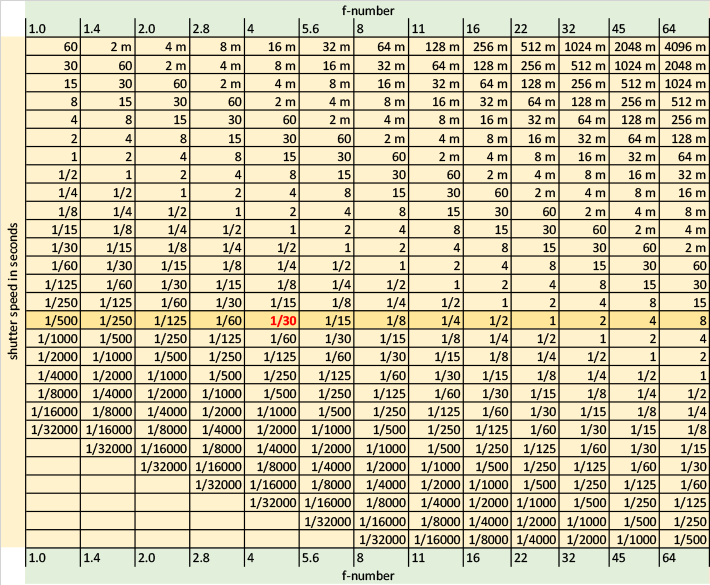
Let’s take an example. You’re at an evening baseball game. You’re there with your trusty dSLR and an f/4 tele-zoom. Given that you don’t have IBIS and that you might want to catch some action as well, you’d prefer shutter speeds of 1/125s, preferably faster. Your body does also not support shutter speeds above 1/2000s (not that this is relevant in this scenario). These limitations together mean, that you’re actually working with a relatively narrow subset of the entire EV table (see below).
The pitch is lit, but when you test the illumination at ISO100 (using your camera’s in-built metering), the fastest shutter speed the camera offers you is 1/30s, and that at f/4. This is a clearly unsuitable combination. Instead, you will need to crank up the sensitivity, but by how much? You know that you don’t want to go too far (noise), but are also worried you may not go far enough (camera shake, motion blur). Here, you can either experiment, or think of the EV table.
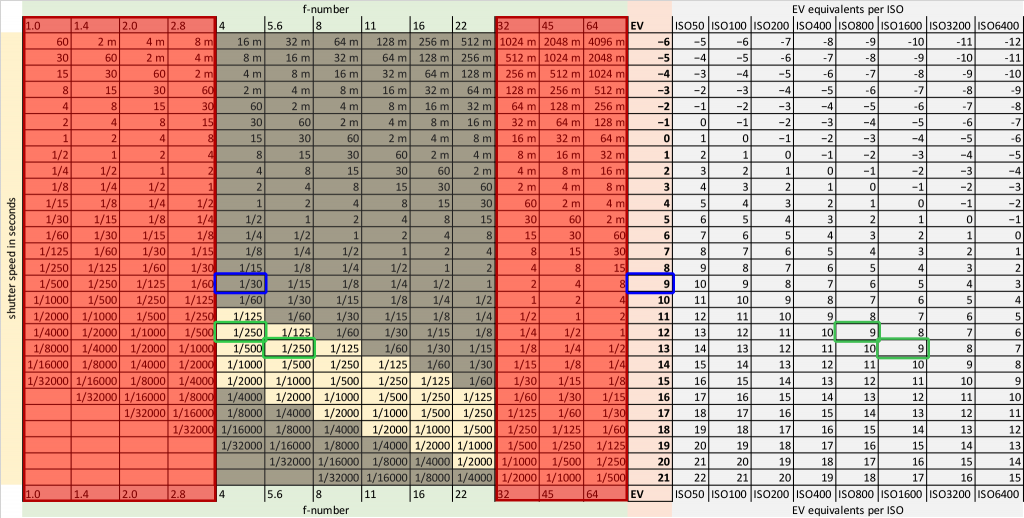
Obviously, the ideal solution would be to use the lens at the aperture offering maximal sharpness (f/8), at the highest shutter speed your camera allows (1/2000s), and get totally noise-free pictures, but that is not in the cards. Instead, you’ll try to make do with 1/250 and accept that you’ll have to use the lens wide open or at f/5.6 [the green rectangles]. Now, you will see that the green rectangles are 3 and 4 lines down from where you actually are. This means that to reach these green rectangles, you will have to increase sensitivity by either 3 or 4 stops, which means going from ISO100 to ISO800 or ISO1600 (if your camera happens to be particularly good at dealing with noise, you might even go a bit further).
Other use cases
The internal (TTL) light metering systems of most cameras have their limits. For instance, the Canon 5D (classic) offered a metering range from 1 EV to 20 EV (and older camera metering systems tend to have a bit more constricting limits). While that range covers a wide range of use cases, it does not cover everything.
Especially, should you be aiming for long exposures using Neutral Density (ND) filters, it is possible that your camera will be unable to meter reliably with a strong ND filter mounted (and you’ll only find out once you’ve taken that ≈10 minute exposure). In such cases, an EV table can come in very handy.
1) Take a metering result without any filters. Say you’re photographing an autobahn snaking its way through some foothills at night, and your camera’s meter says 3 EV is what you have (e.g. 8 seconds at f/8 at ISO 100).
2) But you want a multi-minute exposure, so you dig out a 6-stop ND filter (which reduces available light to 1/64 of the original), and mount it on your lens. If you now take a metering reading your camera is likely to give you either an error or a result that you should not trust (because, at -3 EV, you’re outside of your camera’s metering range).
3) Dig out your EV table (or do the arithmetic in your head). Find your original metering result, then take 6 steps upwards to find your correct shutter speed (8 minutes).
4) If you’re on digital, jump to next, but if you’re doing this with film, remember to factor in reciprocity failure.
5) Mount your cable release (you don’t want to have to lean on the shutter button for 8 minutes), dig out your chronometer, start the exposure and settle in for a wait…