This is a short guide for those among us who like to browse garage sales, flea markets and similar venues in the hope of finding a good deal on a lens. This guide is not meant as a 100% fool- and devious seller -proof regimen for how to be absolutely certain that the lens your considering to buy is in perfect condition, rather as collection of tips which I’ve used to make sure I will not be royally screwed.
Please note, that this guide assumes that you will be able to touch the coveted article, and thus helps very little in situations where you need to buy a lens without seeing it (i.e. online). Please also note, that I’ve posted this guide in three levels:
- Level 1 assumes you are entirely unprepared for stumbling upon a lens,
- Level 2 assumes that you have some tools on you (a flashlight), and
- Level 3 assumes that you are rather well prepared.
While – obviously – you can reach a higher level of certainty at level three, each step you take to prepare also gives away that you’re a serious buyer (which the savvy seller will notice and hike up the price). So, as with everything in life, it’s a trade-off, which brings us to…
Level 0 – when to test and when not to test.
Let’s face it: We – even those of us who did not grow up watching Lovejoy – are browsing garage sales (and their likes) in the hope of striking gold. We want to get lucky. Due to the way in which these kinds of venues operate, getting lucky often depends on the seller not knowing what they’re selling.
No, we’re not talking about stumbling upon a Noct, a Noctilux os some chunk of optics devised by Carl Zeiss for the Nazi war effort. Get real. The chance of you stumbling onto something like that with the seller having no inkling of what they’re holding is about the same as getting struck by lightning twice. On the same day. And with only a funky hair-do to show for the ordeal(s).
What you might expect is a nice fast fifty, some LTM glass, or something which simply makes you curious enough to be willing to pay a few euros or bucks and take it home for an evening in your photo-frankensteininan lab. The point is, getting lucky or striking gold is all about the price being right: as low as possible.
The problem here is that every step you take to ensure that the lens is in Ordnung raises the risk of the seller becoming suspicious and – as a consequence – your deal souring. It would therefore make sense to entirely forgo all testing and let the dice roll (i.e. take your chances) whenever a) the seller is liable to see your interest; and b) the price being such that even if you were sold a piece of entirely seized up junk, you would not really mind.
So before going on and studying my recommended regimen, keep in mind to be selective regarding when to use it: Skip it whenever the deal is really tempting and you don’t want to risk the price rising; use it whenever the seller obviously knows what the thing might be worth and your main point is to not be sold an expensive dud.
If, on the other hand, you’re standing in a camera shop looking at a 400€/$ classic lens – by all means, go the whole way, and go an extra mile for good measure, because this lens you will most likely not be able to flip for a profit. On the contrary, it has happened to me twice, that when I stand in a camera shop scrutinising a legacy/classic lens, the salesman has volunteered some blemish and offered a discount (probably trying to pre-empt my wrath).
For me the threshold value is 100€: When a lens (or other gear) is more expensive then that, I ask to be let outside for half an hour (I may need to leave my ID as collateral). Of that time, I spend 10–15 minutes taking pictures and the rest sitting somewhere with my laptop pixel-peeping. If the camera shop does not accede to my request I leave and only come back for the trinkets.
Level 1 – no tools (but your hands)
There are a great number of things you can do to inspect a lens, even when you have only your hands to use, and once you build up a routine to do these, testing a lens will take merely 10 seconds.
a) check the aperture ring
In the most simple terms, this means that you rotate the aperture ring, feel the clicks, ascertain the evenness of the ring’s motion, and simultaneously check that the aperture blades move as they should. You will not be able to ascertain that the aperture (opening) at f/11 is exactly half the area of the opening at f/8, but just looking at how the aperture changes as you rotate the aperture ring will give you an inkling of whether something is wrong with the mechanism.
To be able to do this correctly, you need to know some things about the type (mount) of the lens. For instance, you need to understand that there are basically three types of lens aperture types (direct coupling, preset and auto), and that auto lenses may work so that the body pushes a pin to close down the aperture (e.g. m42) or so that the body releases a lever to close down the aperture (e.g. Konica AR, Nikon F, many others). Furthermore, there are lenses which are designed so that the aperture only works when the lens is mounted to a body or apapter (e.g. Canon FD)
My basic recommendation would nevertheless be: Be vary of lenses where the aperture mechanism has no effect on the actual diaphragm, unless you think that this might be how the lens is supposed to work when not attached to a body (or adapter).
If you want, you can have a look at more details in the article discussing control ring (esp. aperture ring) malfunctions.
b) Check the actual aperture (the blades).
There are a number of things to look out for:
• is there oil or grease on the aperture blades
• do the blades move sluggishly when you push/release the pin/lever the camera uses to close down the diaphragm. If yes, this may be a result of oily blades or a lame spring
• do the blades form a relatively regular pentagon/hexagon/heptagon/octagon/…?
Any five-bladed aperture is supposed to form a pretty regular pentagon, and six-bladed … well, you get the point, being that by inspecting the form the diaphragm’s aperture takes, you can be able to diagnose some issues with the diaphragm mechanism, such as stuck blades, broken pivot pins etc.
c) Check the focus ring.
Again, in the simplest terms, this means you grab the lens with two hands, your dominant (or more tactilely sensitive) hand on the focus ring, and the other on any non-rotating portion of the lens. Then you try to smoothly rotate the focus ring back and forth between infinity and MFD. In this, there are a few things to check for:
• Does the focusing ring rotate all the way to infinity (easy to check) and to MFD (lenses seldom tell their exact MFD, but you can be sure no shorter distance markings should remain unreachable).
• When you rotate the focus ring, can you see indications that the lens actually focuses? With some lenses this is obvious, as the entire objective extends when focusing toward MFD, but internally focusing (IF) and rear focusing (RF) lenses do not change their lens while focusing. But when you look inside the lens, (e.g. from the front), you should always see elements move (with ultra-wide angle lenses, this can be hard to detect). Because if you see nothing happening, your lens might be fundamentally broken (helicoid stripped of lacking the helicoid keys).
• Is the focusing ring’s movement unduly stiff, and does the movement get easier once you manage to cycle back and forth a few times? If so, you’re probably dealing with a lens which’s focusing helicoid is in need of re-lubrication. See more here
• If the lens has a rubber focusing ring, does the ring feel dry or brittle, or does it slip (vis-a-vis the lens barrel) if not gripped tightly? This issue is covered here, and can be more than merely an optical/usability issue.
• Does the focus ring’s movement feel uneven, or slip, or does it make a pronounced scratching sound? None of these are good symptoms, and their causes may vary widely. While some of those causes are more easily addressed then others, you should feel warned, that all is not as it should.
If the lens is a zoom lens, inspect the zoom ring similarly. Keep in mind that zoom lenses are (internally) significantly more complex and thus more difficult (=expensive) to repair. Also, as relatively few legacy zooms are considered especially valuable, a zoom lens which obviously needs repairing is seldom a wise investment.
d) Check mount, filter ring and general outward appearance.
Check the mount, to make sure that you are able to mount the lens. If you carry an adapter, great (but beware that this makes you look like you know what you’re doing). If not, inspect the mount for obvious bumps, damage and copious amounts of dirt.
Check the filter ring for dents (and in the case of plastic filter ring, for breaks and cracks). Remember that a dented filter ring may render the lens irreparable.
Check the externals for obvious signs of trauma (bumps, big scratches, anything which might indicate the lens has been dropped from a great height) and such amounts of dirt that you suspect the lens has not been taken even semi-decent care of.
e) Look through the lens
Finally, you can perform all the same tests mentioned in level 2, except using available light, but be warned: Firstly, available light is always different, and thus your impressions may be more a result of the available lighting than any quantifiable optical characteristic of the lens. Secondly, holding up a lens and just using the sun in the sky, or any point of artificial light is not as good at spotting the optical defects of a lens, because you have too much ambient ‘noise’ to deal with. But if you have not come prepared with a flashlight, you need to make do with what you’ve got, eh?
Level 2 – a flashlight
A flashlight is a wonderful tool for helping you assess in what repair the lenses and lens surfaces are (and, incidentally, what kinds of repairs they might need). Before we go any further, let me show you the type of flashlight I recommend you carry with you whenever you hope to encounter some optics to consider for purchase:
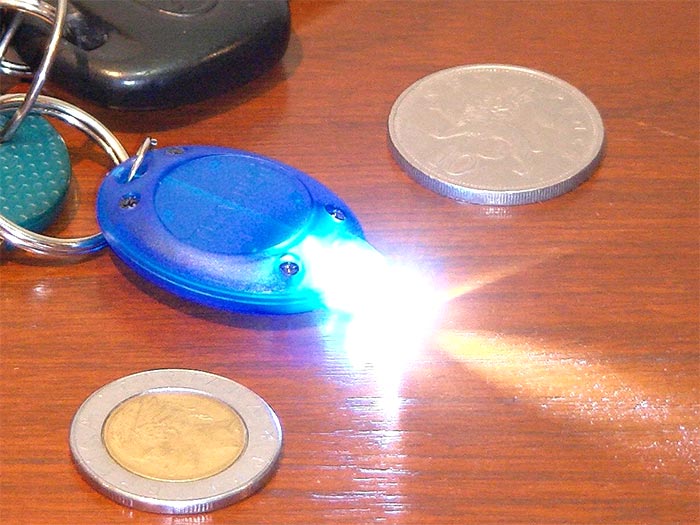
Image credits: Wtshymanski on Wikimedia commons [link]
This type of flashlight has many advantages. Firstly, and most importantly, there’s a high probability that you will have it with you. Secondly, it is perfectly understandable that you would carry such a device on your person, thus not raising suspicions that you’re a pro buyer. Thirdly, it is actually a decent flashlight for examining optics, exactly because it is not too strong a light source. What you want of a flashlight in these situations, is for it to illuminate the lens elements, and highlight the blemishes you cannot see unaided, not blind you.
[Actually, when inspecting lenses before&after cleaning i typically use a decades old mini-maglite (incandescent, not LED), specifically because (when indoors), the level of illumination that offers is more than sufficient. Moreover, I find its warmer tone to work nicely with optics. Obviously, one has to strike a balance between battery endurance and LED technology on the one hand and bulk, low endurance and a more soft light source on the other.]
Inspection procedure:
- Open the aperture to its maximum. If it is a zoom, rotate or push/pull the zoom ring until it is at the position where you feel the optics (when viewed from the front) constitute the widest ‘tunnel’ . This typically is the tele-end.
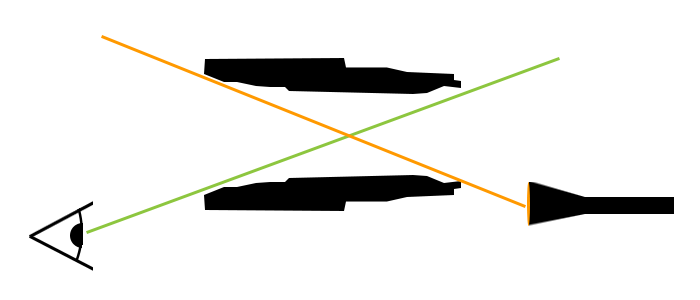
- Look through the lens from the front, and shine the flashlight in from the back, but not in a straight alignment. Instead, follow the illustration below. This, semi-oblique approach has two advantages: Firstly, you avoid blinding yourself, secondly, the blemishes, dirt and dust illuminated by the light actually show up a bit more when not viewed head-on.
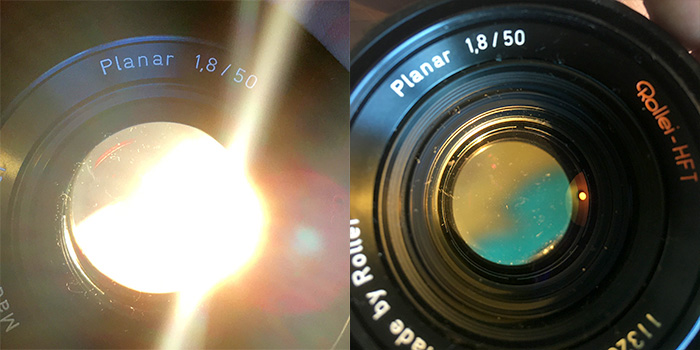
Right: Looking through lens obliquely (with lens offset in accordance with illustration above.
As obvious from the right-hand picture, the lens has some minor dust, but the optics are otherwise clean.
- While keeping your eye and the flashlight steady, move the lens so that the light will reach every extremity of the biggest lens element.
- Once finished, you may want to turn the lens around (front/back), to inspect the lens elements at the other end of the lens.
Typically, if you have the lens in your hand, a flashlight in the other, and 15-20 seconds, you will be able to make a thorough examination of the optical elements. This procedure, when done correctly, shows the existence of fungus, haze, or separation, highlights the nicks and scratches or excessive dust etc. In short, after a few short seconds, you will be a lot wiser.
Level 1 and 2 amount pretty much to the kind of due diligence companies do when thinking of acquiring another company. This will allow you to spot more than 9/10 issues with the lens you’re thinking of buying. Sadly, the only real guarantee comes from using the lens.
Level 3 – some testing
While levels 1 and 2 have allowed you to ascertain that the lens’ mechanics work and that there is no gunk on the lens elements, they do not allow you to ensure that there is not something fundamentally wrong with how the lens is put together. This you can only ascertain by shooting pictures and analysing them. Before we go on, let’s have a look at the things which might be wrong with an old lens (which we have not already covered above), so that you might understand what you need to test for:
Firstly, the lens may quite easily have been machined or assembled incorrectly at the factory. This is all the more likely as many legacy lenses were only ever used to shoot film (and only very few photographers ever did rigorous tests with big blow-ups). Herein, there are basically two types of problems: badly machined lens elements (which do not bend light as designed); and lens elements which were not assembled exactly as designed.
While incorrectly machined elements are – for all intents and purposes – irreparable, one can be consoled by that the errors cannot be utterly massive as no professional lens manufacturing operation has been totally devoid of quality control. None, ever, period 1.
Sadly, even so, that leads to that one is liable to encounter legacy lenses (samples) that simply do not offer the optical definition, that we have learned to expect in the digital age.
On the other hand, one might encounter lenses that simply are not entirely correctly assembled. Typically errors here might mean that a lens element’s retaining ring was not perfectly tightened, allowing a lens element to move; a lens element having been mounted askew, and the technician not noticing that the retaining ring could not be screwed in as it should; an aperture guidance ring not being perfectly aligned as designed (leading to that, e.g. f/8 is not exactly half the aperture (area) of f/5.6, ) etc.. Again, QC would have spotted any big issues, so we’re usually talking about spurious or mild issues, which are, in theory, repairable by an accomplished lens technician, but may be economically non-feasible.
Secondly, something may have happened to the lens after it left the factory. Most typically, these things happen when a lens is knocked around, but may also occur without any maltreatment having occurred. Lens elements are most typically held in place by threaded retaining rings, and while these threads are not known for loosening by themselves, even that can happen, especially if aided along by subjecting the lens to rapid temperature shifts; while high-quality manufacturing operations typically fastened screws using thread-lock or lacquer, even such screws may become dislodged. In short, lenses get worn when used.
Therefore, there are a number of defects – those related to the precise functioning of the aperture and those related to lens elements not being precisely where they are supposed to be – which would not show up in levels 1 and 2 of the testing regimen, which can only be ascertained by testing the lens on a camera. Herein, I recommend testing the lens on a digital camera, preferably on a full-frame mirrorless camera, because these offer two distinct advantages: Firstly, and most importantly, mirrorless cameras meter on sensor, thus giving you real insight on how the lens’ aperture functions. Secondly, the dumb adapters used on mirrorless are less liable to introduce adapter-based artefacts, than the finicky contraptions typical to dSLR adapters 2, or the adapters with optics one is liable to find in all those cases where lenses of shorter flange focal distances (e.g. Canon FD) are adapted to bodies with longer flange focal distances (e.g. Canon EF).
Lens element misplacements:
In short, there are three types of lens element misplacements:
a) a lens element is incorrectly angled, so that the lens element’s optical axis diverges from the optical axis of the entire lens.
b) a lens element has shifted sideways, so that while lens element’s optical axis is not on the optical axis of entire lens,
c) a lens element’s has shifted lengthwise so that while the lens element’s optical axis is perfectly aligned with the optical axis of the entire lens, the lens bends light in ways counter to the design.
Importantly, a, b and c are not mutually exclusive as a lens (even a lens element) may evidence all three forms of misplacements at the same time.
Element misplacements a and b correspond to ‘decentering‘, and whereas c is technically not related to centering, it is often lumped with the others for good measure. All three misplacements do have in common that they have similar origins (errors in assembly, trauma, etc.) and lead to a deterioration in a lens’ resolving power, and should therefore be of interest to the prospective buyer.
First though, search online for “test lens for decentering” and you’ll find a lot of fairly detailed approaches toward testing whether a lens is decentered, and to be honest, many of these tests have issues: some necessitate testing charts or other specialized stuff (e.g. here); some misunderstand (or insufficiently appreciate) the impact field curvature and shallow depths of field may have on testing (e.g. here), whereas some mainly consider type a and b misplacement, and even then fail to see the whole issue, mainly because of two factors:
– they typically assume a multi-element lens has only one misplaced element, which – while certainly possible – need not be the case
– they tend to focus on how a misplacement/decentering has an overwhelming impact on image quality in one spot (typically a mushy corner), while overlooking that any significant misplacement will invariably affect the entire field-of view of the lens. Granted, due to how lenses work, that affect will always be at its greatest in the corners, but it will also affect the center.
Aperture mechanisms which do not close down as they should
Besides problems which should have shown up earlier (oily, stuck or lame blades, non-regular shapes of the aperture), there is one more mechanical issue which could impair a lens’ functionality and value: whether the aperture closes down precisely. Technically an aperture of f/8 means that the aperture opening’s area should be exactly half that of the same lens’ f/5.6 aperture, thus letting exactly half the light through to be passed on to the film/sensor. Thus, on a mirrorless camera, you can shoot a series of test shots (keep subject and lighting identical) from maximum to minimum aperture and for every full stop the aperture is closed down, the shutter speed should double. There are two caveat’s: Firstly, at the wide-open -end of the aperture range, this need not hold true, as modern mirrorless cameras’ metering is more strongly influenced by vignetting than traditional SLRs’ metering systems. On the other hand, from 2 stops below maximum aperture, this rule should hold all the way to minimum aperture.
Secondly, many modern cameras (and even some older ones) are able to meter precisely and select in-between shutter speeds (while still reporting shutter speed to the nearest half- or third stop). Thus, a frame with a reported (in EXIF) shutter speed of 1/200s need not really have been precisely 1/200s, just closer to 1/200s than to the neighbouring values (1/160s and 1/250s). Therefore, what might look like a 1/3 stop deviation in recorded shutter speeds might actually be not an indication of an issue, but merely indicate that the camera is able to control the shutter with extreme precision. The table below shows two series of shutter speeds, one of which is as expected, and the other indicates that something is obstructing the movement of the aperture blades from f/8 onward.
| shutter speeds, OK lens | shutter speeds, troubled lens | |
|---|---|---|
| f/1.4 | 1/1000 | 1/1000 |
| f/2 | 1/640 | 1/640 |
| f/2.8 | 1/400 | 1/400 |
| f/4 | 1/200 | 1/200 |
| f/5.6 | 1/100 | 1/100 |
| f/8 | 1/50 | 1/50 |
| f/11 | 1/25 | 1/50 |
| f/16 | 1/13 | 1/50 |
How serious is such an issue? Obviously that depends on how big the issue is and on what type of camera you intend to use the lens on.
Firstly, if the lens supports metering wide open (i.e. ‘auto aperture’), then a lens which does not close down as it should after – say f/8 – will result in constant overexposures when used on the type of body it was designed for. For instance, if you intend to use an old m42 ‘auto’ lens on your Pentax Spotmatic (you have rediscovered film) or a Nikkor Ai lens on your Nikon higher-end dSLR, you would invariably have overexposed frames at the smaller apertures. If, on the other hand you intend to use the lens only on mirrorless (or on a dSLR in live-view), then this is not so much an issue, except…
Secondly, if the lens does not close down as it should, you will lose some of the benefits you might accrue by stopping down, such as bigger depth-of-field, longer shutter speeds (think: long exposures), as well as (to a point added sharpness. Granted, if the only symptom is that your f/22 in reality is closer to f/16, this might not be a showstopper, but if the lens in reality does not close down past f/5.6, then the functionality of the lens is severely constrained.
If you intend to never sell the lens (and thus do not care about its resale value), and if you feel unlikely that you would need that part of the lens’ aperture range where functionality is limited, the issue is negligible in the short term. In the longer term, it is possible the condition could get worse, so feel forewarned. If, on the other hand the aperture’s functionality is impaired over a wider spectrum, or you intend to sell the lens onward some day, the issue may be significant.
Other useful paraphernalia for level-3 testing:
Adapters
Even when you’re not equipped to take test shots (which really necessitates both digital camera and laptop), simply having a body or adapters with you (to make sure the mount is not damaged) may be of help. Also, if you’re not 100% proficient in identifying lens mounts, carrying adapters will help make certain that you don’t buy lenses you have no way of adapting.
Lens cleaning kit
Sometimes you may encounter lenses which look like they’ve been found in a shed, or have been recently dug out of a tomb. Make no mistake: lenses are not meant to coexist with dirt and sticky liquids.
I have encountered lenses so saturated with dirt that after half an hour with alcohol, lighter fluid, acetone and a goodly number of cotton pads, I’ve felt that I might just immerse the entire lens in a bucket of lighter fluid for a week – it can get that bad. Therefore, it might make sense to carry some simple lens cleaning kit (a small air blower, a lens pen, or simply some microfiber cloth) with you, just to be able to check whether the lens seems salvageable.
The right mindset
Remember, for the treasure hunt to be stimulating, you should not get lucky every time. Expect to fail, because to fail today is to be more motivated the next day.
Footnotes
- I strenuously maintain that ALL professional manufacturers of optical lenses have conducted rigorous and regimented quality control.
The real question is what kinds of tolerances have been used: Optics are all about tolerances. While you can describe a perfect curvature for a glass surface using mathematics, when that mathematically exact ideal is translated into a real life manufacturing operation, two nasty and messy aspects are encountered:
Firstly, the machining can never – not even today – exactly replicate that ideal shape. Therefore, one has to decide what level of precision (degree of deviation) is accepted. These are acceptable deviations are called tolerances. In tandem with tolerances, a very real question is how precisely a shape can be measured (especially considering that measuring needs to be non-destructive). Therefore the precision of measurement partly defines what kinds of tolerances are sensible.
Secondly, quality costs, in a very real sense. Less forgiving tolerances invariably lead to more rework (further grinding&polishing and remeasuring) and waste (as what has been ground away cannot be reapplied, thus meaning the entire lens element must be discarded). Thus there is a very real correlation (and causality) between tighter tolerances and cost of manufacturing acceptable, ‘passed’ items. ↩︎ - This does obviously not apply to Nikon F and Pentax K legacy lenses on respective full-frame dSLR’s. ↩︎