Pekka Buttler (Updated November 2025)
Introduction
A friend of the family (a senior archivist) once told me across the dinner table: “With any categorisation you invent, the most important part is not to take it too far. Firstly, you need ‘other’ – a folder for stuff which does not sensibly fit into any existing folder, yet is so spurious that if you’d make an own folder for these occurrences, those folders would be thin indeed. Secondly, your most important rule is that the folder “other” should be less than double the size of your thickest folder and thicker than the three of your thinnest folders together…”
Naturally he went on to say, that there were exceptions (such as the thin folders for land deeds, birth certificates etc. and other VIP), but that this was a rule he’d applied for decades.
At the time, I just nodded politely, wondering how this would apply to me. After all, I was only 16. But through the years, I’ve come to see his point.
This is the last installment in JAPB’s series of articles on lens defects common to legacy lenses. While the previous articles have dealt with oily aperture blades, control ring defects, defects and dirt on inner lens elements and their surfaces (fungus, haze, separation, dust & debris), and surface defects (incl. the outermost lens surfaces), there are a number of common ailments, that have fit into none of these logical categorisations. In other words, they are miscellaneous defects.
While this article does not precisely meet the standards set out by the senior librarian (i.e., it is not as long as the three shortest together), I hope it will nevertheless prove a worthwhile read. And, as always, if you feel I’ve left out something worthwhile, send me a note.
“Schneideritis”
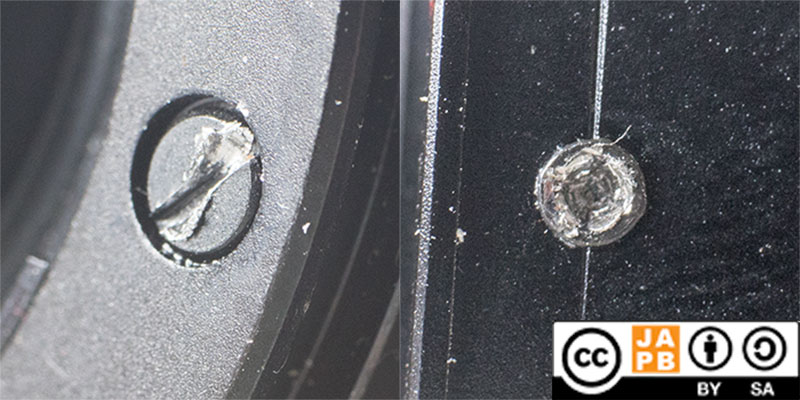
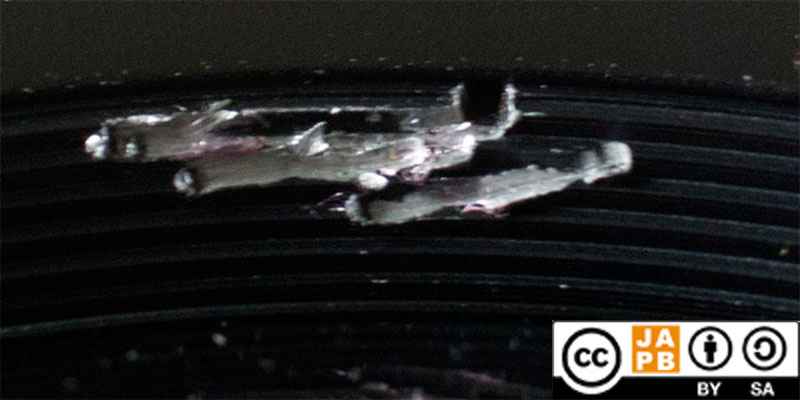
This is a defect that has no official name. Instead, it is commonly referred to as “Schneideritis” due to the defect originally being associated with early Schneider-Kreuznach lenses – Schneideritis, the Schneider illness.
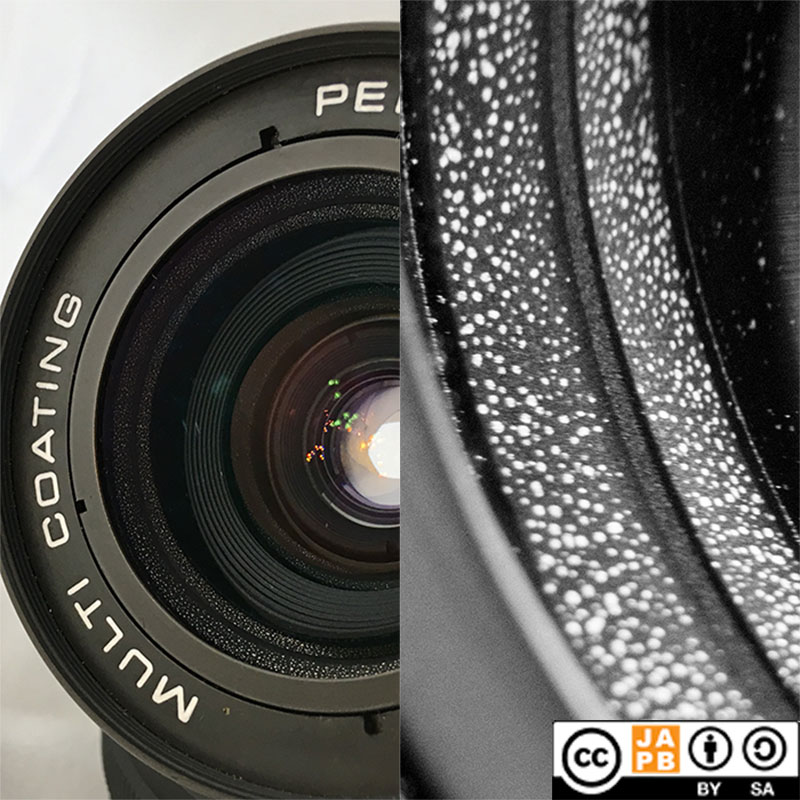
Right: Macro shot of Schneideritis. (Nikkor Ai 35/2.8 & 26 mm extension tubes).
Schneideritis is the flaking of the black paint or varnish on the sides/bezels of lens elements. The defect can be visually quite striking, and (once you know what you’re looking at) easy to diagnose. See image below.
Technically, the paint does not even necessarily “flake” – you might disassemble a lens clearly suffering from Schneideritis, only to find all lens bezels covered in an even black varnish – instead simply that those white spots are areas where the varnish has ‘bubbled off’, and are no longer in contact with the unpolished glass surface.
Schneideritis is a relatively benign condition. The lens bezels have practically no impact on the formation of the final image. Conceivably, the light spots may have a minuscule effect on flaring, but I’ve yet to have seen an account which would indicate the effect being visible even in lab conditions (not to speak of real-world-relevance).

That said, Schneideritis (especially if/when large areas of varnish become detached) may act as a precursor of a different problem, as that varnish may start to flake of and become deposited on the lens elements (thereby basically becoming “dust and debris“).
What to do when considering to pick up a lens which has Schneideritis? First, inspect whether you have simple Schneideritis, or Schneideritis with attendant debris between lens elements. Second, demand a discount. Third, go shoot nice pics with the lens.
But if you decide you want to have your Schneideritis fixed, your local lens mechanic will know how. It’s not an especially difficult task, but doing it properly takes some time (meaning, it may cost you more than is sensible to invest).
Decentering
Decentering (or de-centering) is a potentially severe defect, that is sadly relatively hard to ascertain. Decentering has no outward tell-tales, and cannot be tested without mounting the lens on camera, taking a number of test shots, and inspecting the results closely.
In short, decentering refers to a lens element being out of whack (shifted or tilted or both) so that the lens element’s optical axis is not aligned with the optical axis of the entire lens. The illustrations below hope to aid in visualisation.
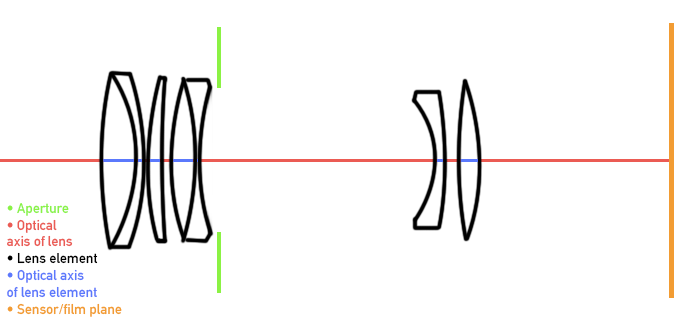
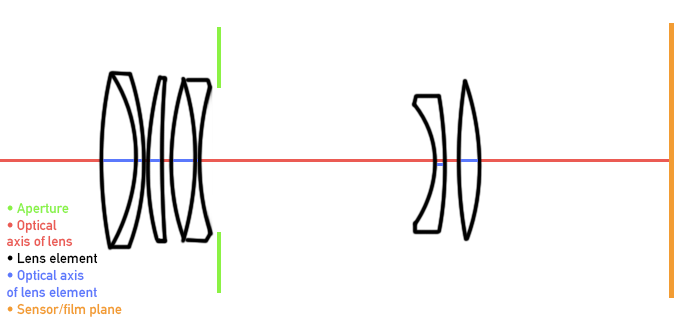
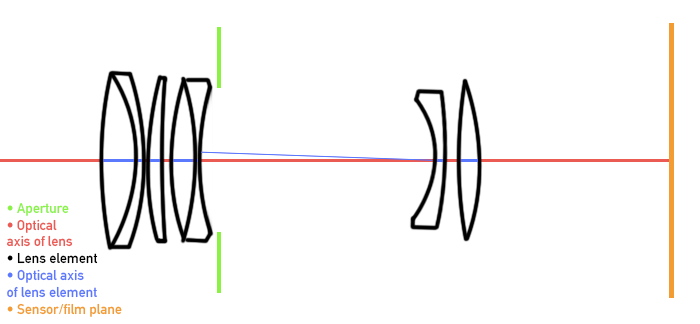
When a lens element is significantly decentered, the most obvious tell-tale is that the sharpness (or vignetting or distortion) of the image is different in different parts of the lens. So you may have a lens that draws sharp in the top left, but in the lower right, it’s mush. Look here for a relatively user-friendly way of diagnosing decentering, and here for a more exact approach to testing for decentering.
Problematically, a significantly decentered lens element – while it may most obvious in that one edge or corner is less harp – most probably means that the entire lens’ image is less sharp than it could (should?) be.
De-centering is not merely a potential problem affecting older lenses, but may also afflict new lenses as well as lenses that come straight from the manufacturing line. See more here. Even so, decentering is one of the many potential outcomes of a lens being subjected to one-too-many hard knocks.
Herein, it must be said, that lens elements are typically manufactured/machined with extremely tight tolerances, and – especially with classic primes (those that focus by moving the entire objective away from/toward the film/sensor plane) – do not have much room to move about even if subjected to excessive g’s. Even so, when discussing decentering with visible results, we’re in the realm where even a shift of 0,2 millimetres or a tilt of less than half a degree can have quite evident repercussions.
While decentering might be hard to ascertain before buying a lens, it is relatively simple to test once you have the lens in your possession: snapping the pictures needed takes less than 10 minutes, and a quick analysis takes about the same. Personally I feel that, if the lens has been bought from a seller who might take a badly decentered sample back, the decentering test should be done quickly after acquisition. Likewise, whenever you’ve recently repaired a lens (any procedure that involves removing lens elements), a basic decentering test is highly recommended.
What if your lens is severely decentered? Unless the decentering can be attributed to a lens ‘repair’ you’ve recently ‘accomplished’ (in which case you can try to do it again, except better), rectifying decentering is best left to a professional.
Broken (and lame) springs
Most lenses made after the 60’s utilise springs (especially thin, long coil springs) for one thing or another. Most typically, these springs are used to act as a counterweight for the aperture mechanism (i.e. when the camera allows, they pull the diaphragm to its preset value), but depending on the mount, springs may be used for other purposes as well.
Due to necessity, these springs are the most delicate parts of a typical lens, and while they were certainly most often designed with care, few designers of these legacy lenses imagined their lenses to still be used today. Moreover, many legacy lenses (especially those you find for a pittance at garage sales) have suffered neglect and sub-optimal conditions, which (depending on the materials originally used) may have contributed to making these springs brittle. Also, those adverse conditions, in combination with the kind of dirt and grime which tends to gather inside lenses if they are not cleaned, can contribute to making these springs lame, meaning that they’ve lost some of their pulling force.
All this contributes to that those mechanical parts of legacy lenses that depend on these springs, may work slowly and sluggishly (especially in cold weather) or (if the spring has broken) not at all. Therefore , if you find a Nikon F, Konica AR, Minolta SR, Canon FD (etc.) ‘auto’ lens which has its aperture stuck open, it can be a severe case of oily blades, or it can be that the spring that is supposed to pull the diaphragm closed has broken or detached from its mechanism. (Note! Some other mounts’ lenses work in the opposite direction, and use a spring to pull the aperture open. See more in this JAPB article). A broken aperture spring may therefore seriously impede your ability to use the lens.
If your lens behaves as if it might suffer from a broken (or detached) spring, this is rarely a problem for a professional lens mechanic (who probably has loads of springs scavenged from broken lenses). For the DIY-lens repairman, this can however be a serious issue, as – unless you can find a donor lens to liberate a suitable spring from – you’re lacking the requisite parts to facilitate a repair. In the case of a lame spring, detaching it (carefully) and cleaning the spring might be all that is needed to return its spring (pun intended).
[n.B! Typically the coil spring itself is not as much at risk of breaking (because the deformations required for the spring’s normal action are relatively limited), but the force acting on the hook at the end of the spring (and its relative rigidity) make the ends of springs the most likely point of breaking. Therefore, if you are opening up a lens, try to do so without having to detach the springs, and if you’re forced to detach the spring, try to do so with utmost care.]
Rattling and clunking
Rattling and clunking, meaning that you can hear the sound of stuff moving around when you shake a lens, is not necessarily a defect at all. Lenses are not solid bricks of glass, but are instead made up of an often great number of parts, some of which furthermore need to move with respect to each others in order to facilitate zooming, focusing and changing the lens’ aperture. In short, many lenses emit some sound when shaken, without it being any sort of indication of something being amiss.
But, and I admit that this might be hard to qualify or quantify, a trained ear quickly learns to hear a difference between a sound which is an indication of something being awry and a sound which is more or less par for the course. But before we go on, if you want to shake a lens and listen, you need to know how: gently. You’re not trying to break the lens, or make a lingering defect worse, you just want to listen.
- Hold the lens firmly in one hand (or two if it’s a big, fat tele). Remember, you’re not aiming to drop it.
- If it’s a zoom, grab the lens so that your grasp precludes any unintended zooming. If the lens has rear filters, remove them as well as the filter holder.
- Slowly tilt the lens back and forth (front element down, rear element down, repeat). Listen, but also feel for movement. Any movement you now feel (or hear) is a lens element or other part of the lens sliding back and forth inside the barrel (along the lens’ optical axis) as gravity pulls it this way and that.
- Some feeling (and sound) is to be expected, but any feel of a heavy object moving (and stopping) or sound of noticeable sliding or scraping is an indicator that something is not as it should.
- Next, hold the lens firmly with a slight down angle (not quite horizontal), and move it firmly (but not too forcibly) up and down. You do not need to wave it like a signal flag, just a couple of centimetres up and down will do to detect anything which is loose.
- This direction of movement will reveal motion which is perpendicular to the lens’ optical axis, so if a big lens element is loose, you will be able to feel (and hear) it.
Finally, the one type of sound you do not want to hear during any of this, is the type you normally associate with glass hitting anything. That is quite probably the sound of a lens element being loose, which in practice also almost certainly means some level of decentering.
And if after these tests you are convinced something is not as it should? Unless you feel curious about having a look inside the lens by yourself (Warning: only for the confident one’s), take the lens to a professional mechanic.
Incorrect infinity calibration
[Note! You might disagree with me, but I’ve placed a lens’ incorrect infinity calibration under ‘miscellaneous’, and not under control ring malfunction. My main rationale is that the prime reason for an incorrect calibration is not a malfunction of a control ring as such, but is most typically caused by a somewhat incorrect flange focal distance, or by that the legacy lens has been incorrectly calibrated at its last servicing (or that something has happened since, that has wrought havoc with the calibration.]
Incorrect infinity calibration is, in short, when a lens’ focusing ring’s distance scale is not accurate. This is most obvious when the focus ring is set to focus on infinity, but the lens actually focuses short of infinity or beyond infinity.
Legacy lenses tend to have hard stops at the infinity-end, which means that (compared to most AF era lenses) you cannot physically rotate the focus ring past the infinity-point. With manual focus lenses, it is relatively important, that that infinity hard-stop is calibrated to match the point at which the lens is focused at infinity. This is especially important for those who like astrophotography (and appreciate being able to blindly rotate the focusing ring to the infinity hard stop and be secure in the knowledge that the star-scape they want to capture will be in focus). It is similarly important for landscape photographers to be able to focus their lens at the horizon (and not have to face the fact that what their lens tells them is infinity focus is actually only 20 meters down the road).
In their modern use, with lens hackers adapting these lenses on their (mostly) mirrorless interchangeable lens cameras, the most typical reason for the focus calibration to be off is that adapter’s thickness is incorrect, resulting in that the combination of body and adapter mount the lens at an incorrect flange focal distance (when considering the flange focal distance of the lens mount in question). If you are new to these topics, you can read more here and here.
Say you have a lens that – when set to infinity – focuses somewhere else than infinity. How can you approach the issue? Firstly you need to ascertain if the problem lies with the lens, or with the adapter.
If you have more than one lens with that mount, and they all behave similarly (infinity is short of infinity or past infinity) when used on the same adapter, the problem is usually with the adapter. In this case you can (if the adapter was a brand product) contact the vendor and report the issue, and ask for a return. If, on the other hand, we’re talking about some cheap adapter, you could try simply buying another adapter. I, for instance, have two fairly cheap Konica AR->NEX adapters, and as the first did not quite reach infinity, I bought another one which does.
If, on the other hand, you can be quite certain that the issue is with a specific lens (e.g. because your other lenses work flawlessly, or you can ascertain that infinity calibration is off even with an original film body, then something might need to be done about the lens itself.
Again, depending on which way the calibration is off (and how you intend to use the lens), the severity of the issue ranges from merely annoying to being a showstopper. For instance if you intend to use it almost solely as a portrait lens, and it does not quite reach infinity (but reaches portrait distances comfortably), you might decide that the issue is not worth addressing. Similarly, if it’s a wide-angle lens you intend to use for mid-range group shots, and your m.o. in any case relies heavily on using focus magnification, you might decide to not have it fixed. But an astro- or landscape- or general purpose lens which reaches nowhere near infinity is basically useless until fixed. Also, should you decide to sell the lens before having it fixed, you definitely should mention the fact. Likewise, if you buy a lens which has focus calibration issues, you should negotiate a reasonable discount.
Again, this not being a lens repair blog, I will not offer any hand-on examples, but I will mention, that depending on the construction of the lens, correcting its focus calibration may be relatively easy, or very hard (basically it depends on how the focus ring is attached to the helicoid, how the infinity stop is implemented, and how much of the lens you will need to disassemble before gaining access.
Also, remember that (if you try to calibrate the lens yourself) infinity focus does not mean the treetops on the other side of meadow, or the high-rise tower you can see out of your living-room window, but the stars.
Stuck blades
In some (relatively rare) situations, one (or more) aperture blades stick to other aperture blades, leading to that the diaphragm when closing down does not close down as it should, typically leading to that
– the aperture is not as small as it should be, leading to that too much light reaches the film/sensor, resulting in an overexposure (when metering is based on wide-open measuring)
– the aperture’s form is not a regular pentagon/hexagon/heptagon/… etc, thus producing weird (and often disturbing) bokeh highlights.
One (or two) blades being stuck while other blades move as they should is relatively unusual, and can be caused by a number of factors, such as:
– an extremely localised presence of oil on the blades often combined with some dust or dirt.
– dust or debris that has stuck between aperture blades, thereby creating significant friction and hindering the smooth movement of blades
– a bent or dented aperture blade, often as the result of an inexpert repair job.
In the case of one (or two) stuck blades, the diagnosis is very much dependant on the root cause, and I have heard repairmen curse blades that have been bent due to amateurish repairs (that diagnosis is bleak). OTOH, I have managed to re-invigorate a diaphragm, which was previously hindered by what I can only assume were cotton fibres, probably left there from a q-tip used to clean the blades…
Stripped screws (and other indications of inexpert repair)
Face it, when you buy a legacy lens in 2020, it’s highly unlikely that you are the lens’ first owner. Even when buying a relatively expensive lens from a trusted source, you typically have no way to ascertain the lens’ previous owners, and whether these have always entrusted the lens to a competent repairman. The problem is, uncle Frank might have let his 13 year old grandson tinker with his lenses, or Mildred (who used to own that Leica, before it ended up in her estate and thence found its way to you) might have become stingy in her older days and stopped having her camera serviced professionally.
This lens came to me from an eBay seller who had not disclosed a) that the aperture mechanism worked only sporadically; nor b) that someone had tried repairing the lens without knowledge of that this manufacturer customarily used a system for cementing the screws which necessitate heating the screws (e.g. with soldering iron) before trying to loosen them.
The results may vary widely in detail, but each spelling out a gruesome tale: stripped screw heads, bent and broken pins, mangled threads, stripped retaining ring notches, faceplates anchored with glue (I kid you not). And these tales are gruesome not only as they spell stories of incompetence and disregard of fine optics, but can render a lens irreparable.
Again, this is not a lens repair blog, and even if you would not dream of ever hazarding a lens repair by yourself, I heartily recommend that you browse one or two lens repair oriented sites, to get a feel for how lenses work, and how a lens repair progresses. That way, you might get a glimpse of how even one stripped screw head might contrive to make a repair several orders of magnitude more difficult.
Therefore, whenever you’re handling a lens, thinking of buying it (and every time you receive a lens in the mail), you should promptly inspect screw heads and retaining rings for signs of “amateur was here”. Not only are such signs valuable information because they might indicate a botched repair job, they may also (as with the stripped screws above) act as a warning of a lens which’s repairability is seriously impaired.
Other, other defects?
What did we miss? Please tell us.
Read more:
Previous article: Part VII, Dust and debris
Sono appassionato dalla vecchie lenti, ho scoperto il tuo lavoro e ne sono rimasto affascinato, COMPLIMENTI !!! PASSIONE,AMORE e COMPENTENZA . Grazie
Claudio
Ciao Claudio.
Sono sempre nervoso nel rispondere ai messaggi in cui dipendo da Google Translate, ma voglio comunque ringraziarti per le tue gentili parole.
Cordiali saluti,
Pekka