Pekka Buttler, April–May 2020
This article is about adapting lenses. Adapting means utilising a lens on a body other than originally intended. In practice, this means hacking 1 a lens to fit a body with different lens mounts.
Before we go on, if you feel you would still like to learn more about lens mounts, have a look at this article. This article also does not address why one would want to adapt lenses, which will be addressed separately. Look here to figure out why we talk about ‘legacy’ lenses.
There are three elements to adapting lenses – adapters, bodies and lenses – and this article will inspect each in turn.
Note! This article does not pretend to be a buyer’s guide. As JAPB does not aim to push commerce to any affiliates we will not list specific products or issue recommendations. However, if you have a specific question, feel free to ask in the comments.
Table of contents
Adapters
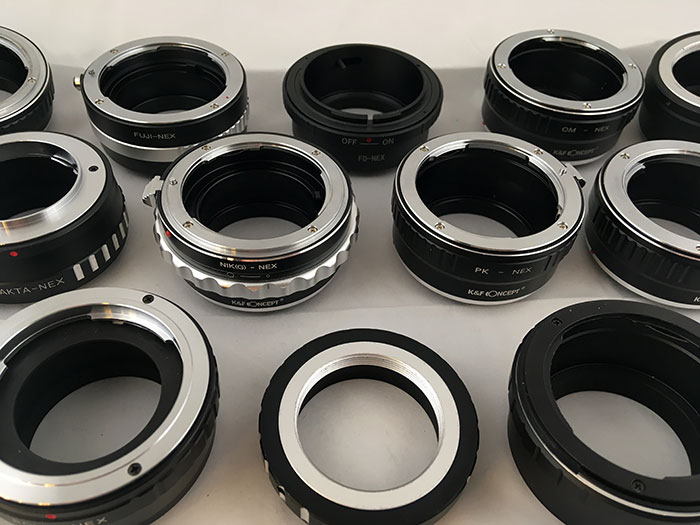
As (with rare exceptions2) a lens using one mount cannot physically be attached to a body using another lens mount, you will always be using an adapter. The main function of the adapter is to attach to the camera body on one hand, and to the lens on the other. Thus, for every combination of ‘body mount’ and ‘lens mount’ you will need either need a dedicated adapter or you can be strategic and combine adapters (such as Olympus OM to Canon FD and Canon FD to Fuji X). See more on being strategic with adapters here.
Adapters exist in order to facilitate mounting lenses to incompatible bodies. While this is the basic function of adapters, they may have added functionality to facilitate other functions as well. We will next have a look at the six types of adapters available: dumb adapters, adapters with settings, adapters with optics, smart adapters, tilt/shift-adapters, and helicoid adapters
Dumb adapters
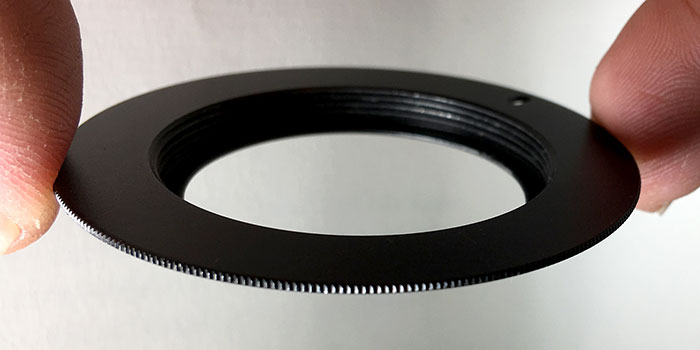
A “dumb adapter” is basically a ring or tube of metal or plastic with one mount on the front-end and another on the back-end. When the difference in flange focal distances is small, the dumb adapter typically takes the form of a simple ring, whereas when the difference is larger, it is a tube with one (physical) lens mount at both ends. Dumb adapters do not facilitate any communication (mechanical or electronic) between body and lens and contain no optics. Besides bridging the gap between two mounts, a dumb adapter should be able to facilitate secure attachment (the lens should not be able to drop off), make sure stray light does not enter the camera, and attach the lens at the correct distance from the sensor/film.
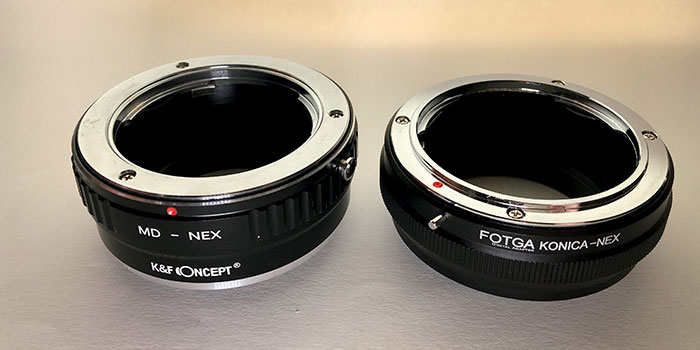
Note that the ‘thickness’ of the adapters reflect the different flange focal distances of their respective systems (Minolta SR and Konica AR)
Adapters always take some space. This means, that dumb adapters can be used to adapt lenses to bodies (while allowing the lens to focus as intended) only when the body’s flange focal distance + width of adapter = lens flange focal distance. This topic will be returned to later.
Take two examples, the first works flawlessly, the second does not:
• Canon EF body (FFD: 44 mm) + width of adapter (1,46 mm) = M42 lens (FFD: 45,46 mm)
• Nikon F Body (FFD: 46,5 mm) + width of adapter (1,05mm) > M42 lens (FFD: 45,46 mm)
In essence, the longer the Flange focal distance of a camera body, the smaller the set of lenses you can adapt using dumb adapters (while allowing infinity focus). This makes mirrorless interchangeable lens cameras very interesting, as these typically have very short flange focal distances, thereby allowing a wide range of lenses to be successfully adapted. Conversely, this also means that some marques of dSLR bodies facilitate adapting a wider range of lenses, while other marques are more limited in the range of lenses which can be adapted.
With the advent of mirrorless interchangeable lens cameras (subsequently “mILC’s), combined with the growing interest towards adapting legacy lenses, these adapters have become very popular. Also, given that they are inherently simple, they can be available very cheaply (ca. 30€/$ on Amazon, cheaper if sourced from China).
That said, a word of warning is in order. While a dumb adapter essentially is a very simple contraption, a lot can still go wrong. Have a look below, where some of the typical issues are elaborated. While these issues most typically apply to cheap dumb adapters, also more costly and elaborate adapters may suffer.
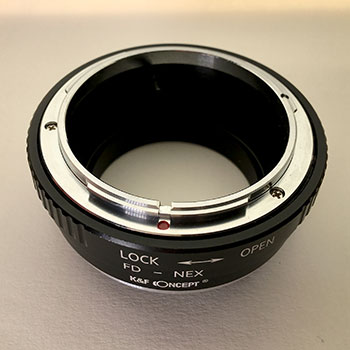
Adapters with setting rings:
There are several types of lenses, that (in their original environment) depend on the camera for some functionality. Most typically this is related to that the lens has no affordance for setting the aperture (e.g. Contarex, DKL, Mamiya Z, Minolta/Sony A, Topcon UV) or that the aperture won’t work without participation from the body (e.g. Canon FD, Canon FDn, Fujica X, some M42 lenses). More rare is, that the lens has no focusing ring, and the adapter needs to facilitate focusing (Contax G).
Such adapters with settings are inherently dumb adapters that offer some form of manipulating the lens, typically in the form of a ring which the user can manipulate.
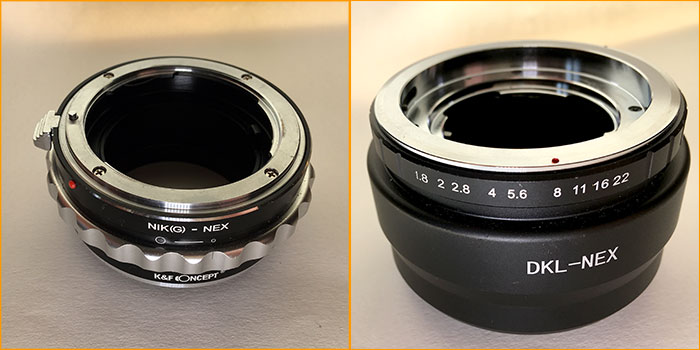
While the Deckel-adapter directly shows the aperture value (f-stop), The Nikon G adapter just has stops, meaning that its use is less precise.
Adapters with optics:
There are basically two different sorts of adapters with optics: Those that (besides physically allowing you to mount a lens on an incompatible body) contain optics in order to allow infinity focus, and those which are used to compensate for a smaller-than designed-for sensor.
Optics for achieving infinity focus:
These adapters are typical for situations in which you want to achieve infinity focus on a lens-body -combination, that due to incompatible Flange Focal Distances does not allow infinity focus. Some of the most typical examples for this are Canon FD (FFD: 42 mm) to Canon EF (FFD: 44 mm) adapters and M42 (FFD: 45,46 mm) to Nikon F (FFD: 46,5 mm) adapters.
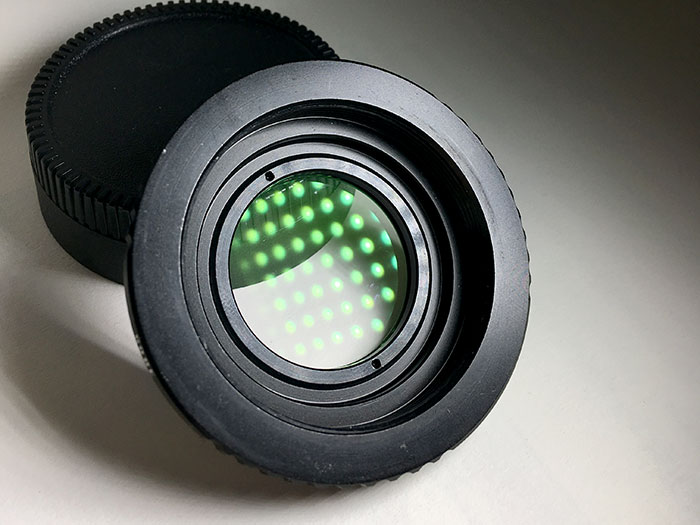
While allowing infinity focus (if correctly calibrated), these adapters suffer some downsides. Firstly, they work as mild teleconverters, leading to that lenses no longer project the intended field-of-view onto the sensor/film. Secondly, as the quality of the glass in these adapters typically is not on par with lens optics, they typically lead to a deterioration in image quality while also slightly decreasing transmission.
Due to these downsides, many photographers avoid these adapters whenever possible.
Optics to compensate for smaller sensor size (aka speedboosters)
With legacy lenses mostly being designed for Full-frame film size, and with many mILC’s being equipped with smaller sensors (APS-C, MFT, even smaller), one problem is that using legacy lenses on sub-full-frame mILC’s leads to a crop factor being applied. In effect, a 50 mm legacy lens projects the field-of-view equivalent to a 75-80 mm lens onto an APS-C sensor.
While sensor size is not an issue when using dedicated lenses (as these can be designed to compensate for the smaller sensor), it can be an issue when combining modern sub-full-frame sensors with legacy lenses, which typically leads to that the angle of-view on smaller sensors is always narrower than intended: Wide-angles effectively become normal lenses, normal lenses effectively become short tele lenses, and so on. This issue is exacerbated by the fact that high-quality, affordable wide-angle lenses are scarce in the world of legacy lenses.
In order to rectify this, adapters have been made which are intended to project the lens’ light onto the smaller sensors. These types of adapters are variously referred to as focal reducers, telecompressors or speedboosters.
An added advantage of using focal reducers (besides a 50 mm lens projecting the roughly the 50 mm field-of view onto the smaller sensor) is that these adapters also concentrate the same amount of light onto the smaller sensor, thus boosting the apparent amount of light available (hence ‘speedbooster’).
While the whole affair is complicated and further confused by less than knowledgeable ‘pundits’ (and maybe the topic of a future article), a full-frame 50mm f/1.2 lens used on an APS-C mILC with a speedbooster equates roughly to
- a native (APS-C native) 35 mm f/0.9 lens on an APS-C sensor
- a 50mm f/1.2 lens used on full frame.
While focal reducers clearly have a role, and bring many benefits, there are some downsides to mention as well. Firstly, effective focal reduction is optically more complicated, necessitating a number of lens elements, each of which are likely to lessen light transmission while also introducing reflections, aberrations and distortion. Also, because of the complexity inherent in focal reducers, they are by necessity relatively expensive (both compared to dumb adapters and adapters with optics to achieve infinity focus).
It is worth to note though, that photographers rarely need more than one or two strategically selected focal reducers, as focal reducers can be used in tandem with ‘dumb adapters’. Therefore a person wanting to use both Canon EF, Nikon F and M42 lenses on a Fuji APS-C mILC would buy a CanonEF to Fuji X focal reducer, and two dumb adapters (M42 to Canon EF, and Nikon F to Canon EF).
That said, there are some significant legacy lens mounts (e.g. Konica AR) that are currently not supported by any focal reducers.
While most focal reducers exist to facilitate adapting full-frame lenses on sub-full-frame bodies, some similar adapters for using medium format lenses on full-frame bodies exist as well.
Note! Focal reducers that adapt an electronic lens mount (such as the Canon EF mount) and an electronic camera mount (Canon R, Fuji X, MFT, Nikon Z, Sony FE etc.) also need to facilitate electronic communication between lens and body (see next heading).
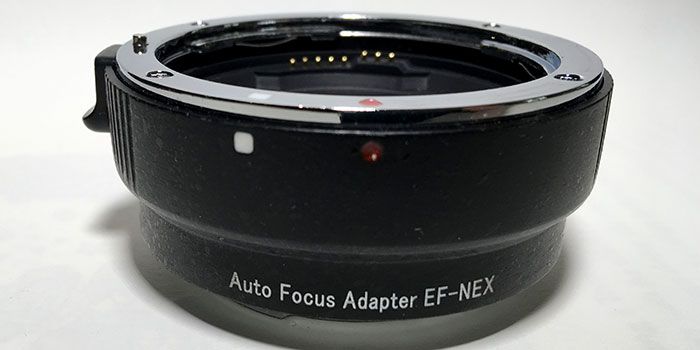
Smart adapters
Given that many modern digital cameras (both mILCs and many dSLRs) communicate with their lenses (aperture settings, autofocus, optical stabilization) only electronically (electronic lenses and electronic cameras), and given that many modern lenses have also long since stopped communicating with their respective bodies mechanically, there is room for ‘smart adapters’ that facilitate such communication.
The aim of such smart adapters (also referred to as AF adapters) is to allow you to mount any electronic lenses on your electronic cameras while retaining the lens’ full functionality. This smart adapters do, albeit with varying degrees of success.
In theory, the highest-reliability solutions are in-house smart adapters, such as Sony’s Sony A to Sony FE adapter; Nikon’s FTZ (F to Z) adapter or Canon’s EF to RF adapter, though in practice even these have limitations in their lens support, both considering the marque’s own lenses and especially in their support for third-party lenses. With smart adapters by third parties it is pretty much a hit-and-miss game (ask around before committing).
While smart adapters (without optics) do not as such have optical downsides (in essence, smart adapters are smart dumb adapters), the big question is how smart they manage to be. I recently encountered a photographer shooting an event with a costly cross-platform (Canon EF to Sony FE) smart adapter who cursed that AF would sporadically stop working, necessitating a hard reset (disconnect everything, remove battery, try again) leading to lost opportunities. While I do not want to mention the brand of smart adapter, it was not a cheap one.
Tilt/Shift -adapters
Given that there is significant room (difference in Flange Focal Distances) in all adapters adapting SLR/dSLR lenses to mILC bodies, this room can also be used to facilitate tilt/shift functionality. Thus, essentially, using a Canon FD to MFT tilt shift adapter, any Canon FD lens can be used in Tilt/shift mode. Naturally, such adapters are significantly more expensive than dumb adapters.
Again, as with focal reducers, if your main interest is legacy lenses, it pays to be strategic in selecting a suitable tilt/shift adapter. In practice, this means selecting an adapter with a lens mount with a short flange focal distance (such as Canon EF), and add a dumb adapter to facilitate serial adaptation to lenses with greater flange focal distances (such as Olympus OM or Nikon F lenses).
Incidentally, Tilt/shift adapters can also be used between medium format lenses and dSLR bodies. While the repertoire is significantly less numerous, some alternatives exist.
BTW, Lens tilt and lens shift are two very different features (with very different results). Moreover, legacy tilt/shift lenses are typically either shift (aka. perspective correction) lenses of tilt (sometimes referred to as Scheimpflug3) lenses
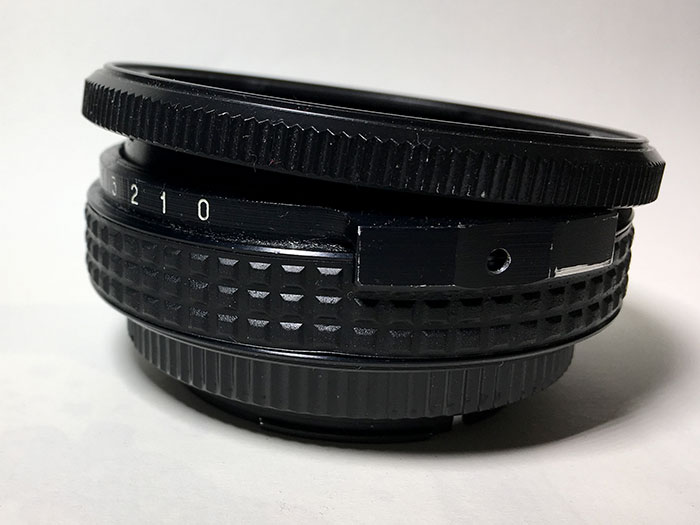
Helicoid adapters
Helicoid adapters or other forms of variable length adapters are most typically dumb adapters which allow their length to be varied – typically using a helicoid (you turn a ring, and the length of the adapter changes). Helicoid adapters can – depending on their range of movement – be useful for several relatively specialized cases:
- A helicoid adapter which in its shortest stage replicates the correct length (difference in Flange focal distances between body and length) can work as a regular dumb adapter at its shortest setting, while – when extended – become a short extension ring, thus facilitating macro photography or simply improving the close focusing capability of some lenses.
- A longer helicoid adapter becomes a variable-length extension ring, useful especially when the lens barrel’s range of movement is not flexible enough
- For those legacy lenses (and enlarger lenses), that lack a focusing mechanism of their own, a helicoid adapter can allow the use of such a lens on a camera.
Finally, there is a special type of helicoid adapter, which while fundamentally similar to a regular (type 1) helicoid adapter offers very specialised functionality: It may offer autofocus for fully manual lenses by shifting the lens further away from or closer to the sensor.
Autofocus adapters are a bit outside the scope of this article, but you can read more on the range of autofocus adapters in the JAPB article on autofocus.
Issues with adapters
When buying any adapters, there are a couple of things to look out for:
- Adapter length: Considering that many legacy lenses have a hard stop at infinity (you cannot focus past infinity), correct length of the adapter becomes crucial. If the adapter is too long, you will not be able to focus to infinity, and if it’s too short, you might easily focus past infinity. I’ve personally encountered adapters with both of these failings.
- Adapter reflections: Some adapters are made out of material which is too reflective (on the inside of the adapter barrel), hence creating image-degrading reflections.
- Insecure locking/too secure locking. Make sure the locking and release mechanism of the adapter works as it should. I’ve had two adapters that do not securely lock the lens in place, and one adapter which is too secure (once locked, it is hesitant to release the lens)
- Shoddy manufacturing. Especially when buying esoteric adapters or when going for the cheapest option, one might encounter symptoms of sub-par manufacturing. Among these, I’ve encountered adapters
- which’s lens mounts have dislodged (lack of thread lock compound on screws),
- that have cuttingly sharp angles (sloppy casting/milling),
- that allow significant play (either at the lens or body-end) and
- that are drenched in lubricant (especially adapters with moving parts).
- Correct rotation of mounting, which simply means that the lens mount’s up should align with the camera mount’s up. This should be the simplest of things, and it is thus amazing that I’ve encountered two adapters that nevertheless have failed here. Granted, a minor misalignment is not normally a show-stopper (as long as misalignment is not such that you have to turn the camera over to read the lens’ aperture settings), but when using tilt/shift lenses (or tilt/shift adapters), this is more than an annoyance. Some adapters (typically thread mount adapters) allow rotation to be adjusted.
The first two issues can be addressed by the DIY-person, and Phillip Reeve has a nice article about this 4. The other issues cannot not be addressed easily and are cause for a refund (especially as it may lead to you dropping/damaging a lens).
Bodies
Given that any body-adapter-lens -combination needs to be synergistic, many elements regarding bodies also affect adapters. In order to not duplicate, issues brought up under adapters will not be repeated.
Camera bodies have five significant traits which are relevant to adapting lenses. The camera’s Flange focal distance (FFD), the actual mount as well as the sensor size and sensor optics, and finally the user interface. Given that any readily available adapter already covers the first two (flange focal distance and mount mechanics), this section will first look at the sensor: size and optics, before going into the body’s user interface.
Sensor size
Unless the reader is totally new to digital imaging, the discussion of sensor size is no novelty. Ever since the first two generations of dSLR’s were offered mainly with sensors smaller than full-frame, photographers have had to deal with crop factors. While many still seem to miss the point (and I might go into that at some stage), there are still some elements to discussing sensor size which are relevant.
Today, there is such a wide repertoire of lenses optimised for sub-full-frame sensors, that discussions on full-frame equivalence have receded. For 99% of photographers, it makes little difference (other than price) whether they buy a full-frame camera and a normal zoom optimised for full-frame or and sub-full frame camera and a normal zoom optimised for that sensor size. Sure, there are differences, and for the connoisseur, some of those differences are all-important, but for the masses, the question of crop-factors and full-frame equivalent fields-of-view has fallen out of the limelight as camera companies have launched spates of lenses optimised for sub-full-frame sensor sizes. You simply bought the lens designed for your sensor size and that was it.
But, with the resurgent interest for legacy lenses, the issue has again come to the fore, because for a person interested in coupling legacy glass with their modern digital camera (mirrorless or mILC), there are no made-for-this-sensor-size legacy lenses available (unless that digital camera is full-frame). Users of APS-C and MFT digital cameras are again faced with the early dSLR -shooter’s dilemma: “Given my crop factor, which lens should I choose?”
Crop factor’s are back! And while some howl in anguish, others rub their palms with enthusiasm. Crop factors are a godsend to many types of photographers: Portrait artists (who can use the entire arsenal of legacy normal lenses and get a very nice short tele), wildlife photographers (who get extra reach for free) and bug-shooters (ditto). Furthermore, whenever you use a lens intended for a bigger format of sensor/film on a smaller sensor, you gain what is referred to as the “sweet spot -advantage”, as the border areas typically most bothered by issues such as distortions, blurriness and vignetting are discarded.
On the other hand landscape and architecture photographers curse the combination of sub-full-frame sensors and legacy glass. For them, there are only two ways around the issue: using focal reducers, or going full-frame or beyond…
Or beyond? Yes, digital imaging beyond Full-frame size is becoming increasingly interesting. While Medium format digital is still far from affordable (and far from actual medium format5), there are digital bodies with larger than full-frame sensors available which sell for far less than the top-of the line full-frame offerings of the “big three” (Canon, Nikon, Sony). While these digital medium format bodies still do not meet what used to be the definition of medium format (6 x 6 cm), the upside of that is, that many full-frame lenses actually manage to cover the entire sensor of digital medium format bodies. Suddenly what used to be a 50 mm normal lens, offers the field-of-view of a 40 mm lens (assuming it can cover the sensor). For more information, see link at the bottom.
The point is, that while dedicated modern gear shooters can always pick up a set of lenses to suit their sensor size, people who are interested in using legacy lenses still need to be aware of sensor size and what it will do to their field-of-view.
Sensor optics
Digital sensors are not film. Most importantly, while film was a thin film (yes, pun intended) coated with photoreactive particles, exposed to light directly, digital imaging sensors (the actual photosites gathering light) are typically covered by various layers of optics, some for protection, others for eliminating specific wavelengths or to facilitate anti-aliasing. These various layers together are generally referred to as the sensor’s filter stack, and that filter stack may create some problems.
The main issue is based on that the filter stack can (coarse simplification) be conceptualised as a bunch of layers on top of the actual sensor, and while the optical quality of those layers is tremendous, it nevertheless is a bunch of matter-to-matter interfaces, which – as you can probably guess – are liable to partially reflect light (and not let everything through) and stray different wavelengths of light differently.
Just as with matter-to-matter interfaces in general (whether it be a pane of window glass or the surface of a lake), the shallower the incidence angle of light, the more light is reflected away and the more unpredictable are the paths of rays which manage to pass through the glass.
With most adapted SLR lenses or native mILC lenses this is not that big an issue, because as there is a reasonable distance between the sensor and the rearmost lens element of a lens (after which all light rays travel straight), leading to that the angles of incidence onto the sensor stack remain relatively steep even in the corner areas of sensors. This is not so with all adapted rangefinder lenses. Rangefinder lenses naturally have a shorter flange focal distance, exacerbated by the fact that many (especially wide-angle) rangefinder lenses have rearmost elements which protrude far into the mount. This leads to a relatively very shallow incidence angle, and produces a multitude of issues with those sensors which have think filter stacks.
The picture below is taken with the Voigtländer 15 mm f/4.5 (M39-mount version) on a Sony a7R. Being a rangefinder lens (and an ultra-wide at that), its rearmost element is very close to the sensor, hence leading to that light-rays heading toward the sensor corners come at a very shallow angle. The left-hand side of the picture is uncorrected, while the right-hand side has been corrected for vignetting. The lens was set to f/16 to eliminate as much (natural) vignetting as possible, therefore most if not all of the vignetting you see in the (left-hand side) is introduced by the shallow angle of incidence leading to light being reflected by the sensor’s filter stack and not reaching the photosites. Moreover, you can see a clear red colour cast towards the corners, likewise introduced by the filter stack.

Left-hand side of image uncorrected for vignetting.
Admittedly, the picture offers a somewhat extreme example (combination of lens with the Sony a7R’s excessive filter stack, and the a7-series being full-frame), and while the vignetting can be corrected for with one click, addressing the colour cast demands significant work in post.
Luckily, the colour cast is not an issue when aiming for a B&W result, and is significantly alleviated on crop-sensor cameras, but results such as the one pictured must be seen as beyond annoyance. See the links 6 for a more in-depth study of the issue and some remedies.
This is deplorable, as mILC’s and rangefinder optics are in one sense a match made in heaven: rangefinder lenses are typically petite and compact, necessitating only a relatively thin adapter and would thus be a perfect match on the small, compact bodies of mILC’s. Sadly, considering the potential issues produced by thick filter stacks, the combination cannot be unquestioningly endorsed. Unless you are sure of what you are doing (or are willing to research the issue), tread carefully.
To be fair, this is not an issue afflicting solely rangefinder lenses, but also affects old-style SLR fish-eye lenses which used to protrude into the SLR mirror box.
If you’re interested in combining rangefinder lenses with MILCs, feel free to peruse the JAPB article on partial colour casts which goes into the phenomenon (as well as some of the physics behind it) in more detail.
User interface (of the camera body).
Having (in a previous life) been a usability specialist, I naturally agree that usability and ergonomics typically are a significantly undervalued aspect to photographic gear. That said, the general usability of camera bodies is – while important – not the topic of this section. Instead, this section will look at camera usability specifically with respect to using adapted legacy lenses.
Herein, there are two main aspects which deserve consideration: focusing and metering.
Focusing MF lenses (and focusing aids in the camera body)
Since about 1990, all mainstream consumer/prosumer SLR cameras have been aimed at autofocus, with manual focus capabilities being a mere shadow of an afterthought. Not surprisingly, this prioritisation carried over into dSLR’s. Thereby, those traditional focusing aids from the era of film (split images, microprisms) largely went away in the early nineties, and never came back. A normal, unmodified dSLR viewfinder offers no TTL manual focusing aids.
That said, several camera manufacturers offered some manual focusing aids. Several dSLR’s offer focus indicators. For instance Canon dSLR viewfinders use a green ball to indicate when the lens is in focus (at the position of the selected AF point), while Nikon has a similar implementation called the ‘digital rangefinder’ (that offers somewhat more detail). In some cases (e.g. Canon) this functionality necessitates that the camera can “talk” to the lens (necessitating an adapter with a chip), whereas in other cases (e.g. Nikon), the functionality works with all MF lenses, independent of adapter.
Further, most higher end SLR and dSLR cameras offered interchangeable focusing screens, with some manufacturers offering an alternative focusing screen for facilitating manual focus (e.g. a split screen).
Likewise, most recent dSLR’s offer live-view, meaning that the mirror is raised, shutter is opened and whatever the sensor records is shown on the dSLR’s rear display (after some ‘massaging’ done by the camera’s imaging chip). The important thing to understand is that dSLR’s normally use the mirror, prism and various sensors in that light path to facilitate both metering and autofocus (and the manual focusing aids mentioned above), and that when live-view is active, the raised mirror blocks those sensors.
On the other hand, when live-view is activated the dSLR now acts mostly as a mirrorless camera would (except a more bulky mirrorless camera).
Mirrorless cameras (and dSLR’s in live-view) basically show whatever the image sensor records on the rear screen (and – when available – on the body’s electronic viewfinder). Naturally there’s a huge difference in resolution between sensor and display/EVF, besides which the imaging chip again does a lot of work to massage the raw sensor feed into something which is shown on the display/EVF. While not giving the same viewing resolution/definition as an optical viewfinder would, this does enable some quite nifty tricks such as focus magnification and focus peaking. The big question is, whether the user interface and programming of the body allow for these features and how their implementation’s usability fares.
Focus magnification is simply that a part of the image is magnified and shown on the rear display/EVF, allowing the photographer to zoom in on a particular spot and ascertain that it is in focus. The part which is to be magnified can typically be selected and moved around, allowing the photographer to place the object which is to be focused on anywhere within the frame (and not only on a AF point), hence also avoiding the need for focus-and-recompose, and the inherent drawbacks therein 7. The problem with focus magnification is that it is an inherently slow process (especially compared to autofocus), and therefore – unless the object is static – does not guarantee that the final picture will be focused correctly.
Focus peaking, is simply a process wherein the imaging chip analyses the sensor’s feed, looks for areas with high pixel-to-pixel contrast, and highlights those areas on the display/EVF, thereby showing which areas are in focus. In theory focus peaking enables a photographer to quickly nail focus without having to use focus magnification (and the number of button-presses that entails), but in practice focus peaking is somewhat error prone, as the functioning of the process depends largely on it’s threshold values for what level of pixel-to-pixel contrast is deemed sufficient to deserve highlighting. If the threshold value is too low, it will be tempted to judge high-contrast subjects (e.g. eyes) to be in focus even when they are far from perfectly in focus, while when the threshold value is too high, it will not highlight even perfectly focused low-contrast subjects. While most camera menus allow this threshold to be adjusted, that adjustment is typically offered in two to four steps (and necessitates some navigating through menus), and whatever setting was suitable for the photographer’s previous subject, may be unsuitable for the next.
Therefore, whether the camera in question is a mILC or a dSLR in live view, the usability of these features depends largely on the quality of both the physical user interface (programmable, ergonomically placed buttons), as well as the general responsiveness of the camera software.
dSLR’s (assuming they have well-implemented live-view) are not inherently less user-friendly for using legacy manual focus lenses (assuming the combination of mounts and flange focal distance allow mounting), but as they lack an electronic viewfinder, their mirrorless-emulation mode (live-view) can only be used with the rear display.
Metering with MF lenses (and metering aids)
Metering, in general, refers to some form of computation of the available light, thereby allowing the camera to set a shutter speed (and aperture) that will lead to a correct exposure. While this sounds simple, it decidedly is not. The big question is where (in the frame) that metering is to be conducted, and how the different areas of the frame shall be balanced out. Many of the central advancements in camera technology during the 70’s, 80’s and 90’s were centred on developing metering further.
Optimally, metering should try to make sure that the picture’s main subject (assumedly, whatever is under the focus point) is not too light or too dark, while generally avoiding that any areas of the picture are pure white (blown out) or pure black.
Again, dSLR’s (while not in live-view) are somewhat problematic. This is largely based on that dSLR in their normal operation (looking through the optical viewfinder) conduct metering based on a metering sensor between mirror and prism, but also that especially more advanced metering assumes that the body knows something about the lens, such as its range of apertures as well as its focal length. When using legacy lenses, that information is typically not available. Moreover, some camera manufacturers have decided to cripple their budget dSLR’s so that they will not meter with legacy lenses at all.
Understand though, that most combinations of modern digital body and legacy glass does not allow the body to direct the lens’ aperture, this leads to two important ramifications: Firstly, you will either need to keep your lens in manual aperture mode (so that your manipulation of the aperture ring directly affects the diaphragm) or remember to activate manual mode just before taking the shot. Secondly, shooting modes that depend on the camera being able to set the lens aperture (shutter priority, program auto and full auto) are out of the question. What you can expect to be able to use are manual and (mostly) aperture priority.
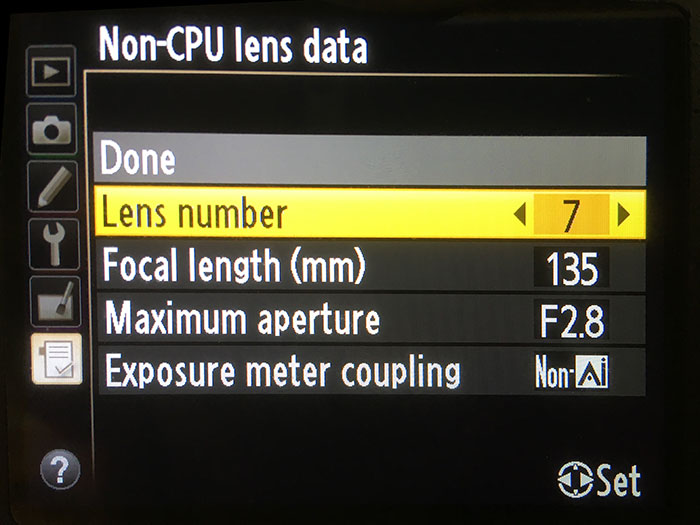
For those situations in which your body will deign to meter with legacy and adapted lenses, it helps if the camera’s user interface allows you to tell it something about the lens as this ensures the metering is correct. The picture below shows how this is implemented in the Nikon Df (other high-end Nikon bodies do almost the same).
Otherwise, most dSLR’s meter in accordance with the assumption of wide-open metering, which means that (if you’re in aperture priority) you should set the aperture-value on the camera to it’s maximum and manipulate the actual aperture directly on the lens (where you are de-facto already defining the amount of light reaching the metering sensor).
In live-view and with mILC’s (again) everything works differently. The normal metering is blocked by the raised mirror (dSLR’s), and metering is conducted by the imaging chip based on the light which de facto reaches the sensor. The photographer can now (using the exposure compensation dial) manipulate the overall exposure to their liking, or (when in manual mode) use whatever values they see fit. What you see is what you get, Right?
Wrong. The problem here is that whether you use the monitor or an electronic viewfinder, there is no way you will be adequately able to judge exposure just by looking at the preview. You will not be able to see parts of the image which are not only bright, but blown out, and you will not see which of the darker parts of the frame receive enough light to be raised out of the black hole. The problem is simply that the combination of the human eye and the relatively low quality and illumination of these displays do not allow one to discern that. The situation is exacerbated significantly if you are in bright sunlight or photographing nighttime vistas.
In order to assure that the metering result is to the photographer’s liking, some aids are needed, and luckily, these are increasingly available (but sadly, not yet universal). The most important aids are the exposure histogram and the zebra-function.
While most cameras have for some time allowed the photographer to have a look at a luminosity histogram (even RGB histograms) after the shot has been taken, this functionality can also be made available before the shot is being taken. Using the live histogram, the photographer can fine-tune the exposure before the shot is taken, thus also significantly aiding videography.
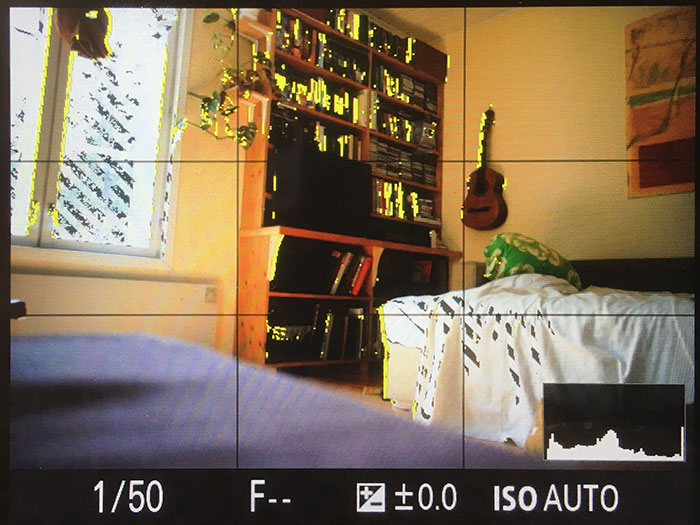
Likewise, the display/EVF can also highlight those areas of the picture which are blown out (or close to being blown-out). In the picture below, the camera has highlighted all areas with a 95% or higher luminosity by painting them with (moving, although the picture does not show that) zebra stripes.
Finally, some cameras support the use of external displays, that can be both of a bigger size and higher quality (colour, contrast and luminosity rendition) than the ones integral to the camera, thereby improving both the usefulness of an un-enhanced preview/live-view as well as making features such as focus peaking significantly more reliable. The downside to this is, that the kinds of usage situations in which you could sensible use a 4K display tethered to your camera are somewhat limited.
Lenses
While the whole discussion of adapting lenses is centred on lenses, lenses themselves are relatively straightforward. As the point of using legacy lenses often is to produce a retro/vintage- or otherwise special look, image quality issues such those stemming from a lack of modern coatings or resulting from other design priorities are not as such a problem. Instead, these are what gives the resulting image character.
Nevertheless, there are a number of lens traits, that are of more than fleeting significance, as well as one highly significant: The existence of manual controls on the lens; the lens’ designed flange focal distance, and the image circle the lens produces. While many of these elements have already been addressed (from one point of view) in the discussion regarding adapters, they deserve to be readdressed from a more lens-centred perspective.
Existence of manual controls:
Photographic lenses (lenses designed for use on cameras) always have two-three traits which need to be controllable: The lens’ focusing (the distance from the imaging plane at which the subject is in focus); the lens’ aperture; and the lens’ focal length (for zoom lenses). Furthermore, some specialised lenses may have further controls, such as apparatus’ for tilting, shifting, defocus control, field curvature etc.
For the purposes of adapting, it would be simplest, if the lens offers simple, tactile controls for manipulating these lens settings, such as through an aperture ring and a focusing ring. If these user interfaces are not available, they have to be supplied by the adapter (or channeled from the camera body through a smart adapter, but in those cases we are hardly discussing legacy lenses).
Thereby, there are several lens mounts, that need an adapter which offers some sort of controls. For example Contax G adapters need to be able to drive the lens’ slot-drive focus as the lenses have no focusing ring, and adapters for DKL, Mamiya Z, Topcon UV lenses (and several others) need to offer a method for controlling the lens’ aperture (as aperture control was traditionally offered on the body and not the lens).

This is not to say that all such lenses would be utterly useless without a dedicated adapter, but their (lacking) usability condemns their use to that of experimentation.
Photographic enlarger lenses are a different story. As they all lack a focusing ring (focusing was typically done using a bellows arrangement on the enlarger), their usability as adapted lenses rely on using either a bellows, a helicoid adapter or as reversed lenses (as macroscopic lenses). Luckily they typically do sport an aperture ring.
Projection lenses (both for cinema and slide projectors) are again a breed of their own. Typically their focusing is based on a set of threads on the outside of the lens assembly’s barrel (in some cases also simply friction), thereby necessitating an adapter with some form of focusing mechanism. More significantly, projection lenses categorically lack an aperture altogether (not just controls for the aperture). While they would therefore seem to be unsuitable for use in digital photography, they can be adapted to be used in relatively specialised situations, such as (relatively) extreme portraiture. For an example, see here.
While I have mentioned enlarger lenses and projection lenses to show how enterprising lens hackers can circumvent the lack of suitable manual controls, the cold fact remains that more everyday adapting of legacy lenses is served well by a lens that has all the requisite manual controls. If for no other reasons, then that this makes the adapter simpler, cheaper and the actuation of the controls more reliable.
Flange focal distance
Differing flange focal distances are a recurring topic in discussions regarding adapting legacy lenses, and for good reason. The short explanation is that every lens is designed for a specific flange focal distance (mounting distance from film/sensor), and when the lens is mounted at an incorrect distance, the focusing will be off. In practice, this might simply mean that whatever is mentioned on the focusing ring will be off by a bit, or if the difference between intended and actual flange focal distance is big, the lens will not be able to focus at anything.
Most legacy lenses focus by moving the entire block of lens elements (sometimes referred to as the ‘objective’) with respect to the film/sensor. For focusing on close subjects, the lens elements are moved farther from the film/sensor. Thus, when a lens is mounted a bit too far from the sensor, what happens is that the entire range of a lens’ ability to focus is shifted towards closer distances. Instead of being able to focus from, say 1 meter to infinity, you might end up with a lens being able to focus from 0,8 meters to 15 meters. You can liken this to what happens to a lens when you put an extension tube between lens and camera.
In some cases this hardly matters. Assume you’re a Nikon dSLR shooter (FFD 46,5 mm) and you want to use a classic M42 portrait lens (e.g. the Meyer Optik Orestor 135/2.8 with 15 blades [data sheet]; FFD 45,46 mm) and you use an adapter ring (thickness 1,3 mm), the result is that you mount a lens intended for 45,46 mm at de facto 47,8 mm flange focal distance. Your lens will lose its ability to focus beyond roughly 10-15 meters, but the portrait range remains perfectly usable.
With other lenses the same situation it is clearly worse, a normal (50 mm) lens would be constrained to a focus on subjects closer than 1,2 meters, while an ultra-wide (e.g. 20 mm) would barely be able to focus outside of the lens itself. The other way around (mounting the lens too close) can actually be worse, as the lens would be able to focus only on infinity (or beyond).
In general terms, longer focal length lenses (those with large lateral focus motion) are more forgiving, while wider lenses exacerbate the issue significantly.
But the simple rule of thumb is, that adapting a lens is always easier when the lens’ FFD is longer than that of the body, because the difference can always be covered by a dumb adapter, whereas when the lens’ FFD is shorter, the issue ranges from troublesome (no focusing on distant subjects), to vexing (no focusing without adapter using corrective optics), to catastrophic (when the difference in FFD becomes so big, it cannot practicably be corrected for).
While the implications of this are clear, let me spell it out: The longer a lens’ FFD, the more systems it can be adapted to and the shorter the body’s FFD, the more lenses it can utilise.
Image circle
Every photographic lens projects its light onto an area, the shape of which is circular (unless constrained by a bracket on the lens rear) and the size of which has to manage to cover the sensor or film.
Similarly, with most lenses, the amount (intensity) of the light naturally decreases as distance from the optical axis increases. A well-designed lens should have a relatively large, central area with even light intensity, after which the intensity decreases, either evenly or progressively. For a fairly typical arrangement, see illustration below.

It is important to understand that this illustration merely depicts one possible setup of one lens at a specific aperture. Some lenses have a fairly large inner image circle, whereas other lenses have a thicker doughnut, with a correspondingly smaller hole. Likewise, the relationship between the size of the entire image circle and the sensor size is merely selected to illustrate how visible vignetting typically comes to be.
Side note: if you’ve seen tests of lenses and how they (typically) vignette more when shot wide open, the reason for vignetting decreasing is that by closing down the aperture, the relative size of the doughnut hole becomes larges (albeit – in absolute terms – less bright). OTOH, with some lenses, stopping down does not carry a significant benefit on vignetting (something I might return to some day).
As you typically do not get to view your lens’ image circle (whatever light passes through the lens, you only see the light which falls on your sensor), you have to make some DYI-contraption to get a better picture of what actually happens. In the following case, I’ve used a fairly typical 35 mm lens, a milk carton (7×7 cm) and a semi-transparent sheet (torn from a plastic bag).
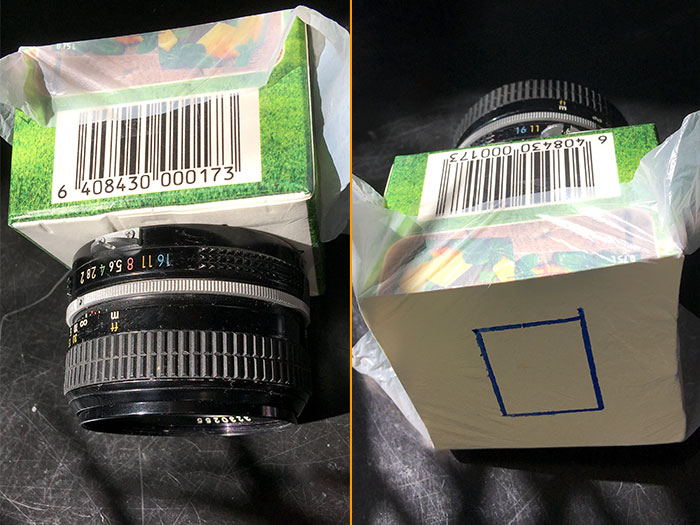
Just as with any camera obscura, the picture which materialises on the semi-transparent film is inverted, and relatively faint. Thus, such a contraption is best used in relative darkness, pointing towards something bright and contrasty. Incidentally, this also makes the effect is somewhat difficult to capture, nevertheless…
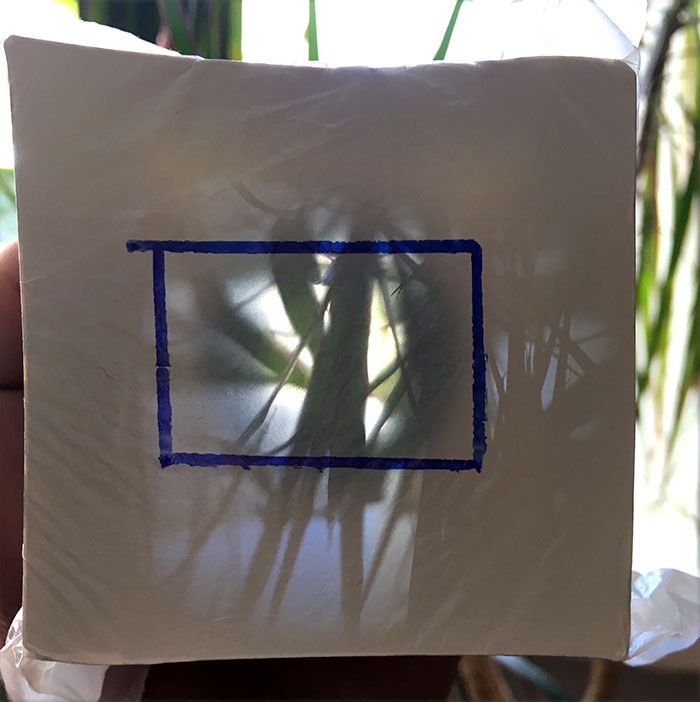
Notice how the image circle almost manages to cover the entire 7×7 cm ‘canvas’, and how (even though aperture wide open), light falloff within the 36×24 mm frame (marker lines) is minimal.
(Dark areas at left and top are due to window ledge and bookshelf)
Another thing which this demonstration shows, is that the field-of-view of a lens is actually a lot wider than you’d think. The 46º field-of-view typically associated with 50mm lenses is only the part of the lens’ field of view which hits the sensor.
But enough of the ‘practical optics’ demonstration. The point is, that in order for a lens to be usable adapted, the image circle has to be able to sufficiently cover the film/sensor. Typically, with full-frame lenses and full-frame, APS-C or smaller sensors, this is not an issue, but it may become an issue with larger formats (such as digital medium format), as any vignetting exhibited in a lens’ intended milieu is destined to become far worse when used on larger formats.
With full-frame lenses, there are thus two aspects to the question of image circles (and I repeat, even while designed for the same sensor/film size, different lenses produce different useable image circles). Firstly, whether a lens can be used ‘upscaled’ to digital medium format, and secondly, whether a lens offers enough leeway to be used on a tilt- or shift-adapter.
Regarding the first (35 mm lenses on medium format), there are no generally applicable rules. Unless you can find other users’ success stories online, you will have to test for yourself. The only generalisation that can be offered is, that having success is not improbable given the relatively small size difference between full frame an digital medium format.
Regarding a lens’ usability with a tilt/shift adapter, the basic rule is that the safest bet is to use a lens intended for a larger format. Thus, if your sensor is full-frame, the safest bet is to use a medium format lens with your T/S adapter, if you’re using an APS-C sensor, full-frame lenses are a safe bet, and so on. That said (and as shown by the practical demonstration above), there is some leeway for shifting even with same-format lenses.
Herein, it must be said, that if you intend to use a full-frame lens with a shift-adapter, the mere brightness of the image circle (the size of the doughnut-hole) is not the only pertinent consideration. As image quality generally tends do degrade when moving away from the lens’ optical axis, one might start to encounter other problems as well (especially lateral chromatic aberration, a.k.a. ‘colour fringing’ and increasing distortions).
Going in the other direction, one might feel tempted to explore adapting legacy lenses originally intended for smaller-than full-frame. The question of image circle is pertinent, should you desire to adapt them. To take just three examples: Olympus PEN F, Pentax 110 and C-mount lenses (technically, also crop factor (DX/DC/DiII etc. lenses are part of this same discussion, but as these lenses cannot be classed ‘legacy’, they will not be discussed separately.)
The Olympus PEN F interchangeable lens camera grew out of Olympus’ popular series of PEN compact cameras. While the PEN-cameras used regular 35 mm film (type 135), their speciality was that they always only used half the frame, cramming two frames (in portrait mode) into the space of one landscape-frame. PEN-F lenses are thus designed to cover a frame of 18 by 24 mm. With a generous flange focal distance of 28,95 mm, adapting should also therefore not be a problem. Given that the designed frame roughly equals that of APS-C and exceeds MFT comfortably, PEN F-lenses can obviously be used on such cameras, and whereas one can say with high confidence that digital medium format won’t fly, usability on full-frame is very much dependent on how much leeway the image circles of various PEN F lenses offer (and how much vignetting the photographer is willing to tolerate).
The Pentax 110 system was intended to be the smallest interchangeable lens system camera and Pentax produced a very nice set of diminutive lenses for the system. Furthermore, the system had a flange focal distance of 27 mm, thereby supporting adaptation on mirrorless cameras. More problematically, the Pentax 110 got its name from the 110-size film cartridges it used, and the film size of the 110-type cartridge is 17 mm wide by 13 mm tall. Compared to formats common today, one can thus assume adaptation to MFT (18 mm by 13,5 mm) is doable, whereas with larger formats (APS-C: 24×16 mm; full-frame: 36×24 mm), it very much depends on how much leeway there is in the image circle (as well as the usual caveat regarding vignetting).
The C-mount is a type of lens designed for the use in 16 mm motion picture cameras, which have been popular since their introduction almost 100 years ago. As a result, there are a lot of interesting C-mount lenses around. Furthermore, considering the growing interest in using mirrorless cameras as a videography-platform, matching mirrorless cameras with C-mount lenses seems like an obvious match. But there are two hitches: Firstly, with a flange focal distance of only 17,526 mm, the C-mount has a flange focal distance shorter than all (current, see below) mirrorless systems but that of the Nikon Z-mount (16 mm). Secondly, with the relatively diminutive size of 16-format film (10,26×7,49 mm for 16; 12,52×7,41 mm for Super 16), these lenses will surely not be able to cover full-frame or APS-C without significant vignetting, while their ability to cover MFT is less doubtful. Then again, assuming one manages to mount such a lens on a body, with the correct flange focal distance, nothing precludes cropping to the useable area during editing. Furthermore, with the generally narrow diameter of C-mount lenses, constructing an adapter which actually allows the lens to be mounted ‘to the rear of’ the body’s native flange is sometimes (i.e. with some lenses) possible.
Alternatively, there are three digital mirrorless mounts which – while no longer in production – also offer an avenue to approaching C-mount lenses:
• Samsung NX mini (FFD: 6,95 mm ; sensor size: 13,2×8,8 mm),
• Pentax Q (FFD: 9,2 mm; sensor size 6,17×4,55 mm or 7,44×5,58 mm), and
• Nikon 1 (FFD: 17 mm; sensor size 13,2×8,8 mm).
Final words
Hey, congratulations! You’ve reached (almost) the end.
As you can see, there are some intricacies involved with being a lens hacker, and if you’re like me, these intricacies will not deter you. Instead, you will feel the challenge is what makes lens hacking worthwhile.
To be honest, I am not a guru hacker. I’ve yet to print my own adapter and I have not yet bought a lathe in order to be able to make my own adapters, but maybe that will change…
In the meantime, if you have any comments, corrections or greetings, feel free to use the comments below.
Related articles on JAPB:
- An introduction to lens mounts
- Identifying a lens mount
- Legacy, classic and vintage lenses – what are those
Footnotes
- hacking, as in “using one’s technical knowledge to overcome a problem”, not to be confused with “cracking” or “security hacking”. See more here ↩︎
- One such exception are Mamiya NC/CS lenses, that could be used on some of the subsequent Mamiya Z/E bodies, but you had to mount them so that they were rotated 90 degrees (along the lens axis). See more in the JAPB article on all 7 Mamiya 35 mm lens mounts. ↩︎
- A Scheimpflug lens is a type of optical lens designed to maintain sharp focus across an image plane that is not parallel to the lens plane. This lens principle, known as the Scheimpflug principle, is commonly used in photography and optical devices to achieve extended depth of field and perspective correction. The principle is named after Theodor Scheimpflug, an Austrian military engineer who developed it in the early 20th century. Scheimpflug’s work was instrumental in advancing aerial photography and cartography by enabling clearer and more accurate images of tilted or irregular surfaces. ↩︎
- “Tuning adapters for infinity focus and reflections – how to” (on phillipreeve.net) ↩︎
- In the film era, medium format meant 120 -format roll film, and the camera would usually shoot in one of the following formats: 645, 6×6, 6×7, 6×8, 6×9 (as well as some panoramic formats). While the 6×6 may be the quintessential ‘medium format’ the actual size of the negative is not quite 6×6 centimetres, more like 54×54 millimetres or ≈2900 square millimetres.
Digital ‘medium format’ on the other hand is significantly smaller. Fuji’s GFX and Hasselblad’s XCD sensor size is 43,8×32,9 mm (≈1440 square millimetres), whereas Leica’s S system’s sensor is 45×30 mm (≈ 1350 square millimetres) ↩︎ - “Rangefinder wide angle lenses on a7 cameras: Problems and solutions” (on phillipreeve.net) ↩︎
- ↩︎
Piękny wykład. Zaczynam od nowa patrzeć na fotografię. Gratuluję !
If my translation software does your original text justice, then I thank you.