Pekka Buttler (Updated November 2025)
Introduction
Photographic lenses typically have at least two characteristics that the photographer should be able to modify, namely the size of the aperture, and the focusing. With Zoom lenses, a third characteristic is added, namely the focal length.
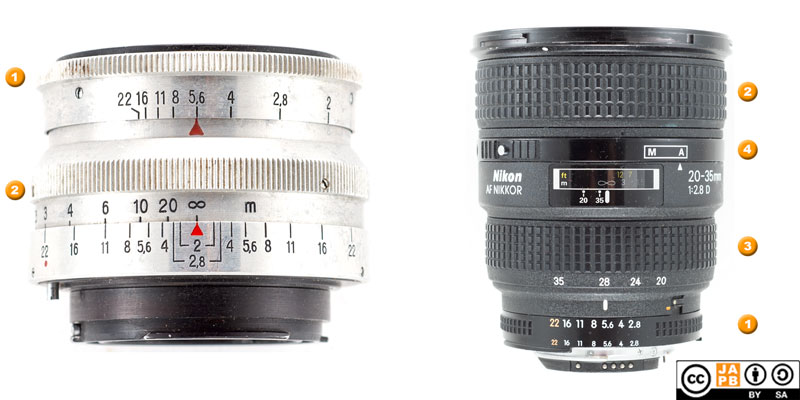
[1] Aperture ring
[2] Focus ring
[3] Zoom ring
[4] AF (dis)engage ring
Except in some of the oldest photographic lenses (and some historical oddities), the aperture and focusing are manipulated through twisting a ring (some old lenses used levers), while with zoom lenses, the third control may be based on a third ring, or a push-pull mechanism combined with the focus ring. This article is dedicated to the malfunctions of these controls – mostly in the form of excessive stiffness, but also other forms of malfunction. Each of the most common types of control surfaces will be addressed in turn.
Further, specialist lenses (adjustable soft focus lenses, shift and tilt-lenses, adjustable field curvature lenses) may have further controls, that – due to the relative scarcity of these lenses – this article will not cover. This article will also not cover the auto/manual focus switches available on many autofocus lenses or other ‘newfangled contraptions’ such as focus limiters or switches for Image stabilisation.
Aperture ring
Types of aperture rings
Depending on the era and type of a lens, the aperture ring can take on many forms – it can have clicks or be clickless, it can have evenly spaced f-stops, or not (for an example of the later, see above). Most importantly, depending on the type of lens, the aperture ring may be designed to work in one of four ways: direct coupling, preset, semi-automatic or automatic.
Direct coupling, manual aperture rings mean that the manipulation of the aperture ring directly affect the aperture diaphragm. Direct coupling aperture rings are typically clickless and a feature of cameras where the photographer does not view through-the-lens. For instance, a rangefinder or TLR user who would be framing their shot through a dedicated viewfinder, would therefore not mind a lens which when set to f/16 would be closed down all the way. The advent of SLR’s and through-the-lens composing necessitated another approach.
The first new approach were preset lenses, that typically have a two-part or double aperture ring. One part of the ring would be used to pre-set the intended aperture (to e.g. f/11), which would then limit the range of movement of the ring that operates the aperture to between fully open and the pre-set value. The photographer could then frame and focus in fully open, only to – without having to look – twist the aperture ring to the pre-set value before taking the shot. Preset lenses thus have one ring that is used to limit the movement of the aperture ring (called the preset ring), and that ring would typically have clicks, while the the aperture ring would operate like a direct coupling aperture ring (albeit in a range limited by the pre-set ring).
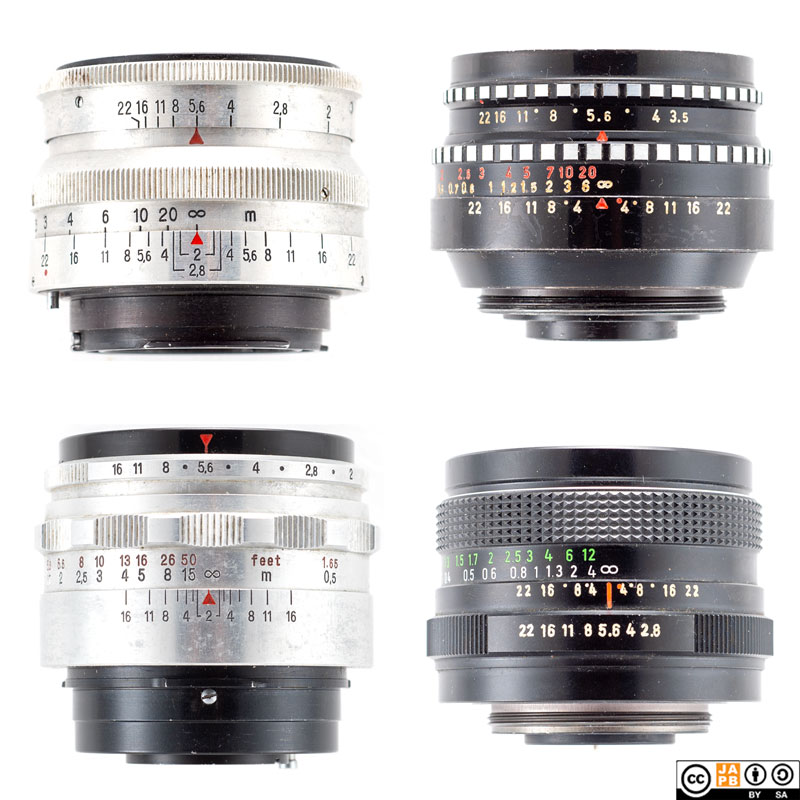
Top Right: Meyer-Optik Görlitz Lydith 30/3.5 (M42) (preset aperture) [data sheet]
Bottom Left: Carl Zeiss Jena Biotar 58/2 (Praktina) (semi-automatic) [data sheet]
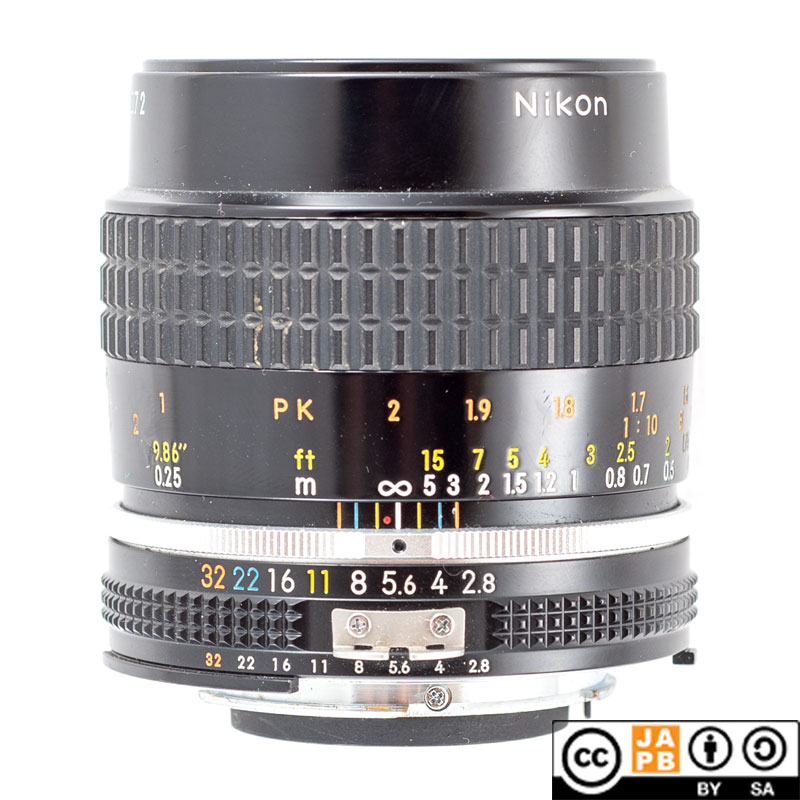
Right: Pentacon auto 29/2.8 (M42) (auto aperture) [data sheet]
Semi-automatic and Automatic aperture (auto) lenses were – in their day – a significant development. In automatic mode, the turning of the aperture ring would not at all affect the actual aperture (the diaphragm), but would instead set an aperture value (much like a preset lens), that the lens would automatically close down to just before the shot is taken. This automatic closing down would be based on a pin (e.g. M42, QBM) or lever (e.g. Nikon F, Minolta SR, Canon FD) in the lens mount, that the camera would operate. The key difference between Semi-automatic and (fully) automatic was in whether the lens would open back up again after having been stopped down. Fully automatic lenses were able to do this, whereas semi-automatic lenses typically had a swing or switch that would open the lens back up and prime the lens for being stopped down again.
Semi-automatic aperture lenses turned out to be a stopgap1. After a few years, fully automatic lenses supplanted semi-automatic lenses entirely. Hence, a majority of all legacy lenses out there are of the auto-aperture type.
Many auto aperture lenses also supported a fully manual mode, where the aperture diaphragm would always adjust as commanded by the aperture ring. To aid in selecting a suitable combination of shutter speed and aperture, these aperture rings typically had clicks – either limited to full-stops, half-stops or a combination of both.
How auto aperture lenses work their magic (and what can go wrong)
Warning: This is where it gets a bit nerdy. If you want, you can jump over it.
Irrespective of what type of aperture operation (direct, preset or auto), and almost without exception, the physical aperture ring is not hard-coupled to the diaphragm mechanism. Instead, the aperture ring would operate a prong or lever, that would push or pull on another lever coupled to the rim of the diaphragm mechanism. Partially this is in order to allow for the lens’ parts to move (e.g. for focusing), but there is another reason which we’ll get to in a moment. (Furthermore, these mechanisms are often designed with an eye to lessening the risk of oil entering the diaphragm mechanism.)
The other reason is specific to auto aperture lenses and is that while the aperture ring (used for setting the desired aperture) is part of the lens, and the aperture diaphragm or iris (used for constricting the light-path) is also part of the lens, the camera’ ability to command a stop-down of the lens relies on that command being able to be given through the lens mount. And because the lens mount needs to be replaceable, this typically means that the command path from aperture ring to diaphragm needs to take a detour via the lens mount. The image below tries to illustrate this.
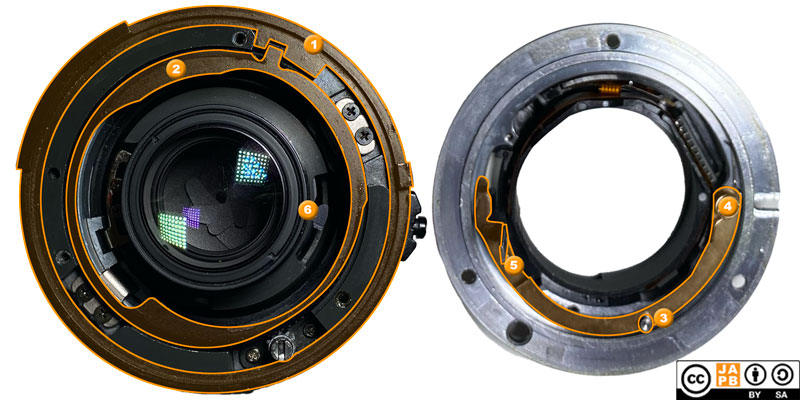
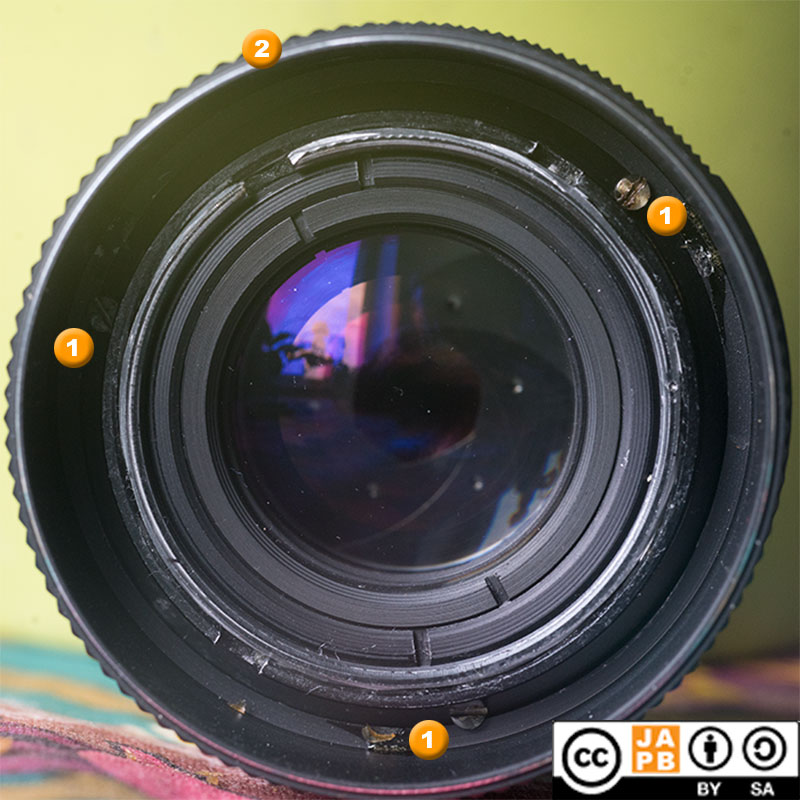
The aperture ring [1] on the outside of the lens can be rotated, but it interacts with an elaborately shaped inner ring [2] so when [1] moves, so does [2]. Rings [1] and [2] are only directly connected with each other.
However when ring [1] (and therefore also ring [2]) is turned, the inner ring [2] pushes on a pin [3] in the mount, that is connected to a sickle-shaped arm that pivots around point [4]. Hence, every time ring [2] presses the pin [3] towards the centre of the optical axis, a long prong [5] protruding from the sickle-shaped arm pushes at the diaphragm actuator lever [6].
Lever [4] has a spring that constantly tries to push [3] outward, while the aperture mechanism itself has a stronger spring that tries to pull the aperture closed. Further, to facilitate wide open composing and auto stop down, the arm on the mount [4] also has a lever protruding into the camera-side of the mount (this part [x] is not visible in the picture, but is located roughly behind [5]).
When the lens is not attached to a Nikon F camera, no forces impinge on [x]. Hence,
• when the aperture ring [1] is turned to open up the aperture, [2] turns, [3] is pushed upward, simultaneously levering [5] upward, which pushes on [6] and overpowers the spring in the diaphragm to open the iris.
• when the aperture ring [1] is turned to close down the aperture, [2] turns, [3] is released a step downward, simultaneously levering [5] downward, which releases [6] and the spring in the diaphragm can close the iris a step.
The way on in which Nikon F SLRs and dSLRs facilitate auto aperture is referred to as the “release to stop-down” method (see more here). In practice this means that the camera’s mount has a lever [z] that constantly pushes on [x] to keep the aperture open.
• Therefore, when A Nikon F lens is attached to a Nikon F camera the camera is pushing on [x], which in turn means that [5] is interacting with [6] to keep the aperture diaphragm open. When the aperture ring [1] is turned, also ring [2] is turned, but nothing else happens, because the force impacting [x] keeps [3] from touching [2].
• When the camera starts the picture-taking process, it relinquishes the pressure on [x].
• If we’re assuming that the camera is allowing the lens to control aperture (see more here) it will pull [z] all the way back and now the forces stored in the springs take over: lever [6] pushes on [5] which will move the entire sickle-arm system until [3] hits the inner aperture control ring [2]. At which level of closing down the aperture that happens depends on the setting on the aperture ring [1]. If the user has set the aperture at f/5.6, that is as far as the aperture closes.
• If however the camera’s has not allowed the aperture ring to control aperture, then the aperture ring of the Nikon F lens must be set to its smallest aperture (f/22 with this lens). Now when the camera wants the aperture to stop down to f/5.6, it does not pull [z] all the way back, instead it pulls [z] back only to the distance corresponding to f/5.6. Again the spring in the aperture mechanism pulls the diaphragm closed and the whole system of levers moves until [x] hits [z] at around f/5.6
Nerd-excursion over.
… and the reason I am showing you this example is so that you might start to appreciate some of the complexities (as well as some of the potential pitfalls) involved in aperture ring operation.
No matter whether you jumped here or went with me on the nerd-excursion, there are several things to consider:
Firstly, the actual aperture ring is typically just a flimsy metal (or even plastic ring), that (when things work as they should) should be very easy to turn. The aperture diaphragm mechanism in itself is also a very light, even delicate affair, and should likewise not offer much in the way of resistance. In fact, some lenses added contraptions for slowing or dampening the movement of the aperture ring. Also, the implementing of clicks on aperture rings typically either necessitated a metal spring or ball on a spring in conjunction with notches on the inside of the aperture ring, in order to make the aperture ring click at a specific aperture values. But as it sometimes happens, especially when lenses grow old, several things may start going wrong…
Typical aperture-ring related maladies
Oil on the aperture blades (see details here) can act in two ways. In its milder form, oily blades merely increase friction in the diaphragm mechanism. With preset- and direct coupling aperture lenses, a mild increase2 in friction is in no way an issue, but with auto lenses, you may have a problem (see more in the oily blades-article). In its more severe form, oil (typically combined with dust etc.) may increase the friction of manipulating the aperture diaphragm to the point where the diaphragm is effectively stuck, thereby also making the aperture ring (on direct coupling and preset lenses) stuck or heavy to operate. In such cases, using force to unstick the mechanism is dangerous. Force may lead to bending or breaking the coupling levers/pins (between ring and diaphragm mechanism) or that parts within the diaphragm mechanism are bent out of shape.
Oil on other parts of the aperture can also be a problem. If you noticed in the illustration of auto aperture above, the aperture mechanism (in its entirety) contains many pieces that need to move freely and quickly, pulled by only a small spring. Often such pieces move better when they’re dry, than if there is oil on them (even if oil is a lubricant, it can still increase drag).
Dust, dirt and lubricants may combine to form a sticky goo that hinders the free movement of all/any parts (aperture control ring or other parts of the aperture mechanism). As long as that sticky goo affects the actual aperture ring (and not the coupling) and does not threaten to stick totally, the problem is more of a nuisance than an actual threat to the lens. Then again, how can you be sure of where the goo is at its worst? Luckily, giving the lens a basic cleaning is not too big a deal.
An aperture control ring can also become obstructed. In this case there are typically one of four reasons:
• The diaphragm is utterly stuck, thereby hindering the aperture ring from moving (direct coupling and preset lenses);
• A grain of sand or a similar obstruction has managed to find its way below the aperture ring or deeper into the mechanism (all kinds of lenses); or
• the aperture ring is loose or worn, and one of the small balls used to facilitate ring clicks has managed to come far enough out of its cavity to jam the aperture ring.
• Finally, some lenses have a contraption for locking the aperture ring in its minimum (f/16; f/22; or F/32) position in order to facilitate various systems of auto exposure. These contraptions are also liable to break (but not relevant if the aperture ring is stuck in a position other than minimum aperture).
In none of these cases is the use of force an advisable course of action.
Importantly, all lenses are designed so that twisting the aperture ring should have an even resistance. An aperture ring that clearly offers varying resistance is a sure sign that something is out of kilter. Also, while moving the aperture ring should produce a mild sound of metal moving against metal (or plastic) and clicks (if the lens has clicks), there should be no sound of scraping or grinding.
Typically, the repairability of these issues is relatively high, as long as the aperture blades are not bent out of shape, or none of the internal parts has been broken or severely bent. Oil and gunk can be cleaned, and dirt can be removed. Metal parts usually do not wear too badly, but plastic parts may produce nasty surprises. Luckily, even the worst aperture-related issues can be relatively easily rectified using a suitable donor lens. Again, this is not a lens repair blog, so unless you’re an accomplished lens mechanic, find someone who is.
Focus ring
There are four predominant types of issues with focusing rings, three of which can be diagnosed without mounting the lens on a camera (too much resistance, slipping focusing rings, and uneven movement of focus ring) and one which requires testing to ascertain (incorrect infinity calibration). The first three will be treated in this article, and the final will be treated in the series’ last article.
What is ‘focusing’?
Focusing a lens depends on moving optics (closer/farther) relative to the sensor/film plane. Most legacy prime lenses do this by moving the entire assembly of lens elements (typically referred to as the objective) forward (away from the film/sensor plane) and backward, but especially newer3 lenses can employ internal focusing or rear-focusing mechanisms where only some of the lens elements are moved to achieve focus.
Those lenses that focus by moving all the lens elements together are referred to as ‘objective focusing’ lenses, whereas those lenses that focus based on moving only some lens elements are called ‘rear focusing’, ‘internally focusing’, ‘front-focusing’, or ‘element focusing’ lenses, partially as a reflection of where the elements that do the focusing are, but partially also just as a marketing term.
Furthermore, there are elaborate designs where the objective is subdivided into several parts, that (when focusing) move at different increments. These are generally referred to as ‘floating elements’ designs, but major manufacturers also use proprietary terms, such as Nikon’s “close-range correction” or CRC.
The magic helicoid
Irrespective of whether focusing is achieved using all or just some lens elements, lenses typically employ a helicoid to convert the rotational motion of a focus ring into forwards/backwards -motion of the lens elements.
The helicoid is a (typically) metal set of threaded barrels, with lengthwise grooves cut into them. Within those grooves, a helicoid ‘key’ converts the rotational motion into forwards/backwards motion. If you’re interested in the details, I recommend Richard Haw’s fantastic guide on working with helicoids.
What is relevant here, is that the helicoid is an absolutely crucial part of any lens’ focusing system, and also typically the root cause of many focus ring-related issues. If you’ve already read the article about oily blades, you know that there are parts of the lens where lubricants are not only unnecessary, but an actual bane. You might already have noted that haze typically is also due to evaporated/condensed lubricants. Lubricants are naughty, eh?
Problematically, the focusing helicoid utterly depends on lubrication in order to be able to function smoothly. The combined total metal-on-metal friction area of a typical standard lens’ helicoid may be on the order of 100 square centimeters (when taking into account the threading’s effect on friction area), and – by itself – that amount of precision machined friction area needs lubrication in order to be smoothly operable. Moreover, the helicoid keys (and grooves) need further lubrication so that the motion conversion (rotational to linear) is both smooth and happens without unnecessary wear.
Focus-related issues
Too much resistance/stuck focusing ring
And even though lens manufacturers have spent decades perfecting the designs of lenses and the compounds used for lubrication, these lubricants cannot remain stable indefinitely. Thermal stress, constant motion, and even gravity slowly moves lubricants away from where they should be, thereby not only (potentially) wreaking havoc elsewhere, but also lessening the amount of lubrication on the helicoid. Dust and other small particles enter the lens, get stuck in the lubricant and (minutely, but accumulatively) change its viscosity. Lastly, few lubricants remain chemically stable decade after decade. Instead they may start to dry out or crystallise and loose viscosity…
At the end of this exposure to dust, elements and the tooth of time, the lubricant is as thick-flowing as oatmeal, and stops lubricating as it should. As a result, you will have a focus ring that does not move as smoothly as it should, and might even be stuck solid.
In this respect, the lubricant has some cement-like properties (and I mean the cement used to make concrete, not lens glue/cement), in that once lubricating properties are lost, the longer a lens is left unused (the lubricant is left ‘unstirred’), the more solid the lubricant may go. You may pick up a lens that is almost stuck solid, you start (carefully) turning the focusing ring and with every turn it feels a bit lighter, until you’re happy with the lens and think you dodged the price of a CLA. Then you leave the lens unused for a couple of days/weeks, and when you pick it up again, the lens is again as stuck as it was when you bought it.
This is typical for legacy lenses you pick up from a garage sale or find in an attic. After the lubricant has already deteriorated, it has then been left unused for long.
The only real, sustainable solution for issues like these are that the lens is opened up, the helicoid disassembled (if you try this at home, you MUST read Richard Haw’s article I linked above), thoroughly cleaned and re-lubricated using a suitable lubricant (stability and viscosity).
N.B! I do not recommend using pure force to unstick a stuck focusing ring, mainly because the link between the focusing ring (the part which you use to operate focus) and the actual focusing mechanism (the helicoid, where the problem is most likely to be) is quite delicate in many lenses. Instead, the only sustainable solution is to tear open the lens (or have a more accomplished repairman do it), and have the helicoid cleaned and re-greased.
Focus ring slippage
In order for lenses to be easier to assemble and repair, the focus ring on the outside of the lens barrel is usually not physically a part of the helicoid mechanism. Instead, it may be attached to the outer barrel of the helicoid through set screws (a.k.a. grub screws) or using a combination of screws and friction.
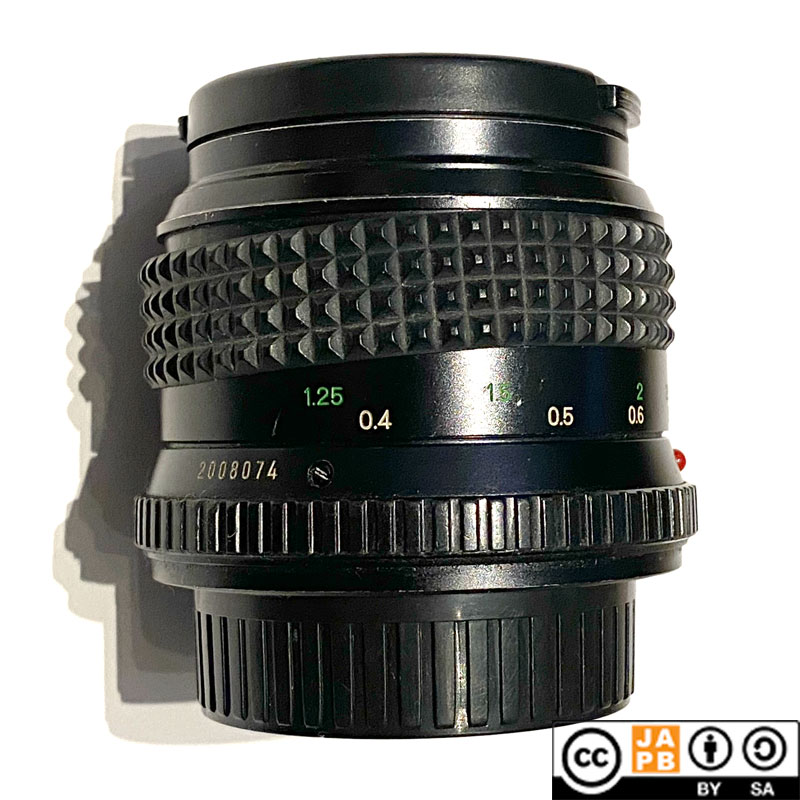
[1] shows a trio of screws, that press the focusing ring [2] onto the front of the main helicoid barrel. If these screws are even slightly loose, the focusing ring starts slipping.
The main issue though is, that such methods of linking the focus ring with the helicoid are liable to loosen over time (or when the lens has been knocked around), resulting in that the focus ring may start slipping or even loosing contact with the helicoid altogether. Incidentally, this is also why I definitely do not recommend the use of force to unjam a stuck helicoid: The coupling is liable to give, long before the helicoid becomes unstuck.
The above pictured method of linking focus ring to helicoid barrel is (IMNSHO) still preferable to the set/grub-screw approach. The problem with set/grub screws is that when they start to loosen, they start slipping – ever so slightly at first, but increasingly. Unless the issue is rectified quickly (basically through adjusting infinity focus and re-tightening the screws), the slipping set screws have a tendency to scar the inner barrel. After the barrel is sufficiently scarred, the set screws have nothing to hold on to, even when you try to tighten them.
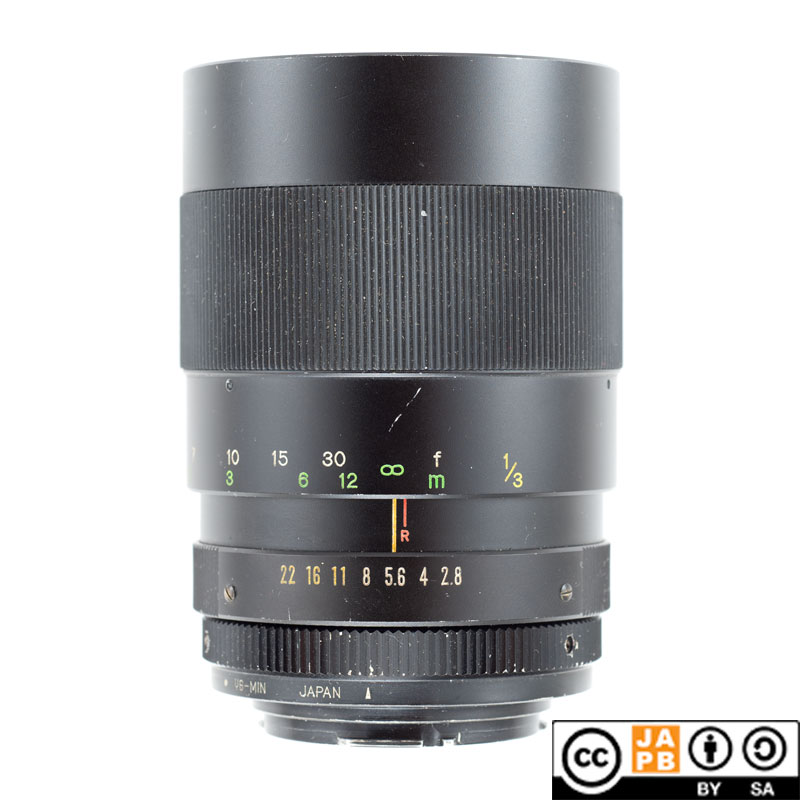
This lens is waiting in my repair queue because its focusing ring has become entirely detached from the helicoid (likely the set screws are implicated)
While a partially slipping focus ring might not render the lens entirely useless, it nevertheless typically results in less than the total focusing range being at the photographer’s disposal. This is especially critical when infinity focus (as well as a section prior to infinity) is beyond reach. Depending on the type of lens construction (especially the type of link between focusing ring and helicoid), the issue is laughably easy to moderately difficult to rectify (as long as it is done before slippage has caused damage). Again, it is not for everyone, and if you feel uncomfortable toying with precision screwdrivers, find someone who is.
Focus ring rubber bands
A related, but somewhat different set of issues is related to the rubber band (on the focus ring) that most lens manufacturers in the 70’s started fitting on their lenses.

photographed using Nikkor AI-s 50 mm f/1.2 (and 26 mm extension rings) at f/8 on Sony a7R2
As designed, that rubber ring sits quite snugly in the shallow groove it is designed for. Because that ring is often further used to cover up a variety of sins (such as screws or the split where the front-end of the lens is screwed into other parts), gluing it firmly and permanently into place never was a viable option.
Due to the lack of a rock solid glue (as designed) and the difference in behaviour of a semi-solid like rubber and the underlying metal/plastic, it is not uncommon for that glue to unglue. Normally, this is not a serious issue, because the rings has enough natural friction, but as those rubber rings do not last as well as the rest of the lens, problems may appear.
Specifically, and depending on the characteristics of the rubber compound (or the softened plastic used in stead of real rubber), the rubber ring may harden (become more brittle), contract, or expand, as well as suffer some optical degradation (i.e. look bad, which we will not cover).
Mild brittleness is not a problem as such, but if that rubber ring needs to be removed, it might be damaged on removal. Contraction has a similar effect, meaning that the ring becomes harder to remove without breaking, but also that the ring may become so stressed, that it tears seemingly on its own accord. Alternatively, expanded rubber rings may easily slip off the lens, and as they can not be held down by any glue, they make focusing difficult. As long as the rings on legacy lenses are real rubber it is possible to cut expanded rubber rings down to size and re-vulcanise them, but this does not end the natural process of expansion. On the other hand, from the earliest stages of rubber rings, some rings were not rubber, but synthetic elastomer compounds where vulcanisation is not an option.
Ironically, from having started out as a usability convenience, these rubber rings are liable to seriously impede both a lens’ usability as well as its resale value. That said, and as long as we’re not talking aesthetics or collector-appeal, these rubber rings are inherently a low-tech issue as anyone who has a rubber sheet, scissors and a bicycle puncture repair kit, and the ability to read a how-to, can fashion a new rubber ring.
Uneven movement of focus ring.
Again, we’re not talking about focus ring slippage here (that was covered above), but simply that the resistance offered by the focus ring changes depending on the focus ring’s position.
As long as there is not a point at which the focus ring is barely moveable, and as long as there is not scraping or tearing sound associated with rotating the ring, this is not a reason for immediate concern, but it indicates that something is wrong.
The most probable cause is that the lens would need to be re-lubricated as either the helicoid has partially dried out or the helicoid keys travel through a partially dried-up groove. Alternatively, if the areas of rotation with more stiffness also are indicated by a mild metal-on-metal sound (mild, not enough to be classed as ‘scraping’), it might also be that some part of the helicoid is slightly out of kilter.
Face it: If it’s a ≈50 years old lens, and you have not held your eyes on it 24/7 since it left the factory, you can expect the lens to have been on the receiving end of some beyond-specs g-forces. Given how tight the manufacturing tolerances often are, a barrel does not need to get knocked more than a tenth of a millimeter out of shape to change a comfortable passing clearance into a contact sport.
For the potential buyer, an uneven focus ring is a conundrum, because it might be nothing at all to worry about, or it might indicate a lens in need of service. Finally, it might also be the only outward indicator of a lens having been knocked around and thus being liable to suffer a range of issues, such as (but not limited to) de-centering. Therefore, an uneven focus ring should not be treated as a minor trifle when agreeing on a price.
Zoom ring
Firstly, believe it or not, legacy and zoom are not an inherent contradiction. The first production zoom lenses were introduced right after the end of WW2, and not were they all unusably fuzzy, dark contraptions: The legendary Voigtländer Kilfitt Zoomar 36-82 mm zoom lens had a f/2.8 max aperture throughout the zoom range. But this is not the place to discuss the relative advantages and disadvantages of zooms vs. primes. Suffice it to note, that many decent legacy lenses simultaneously happen to be a zoom lenses.
As noted above, there are basically two ways to implement a zoom function on a lens: a so-called push/pull design (where zooming is operated through pushing and pulling on the focus ring), or an approach where one ring operates the zoom and another one operates the focus (and a third to manage the aperture).
While prime lenses focus by moving the entire lens assembly (or a subgroup of lenses) back/forth, zoom lenses basically operate by moving a group of lens elements with respect to the rest. Typically this results in a design wherein some lens elements move in order to facilitate zoom; other lens elements move in order to focus, and some lens elements may remain stationary.

Interestingly, if a focus ring moves a lens’ element by some millimeters (about 7 mm in the case of a standard lens), the typical zoom lens entails movements a lot bigger. Therefore, all the stuff mentioned above while discussing focus rings applies to zoom rings as well, and often even more so.
• Too stiff zooming action => BAD
• Zooming action uneven => BAD
• Zoom ring rubber issues => Annoying-BAD
• Zoom ring moves but does not change zoom => Very BAD
Moreover, due to the inherent complicatedness of zoom lenses, repairs have a tendency to be decidedly more costly. Therefore extra care should be taken when purchasing legacy zoom lenses.
One more thing: zoom creep:
Finally, push-pull-zooms have one extra potential wrinkle: A stronger than usual tendency to develop zoom creep. Zoom creep happens when gravity manages to pull at a lens in a way that changes its field-of view (gravity zoom), and push-pull -zooms are (due to their construction) significantly more liable to develop the issue (although it must be said that all zooms can exhibit the issue, even very new ones).
This tendency is based on that the push-pull-zooms are not based on rotational motion, but on a linear motion which is more susceptible to gravity (if you’ve ever played with a worm gear, you know why gravity does not so easily tug on lenses with dedicated zoom rings). Typically, the method that push-pull -zooms rely on to counter the draw of gravity is based on increasing the friction of the zoom&focus ring vis-a-vis the lens’ barrel, and the stereotypical solution is putting a felt liner on the inside of the zoom&focus ring. Naturally, that felt liner (as well as any friction-based system) is liable to degrade through use and with time.
Zoom creep is one of those things that divides photographers: Is it just plain annoying, or is it a showstopper? When discussing legacy, manual focus lenses, I tend to side with the first-mentioned, but YMMV. In either case, zoom creep can be addressed by renewing the felt lining (the easy DIY -solution of using electrician’s tape is risky, as the tape may start to roll up under the ring), but – as it necessitates a relatively deep invasion into the lens – leave it to the pro’s unless you are one (or want to become one).
Read more:
Previous article: Part IV: Element separation
Next article: Part VI: Surface defects
Footnotes
- One can pretty much deduce which lens manufacturers were on the bleeding edge of development from that they were among the few that introduced semi-automatic lenses (Asahi (Pentax), Canon, Carl Zeiss Jena, Schneider-Kreuznach, Topcon, and some others) ↩︎
- Emphasis on “mild”. As long as you do not feel you have to fight the aperture blades, you’re okay. ↩︎
- Some legacy lenses have however utilised element-focusing approaches since more than 100 years, as especially the Tessar and Triotar designs can be used as front-focusing. This is a contributing factor to the popularity of these lens designs in folding cameras (and others). ↩︎