Pekka Buttler, June 2021
Introduction
This article is part of a JAPB series of articles on the optical flaws of lenses and you can find the index of the series here.
‘Vignetting’, sometimes also referred to as ‘corner [light] falloff’ is a phenomenon wherein an image’s corners are perceptively darker than its centre. Vignetting can be used for artistic effect, and photographers sometimes add to a photograph’s (natural) level of vignetting in post-production. On the other hand, vignetting is often a nuisance and photographers may spend time in post-production trying to rectify vignetting.
One thing, however, is certain: Natural vignetting means that less light (signal) reaches the sensor’s (or film’s) corner areas. In other words, the image’s signal-to-noise -ratio is worse in the darkened corners than in the brighter centre. While post-production allows one to rectify that vignetting, this entails the artificial boosting of those weaker signals, thereby leading to an increase in visible noise and other artefacts. This is an especially relevant issue if the vignetting is particularly strong (> 2 stops).
In adapting legacy lenses, there are – however – two partially unrelated mechanisms that produce vignetting, that therefore deserve separate treatment. The first, and undoubtedly more common mechanism is vignetting induced solely by the lens itself. This is also the mechanism that this article will focus on.
The other mechanism is based on a less than fortuitous interaction of a specific class of lenses (mostly rangefinder wide-angle lenses) with most digital imaging sensors used in mirrorless, mostly full-frame, digital cameras. This phenomenon will not be discussed in this article, but is instead discussed in the JAPB article regarding partial colour casts.
Why do lenses vignette?
The image circle
First, lets go wide. And by ‘wide’, I mean, let’s go beyond the limits of the sensor/film.
Every collection of lens elements (which we refer to as an ‘objective’ or simply ‘lens’) produces an image circle. You can read a bit more about image circles here, but for now, let’s simply state that every lens (that is intended for a specific format of film/sensor) produces an image larger than that needed by the film or sensor.
Some lenses are mounted with brackets/baffles at the rear of the lens (see below), but in the absence of such contraptions, a lens’ image circle is circular.
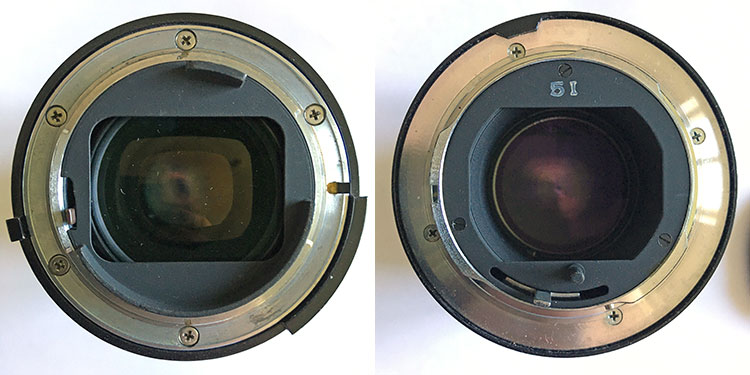
Left: Nikkor Ai 80-200mm f/4.5; Right: Konica Hexanon AR 135mm f/2.5
In the absence of an adjustable aperture (or such brackets), the image circle is always bright in the central portion of the image circle and progressively darker towards the image circle’s edges. To borrow an illustration from another article, a wide open lens produces a picture pretty much like the one below.

To be precise, most lenses tend to have an inner image circle where the level of illumination is reasonably even. Between that inner circle and the outer limit of the image circle is a ‘doughnut’ of progressively diminishing illumination. What we (when looking at the pictures our camera has produced) refer to as ‘vignetting’ are those corner areas where the doughnut of decreasing illumination encroaches on our sensor/film size.
I’ve often said (and will keep doing so), that lens design is the art of compromise, because if the lens designer would want to, they could design a lens that does not vignette, even wide open. If you do not believe me, take any medium format lens and mount it on your full-frame (or even better: APS-C or MFT) camera, and you will have very little (if any) vignetting.
The ‘cost’ of being free of vignetting is having to deal with a huge, heavy and, (most likely) expensive chunk of optics. Instead, most lens designers have accepted some level of vignetting as the cost of doing business (i.e. keeping size, handling and cost within limits). Especially so, because in most cases, if the photographer wants get rid of vignetting, the only thing they need to do, is to stop down the lens.
Stopping down – and why it helps
If you’ve ever dabbled with pinhole photography, you’ll know that you do not need a lens to take pictures. You only need a hole. Granted, pinhole photography has some downsides, lack of flexibility, diffraction, and excessively show shutter speeds being the most obvious. Should you want faster shutter speeds, you’d have to increase the size of the pinhole, but as a result, your pictures would lose sharpness.
Objectives (lenses) made up of collections of lens elements solve these issues (especially when you add an adjustable diaphragm to give you flexibility), because their optics allow the camera to gather light on a much wider area than the pinhole, and still give you a sharp picture. The ‘price’ of all those fancy optics trying to gather every erg of light, refract those rays precisely, and send them toward a specific point of the film/sensor is that the ensuing image circle is not evenly illuminated.
The reason, however for why a lens produces an image circle that has a central area of high and relatively even illumination, and a doughnut of progressively weakening illumination is relatively simple1:
• Every point within that central, relatively evenly illuminated area manages to gather light from the entire assemblage of lens elements.
• Every point in the outer doughnut manages to gather light from only a part of the lens elements – the farther from the image circle centre, the smaller the share of lens elements from which the light is gathered.
The effect of moving from the centre of the image towards the corners (and how that entails using less of the lens elements’ area) is easily demonstrated by the phenomenon referred to as ‘cat’s eye bokeh’ ( optical vignetting of specular out-of-focus highlights). Cat’s eye bokeh is always at its worst wide open, whereas when you stop down the lens, the ‘flattening’ or vignetting of bokeh balls lessens until it goes away entirely. See illustration (wide open) below.

So what happens when such a lens is stopped down? The simplest explanation is that the aperture – by closing a bit – cuts off a proportion of the light passed through, but it cuts light more from the image centre than from the outer doughnut. Thereby – in practical terms – closing down the lens leads to that that relatively evenly illuminated centre area gets bigger, and the doughnut of progressively decreasing illumination gets narrower (the outer edge of the image circle, however, remains unchanged). Thereby – looking only at the area captured by the sensor or film, it looks as if closing down the aperture lessens the amount of vignetting.
Is vignetting an optical flaw?
In absolute terms? No. Every lens has a tendency to produce a gradually decreasingly illuminated image circle, and the only way to avoid that, is to use a bracket on the rear of the lens to forcibly cut away a part of the image circle altogether 2.
Justifiably, in a sense, vignetting is a fact-of-life with lenses. So why do bloggers and reviewers keep banging on about it? Considering that one no longer needs to light a smoke to pass the time while the camera is recording the picture – as it did with pinholes – and that photographing moving subjects is suddenly possible, who cares about some vignetting? Well, obviously we’ve become somewhat pampered, and it turns out we do. Moreover, as photographic equipment has progressed, photographers’ tolerance for imperfections has decreased and is now nearing zero.
But in practical terms, vignetting is (or can be seen as) a flaw if and when the lens designer has made decisions and trade-offs that lead to that a lens produces way more vignetting than similar lenses (focal length, maximum aperture) do. This is especially so, when vignetting is so severe, that photographers feel they must address it. The JAPB policy for reviews and lens comparisons therefore is to accept that all lenses vignette a degree wide open, and only make an issue about vignetting if the level of vignetting exhibited is clearly beyond the norm of lenses in that category.
Addressing vignetting
Clearly, the most potent way to address vignetting is to stop down. This works every time when vignetting is due to the lens. If, however, stopping down is not possible or counterproductive (such as when shooting in low light or when shallow depth of field is sought), then the photographer should accept a moderate level of out-of-camera vignetting as natural. Trust me: we don’t want to carry the kinds of lenses along that would have enough glass to overcome vignetting altogether.
This does not mean that every photographer needs to accept whatever level of vignetting coming out of the camera. In digital photography, correcting for moderate vignetting is a piece of cake 3. With severe vignetting the actual correction is not especially difficult either, but once vignetting correction has to be applied with a heavy hand, it will turn out that a lot of signal has originally been lost due to vignetting – leading to (among others) increased noise, loss of dynamic range, loss of saturation or false colour, and various artefacts. In effect, vignetting needs to be relatively mild (less than 2 EV) for it to be correctable without ill effects.
Examples
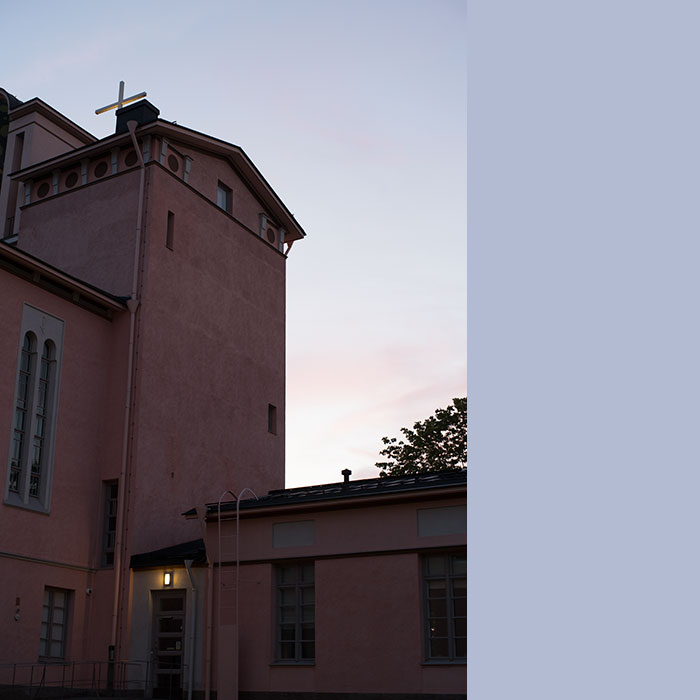
Let’s start with some examples of ‘normal’ vignetting (normal, as in ‘par for the course’). Start by looking at the picture below, and make up your mind whether that level of vignetting is bad. All pictures taken in a go: Sony ⍺7R2, ISO 400, WB 4400, tripod and cable release. ACR default and resize.
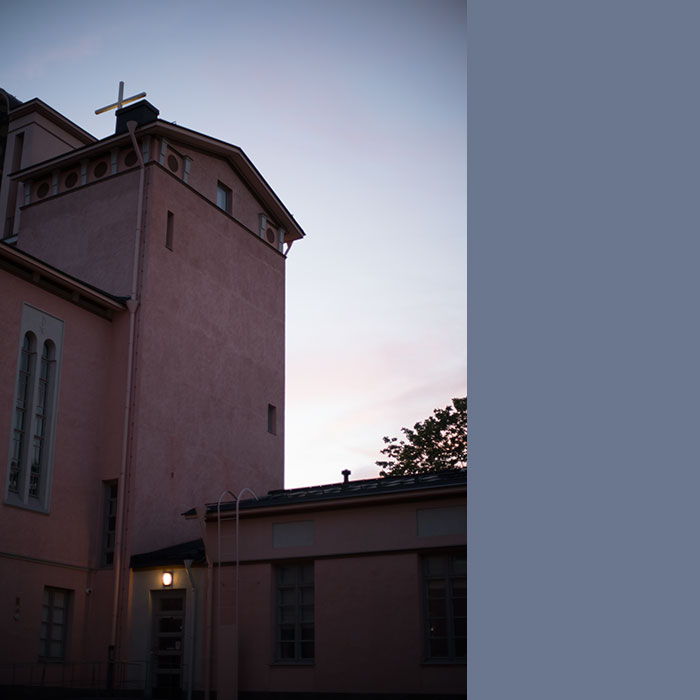
That image is a sample from a highly respected legacy standard lens. In case you’re wondering what that coloured bar beside the image is, it is a 233×700 pixel sample from the upper right corner of the original (high-res) image, that has been averaged out as an indicator of how light/dark the upper right corner is. Next, let’s stop down 1, 2, and 3 stops.
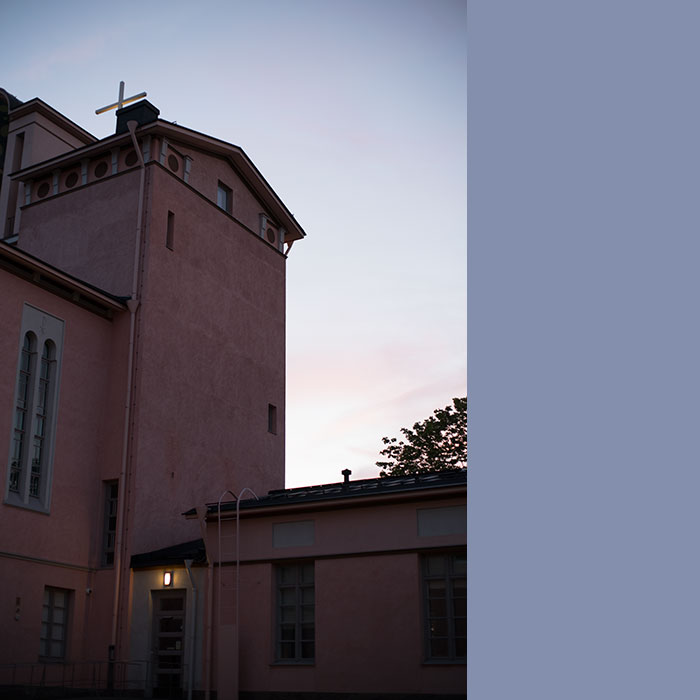
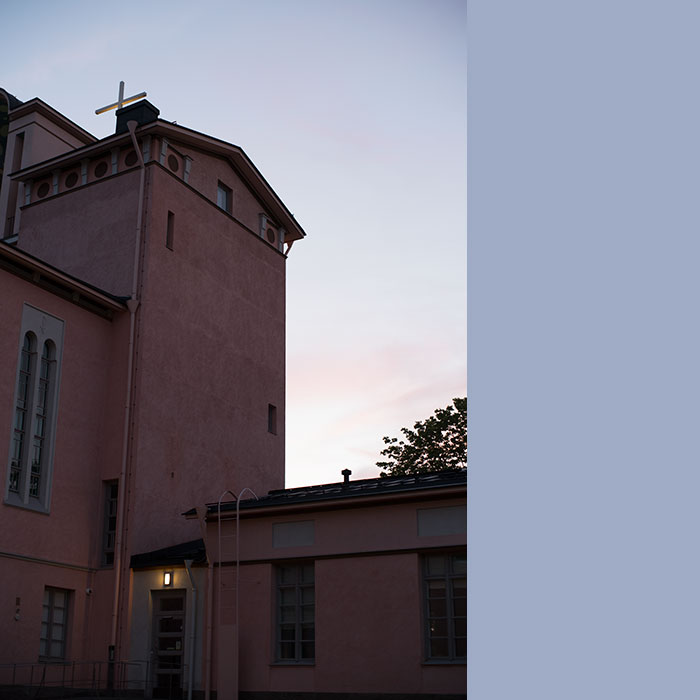
If you analyse these pictures, you’ll notice a few things:
Firstly, there really is a significant amount of corner vignetting wide open. This the coloured bars beside the pictures clearly show. Whether this vignetting is an issue is however debatable (certainly the SMC Takumar does not show significantly more vignetting than other lenses in this class (legacy fast fifties).
Secondly, while the vignetting is most obvious in the sky (upper end of picture), its effect is potentially more significant in the shadows (lower end of picture), as the ‘heavily’ vignetting wide-open shot failed to show the railing leading up to the church’s back door (wheelchair entrance).
Footnotes:
1 This rule applies to unit-focusing (all lens elements move together) lenses, and becomes a bit more complicated when groups of lens elements move in respect to each other (such as for instance in internal focusing, rear focusing and zoom lenses)
2 The reason for mounting such brackets on the rear of lenses is to lessen the risk of off-sensor/film rays leading to problematic reflections within the camera.
3 With film photography, however, vignetting is a real issue (especially as long as the photographer wants to keep within a fully analogue process).