Welcome to part 5 of the JAPB comparison of nine fast 35 mm focal length lenses.
This is a big article, which has been subdivided into several parts for convenience and the sake of humane loading times. See table of contents below.
• Part 1: Introduction, the lenses: pedigree and handling
• Part 2: IQ-comparison I – The Brick wall test
• Part 3: IQ comparison II – Urban vistas
• Part 4: IQ-comparison III – Bokeh and feel
• Part 5: IQ-comparison IV – Night-time vistas (you are here)
• Part 6: Summary and conclusions
Shooting in the dark…
Large aperture lenses are typically heavier and significantly more expensive than a smaller-aperture variant of the same lens. For instance, the Canon FD 35/2 (concave) cost 32 000 yen when introduced in 1971, while its darker sibling, the Canon FD 35/3.5 (not part of the comparison) cost only 18 900 yen when introduced the same year (price info from Canon Camera museum). Similarly, the three simultaneous versions of 35 mm primes offered by Nikon all had significantly different weights: the 35/2.8 Ai weighed 240 grams; 35/2 Ai weighed 280 grams; 35/1.4 Ai weighed 400 grams (weight data from Roland Vink’s fantastic collection of Nikon lens data).
Therefore, to acquire a wider aperture lens (when smaller aperture alternatives are available), one typically needs a strong motive: These motives mainly fall into three categories:
1# Hoping for the shallower depth of field offered by a wider aperture;
2# Being able to shoot in less light
3# Added kudos (among photographers) of carrying a high-end lens.
Finally, there is also a widespread belief that wider-aperture lenses produce better images at medium apertures (say f/4–f/8), which I will mention, but which I do not fully subscribe to (maybe I’ll write an article on this one day). But considering that we typically today shoot these lenses at sensitivities beyond the dreams of photographers back when these lenses were new, I will say that the main weight of these motives today is less on point 2 (low light) and more on point 1 (shallow DOF).
In any case, the ability to shoot in low light (think: Christmas dinner, candle-lit events, etc.), even utter darkness (think: astrophotography) is one prime motive for wanting a fast 35 mm lens. Furthermore, many of these lenses have – in their day – been targeted at shooting starlit skies (example here).
Hence, no comparison of fast 35 mm lenses would be complete without some night-time vistas and star-shots. Before we get into these, we’ll inspect the main issues typically plaguing such shots, namely: ‘coma’ and ‘astigmatism’.
What are coma and astigmatism
Coma and astigmatism are two phenomena, which tend to plague nighttime shots, meaning shots where the absolute majority of the frame is very dark, but where there are a number of point-light sources (far-off streetlights, stars, etc.). Both coma and astigmatism result in that these point-sources of light are not rendered as clean points, but rather as points with wings, tails or blobs. Technically, these two are regularly confused, and one can see even seasoned lens reviewer’s talk about a lens and how it has bad coma, while the picture shows not coma but astigmatism.
Coma or comatic aberration results in that a point-light source is projected onto the imaging plane (film/sensor) as a bright dot with a (comet’s) tail (hence the name). As with real comets (whose tails always point away from the sun), coma tails always point away from the image centre.
Astigmatism is basically that a lens is unable to refocus all the light (coming from a single point source) onto a point source on the imaging plane. Astigmatism comes in two variants called tangential and sagittal astigmatism. In tangential astigmatism the light-point has a ‘tail’ pointing both away from and towards the centre of the image (like a two-sided coma), and in sagittal astigmatism those ‘tails’ point radially around the image centre.
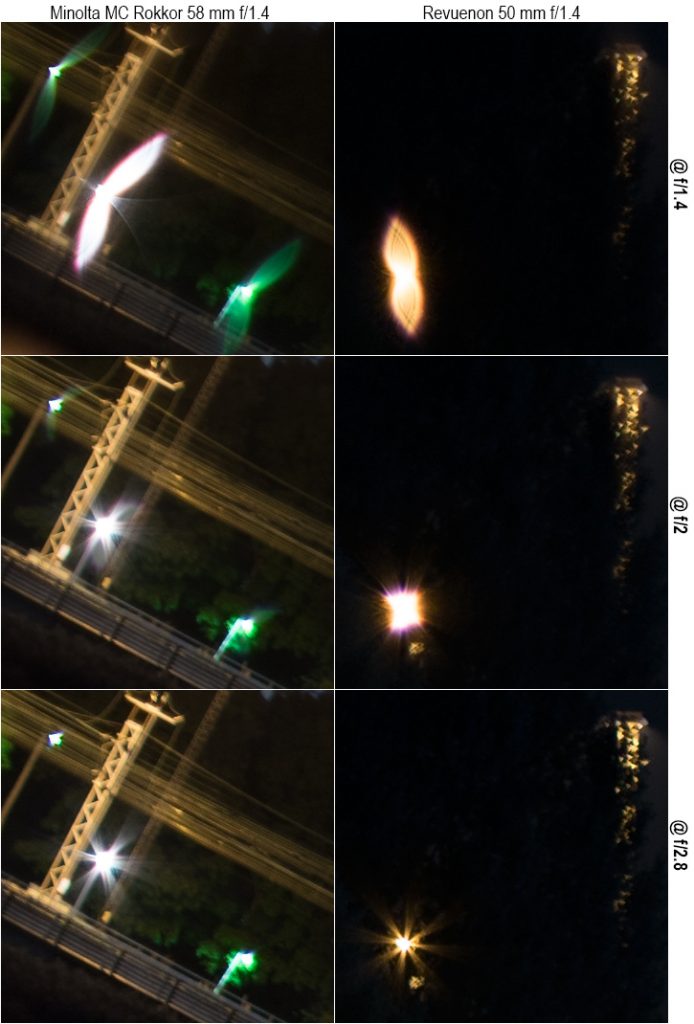
One very often sees these three aberrations (coma, tangential astigmatism, sagittal astigmatism) combined, and they may produce complex and even beautiful patterns. All these aberrations are usually at their worst …
• wide open. (Stopping down a few stops largely resolves the issue.)
• away from the image centre. (Sometimes badly affected areas can be cropped way.)
For a more in-depth discussion of coma and astigmatism, please look at the JAPB articles on astigmatism and on comatic aberration.
See illustration below (from an upcoming comparison) for some examples of complex combinations of these aberrations, and how they respond to stopping down.
In cityscape shooting, one should therefore – when possible – rather stop down and use longer exposures. For astrophotography, where every erg of light matters and too long exposures would lead to star trails, there is good reason to shoot wide open (or only a bit stopped down). Hence, the absence of coma and astigmatism are a prime requirement for astrophotography lenses.
Legacy lenses vs. coma and astigmatism
Problematically, with legacy lenses coma and astigmatism are rather the norm than an exception, as these aberrations are largely an unavoidable byproduct of using spherical lens elements. As the grinding of aspherical lens elements is (and even more: was) more expensive than spherical lens elements, most legacy lenses rely on spherical elements. Naturally, there are some notable exceptions, such as the Noct-Nikkor 58/1.2 and Canon FD 55/1.2 Aspherical, but these were (and still are) exceptional and exceptionally expensive lenses.
The real question for night-time photography using legacy lenses therefore is mostly not whether the lens has coma and astigmatism, but how bad (disturbing) these are and how much stopping down will help.
Note, please. While subjectively very different from all other test shots in this comparison thus far, these shots are similar to some of the ‘urban vista’ -shots in that we’re dealing with extreme contrast. What some of the subsequent shots also evidence of is a phenomenon typically referred to as (non-chromatic) scattering of light, in other words that due to the fact that optical glass can never be truly optically perfect (and legacy glass typically is even less perfect than modern glass), a minor percentage of the light rays of these (relatively) bright points of light’s rays are bent in ways in which they should not. These scattered rays are not what causes coma or astigmatism, but are instead evidenced as a general lessening of contrast in the vicinity of bright light-points (in a way, this is similar to veiling flare, except caused by a streetlight half a kilometre (or more) away).
Night time vistas: Image comparison
Finland, in summer. Darkness is the one thing we don’t have a lot of. If you’ve heard of the St. Petersburg ‘white nights’ festival, keep in mind that the entirety of Finland is north of St Petersburg. On the 23rd of July (the date of these shots), Helsinki had 17 and a half hour of daylight, and the rest of the night is divided into 2:18 minutes of ‘civil twilight’ and 4:09 of ‘nautical twilight’, without either ‘astronomical twilight’ or ‘night’ (see description of terms here)
To get as near maximal darkness as possible, I set up my tripod at 02:30, and waited for a cloud bank to approach. ISO was set to 200, WB to 4750.
Also, at one time in the series of shots I was being harassed by a municipal street sweeping machine. While I thought that I had taken a sufficient break to let it pass, it would seem one shot was affected by a tremor caused by the vehicle (The Minolta’s wide open shot), which you would do well to disregard.
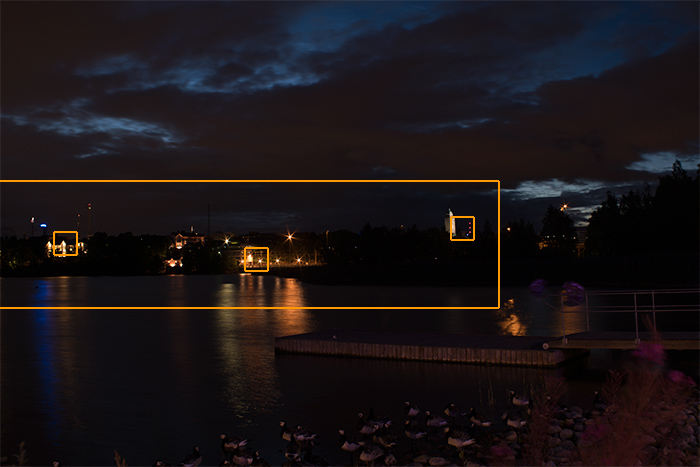
The contents of the big rectangle is reproduced below significantly (9:1) scaled down (to give a general feel), whereas the smaller rectangles are reproduced in 1:1
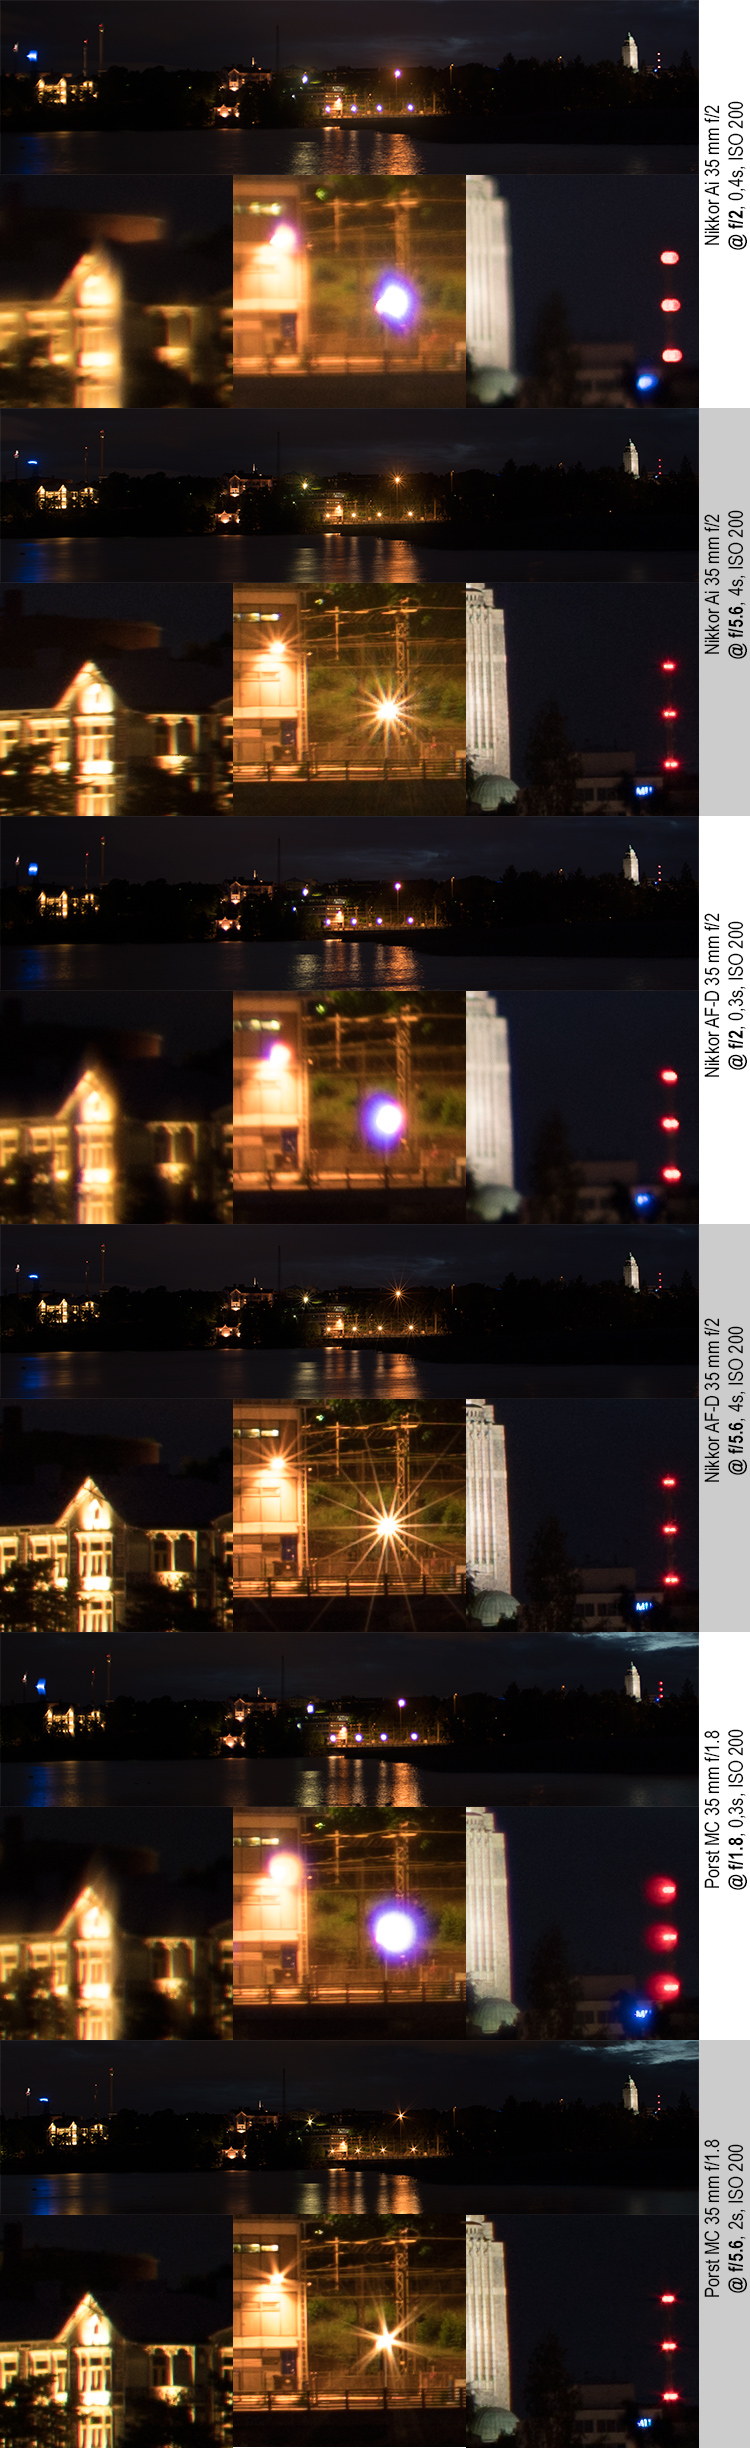
Looking at these samples, it is blatantly obvious that extreme contrasts tend to accentuate any lack of wide-open definition. I say again, if you compare
• wide-open sharpness in the (decidedly low-contrast) brick wall shots with
• wide-open sharpness in the high-contrast shots of the air vents in the urban landscape shots with
• wide-open sharpness in these extreme-contrast shots,
it is quite obvious that the more extreme the contrasts, the more ALL LENSES suffer wide open.
The interesting question is whether all these bright lenses are at all usable wide open in these kinds of shots. The answer is no, and also yes.
Quite obviously, stopping down to f/5.6 produces immense benefits both in sharpness and contrast, as well as through the elimination of coma and astigmatism. If what you want is a sharp, brilliant picture showing nice sunstars, then f/5.6 or even f/8 is THE way to go. But this approach also unavoidably leads to a shot which is not feasible without a decent tripod or cranking up the ISO beyond a camera’s comfort zone (even with IBIS, 1/10s is the comfortable limit for a hand-held shot. At f/5.6 that would necessitate roughly ISO 8 000; without IBIS, going by the 1/f -rule (==> 1/40s), we would land at ISO 40 000). So if you can, use a tripod and stop down.
But if you can’t, are these wide-open shots totally useless? No.
Yes, there are obvious coma & astigmatism artefacts, and yes, definition and resolution clearly are not what they could be, but even so, all these lenses are able to produce a shot worth a 15×10 cm (even a 30×20) print.
Even so, I find it less interesting to gawk at the preposterous coma, astigmatism and even flare some of these lenses produce wide open. Instead, I find it more rewarding to have a second look at how they perform stopped down to f/5.6.
Another look at f/5.6
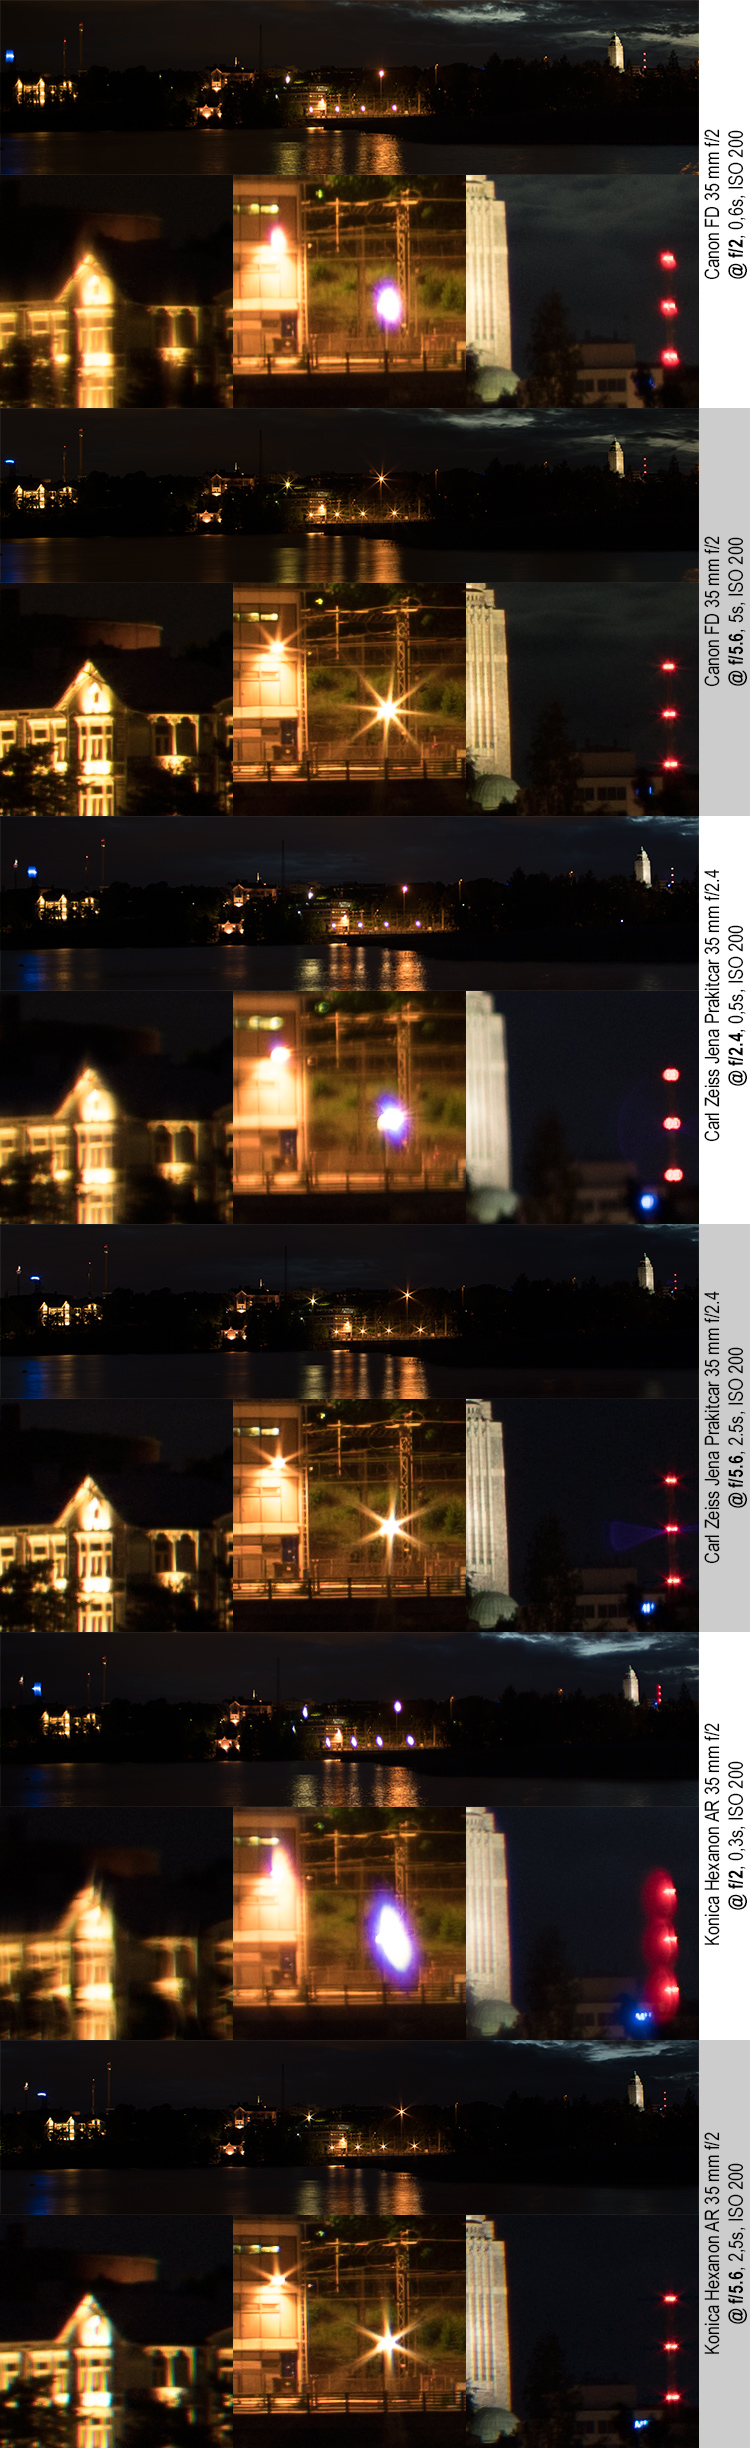
So, let’s just focus on the three 1:1 clips at f/5.6 for the entire range of lenses
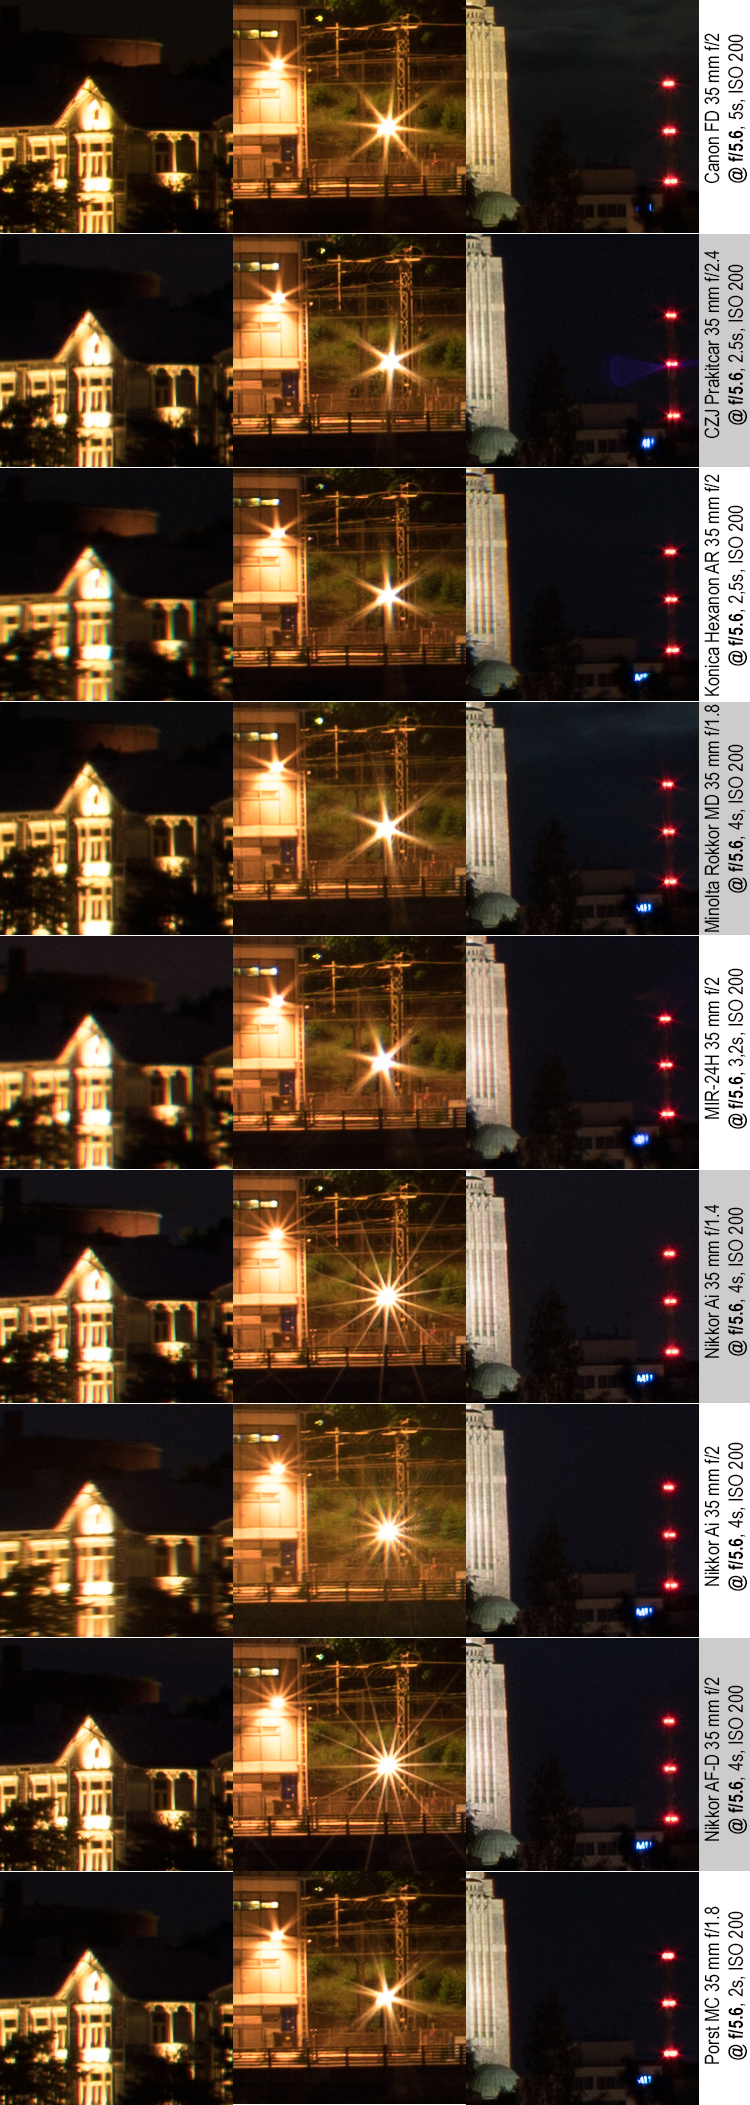
Again, while scrutinising these shots, keep in mind that only the centre clip is at the focal plane, with the left-hand side being both roughly 100 meters behind the focal plane and at the edge of the frame, and the right-hand shot being roughly half a kilometre (church) to three kilometres (chimney stack) behind the focal plane (Yes, they are within the depth-of-field, but beyond the plane of optimum sharpness). That said…
Canon FD
The Chrome Nose concave continues to perform very well. Yes, the yellowish tint (due to the decayed optical elements) is still there, and the lens also obviously loses some light (lower transmission) due to that, but otherwise… The (centre clip) stanchion has great detail and definition, and very nice (balanced) 8-pointed sunstars, the lighted facade of the villa (left clip) looks very clean and shows negligible signs of frame-edge smearing, while the only point at which the FD lens is clearly outperformed (by some, but not all other lenses) is in the definition/boundary clarity of the warning lights on the chimney stack (right clip)
CZJ Prakticar (‘Flektogon’)
The ‘Flek’ seems to have very high definition at the focal plane (centre clip), and its six-bladed aperture produces a very nice and balanced (albeit only 6–pointed) sunstar. The left-side clip is also very clean. The church tower (right clip) shows very good detail, whereas there’s something weird going on with the middle warning light of the chimney stack (I’m not sure how to describe it). All in all, a splendid result.
Konica Hexanon 35/2
To be honest, the Hexanon somewhat disappoints in this shot. It is by no means among the worst, but it nevertheless falls below the median here. There simply seems to be an overall lack of clear definition, because the lens basically manages to render everything without apparent aberrations, but with less clarity and detail (e.g. the lighted facade, left clip). On the other hand, the Hexanon performs really well with the chimney stack warning lights (so we’re not talking about camera shake). The 6–pointed sunstars have good definition and proportion.
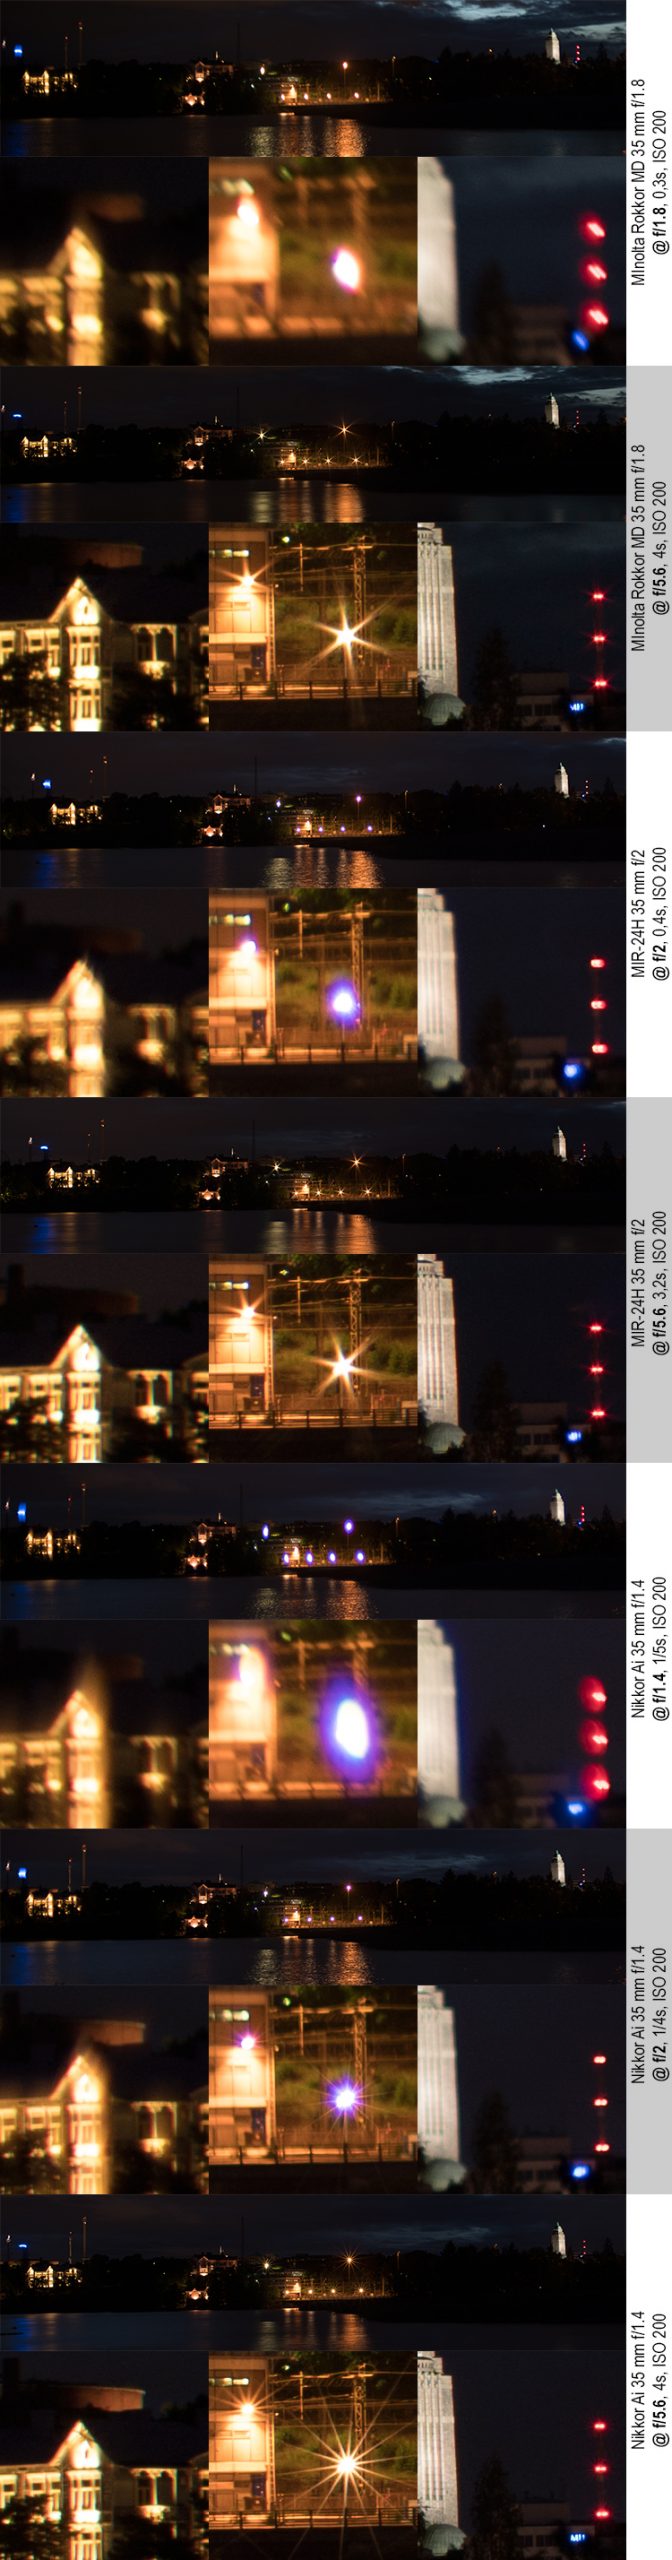
Minolta Rokkor MD
The Rokkor again delivers, through a combination of clear and precise rendering and an absence of any clear aberrations. The centre definition is not quite on the level of the ‘Flek’, but leaps and bounds in front of the Hexanon. There’s something about the rendering of the Rokkor’s 6–pointed sunstars which rub me the wrong way, but this is both a minor and unquantifiable issue.
MIR-24H
While the MIR is somewhat soft, importantly – in this night-time shot it performs less badly compared to other lenses than in any previous comparison. Yes, there is considerable smearing in the lighted facade (left clip), but no more than with the Nikkor Ai 35/2. Yes, definition and clarity in the centre clip is not on the level of the top-3, but not immensely behind either. No, the stonework of the church’s bell-tower is not as well defined as with the best lenses, but neither is it a bad result. Furthermore, the MIR has some of the nicest 6–pointed sunstars I’ve ever seen.
Nikkor Ai 35/1.4
Considering that the f/1.4 Nikkor here is stopped down by a whole 4 stops, it is not surprising that it performs well. Very well, in fact. The left-hand clip shows some very minor smearing, and not the highest contrast, but resolves details shown only by the FD and the AF Nikkor. The centre clip shows Nikkor’s signature slender 14-pointed sunstars as well as a wealth of details matched only by few other lenses, and the church’s stonework has immensely good detail.
Nikkor Ai 35/2
The cheaper sibling on the other hand falls totally flat. The left-hand side clip shows significant smearing and (resulting) loss of resolution and contrast, the centre clip shows clear signs of light scatter/veiling flare and it is as if the 14-point sunstars would be all over the place. The right-hand clip is the only one where the lens’ performance is not clearly sub-par. All in all a both disappointing and interesting result.
Nikkor AF-D 35/2
The Nikkor AF-D performs extremely well here. In the centre clip it combines Nikkor’s signature 14-point sunstars with a wealth of finely resolved detail, the left-hand side clip is clean and offers very good definition and detail, while the church tower’s stonework is very well defined. This sharpness and contrast combined with an utter lack of aberrations means, that if I had to pick a winner, the AF-D lens would be a strong contender.
Porst MC 35/1.8
While not worth a long eulogy, the Porst manages to put in a really solid performance. The left-hand clip is clean and shows a wealth of detail as well as good contrast, the centre clip shows very good detail and interesting 6(12) pointed sunstars, and the right-hand side clip offers good definition and detail. All this combined with an absence of any aberrations make the Porst a very decent lens for these kinds of night-time shots.
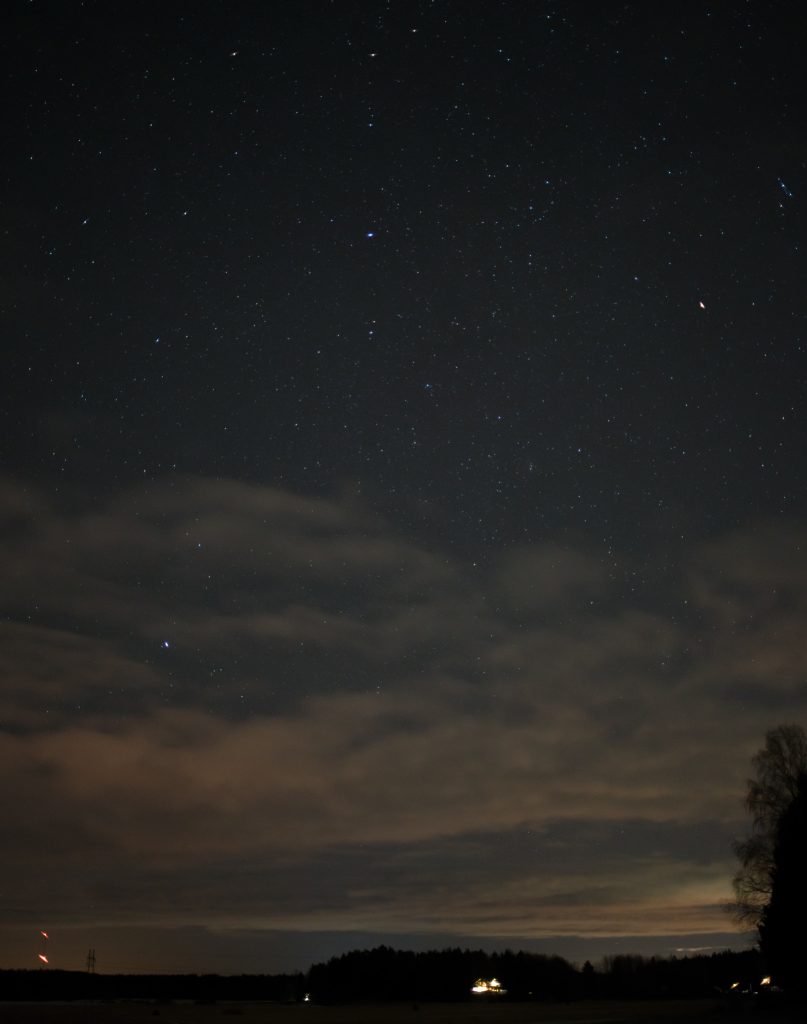
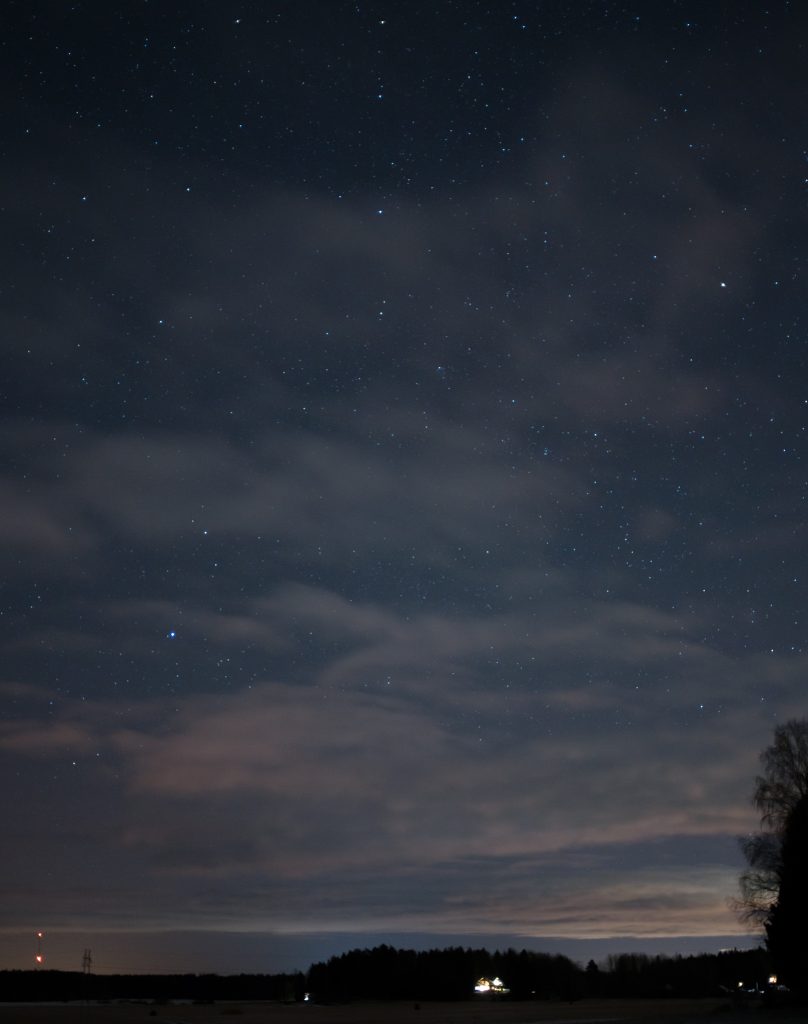
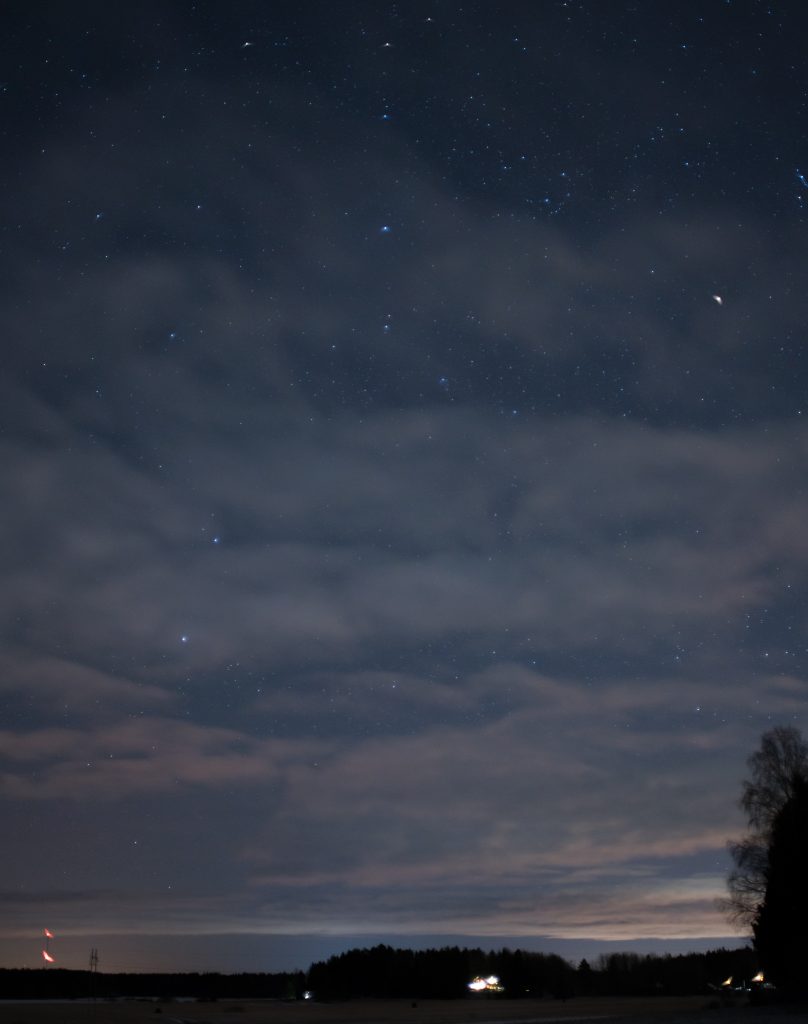
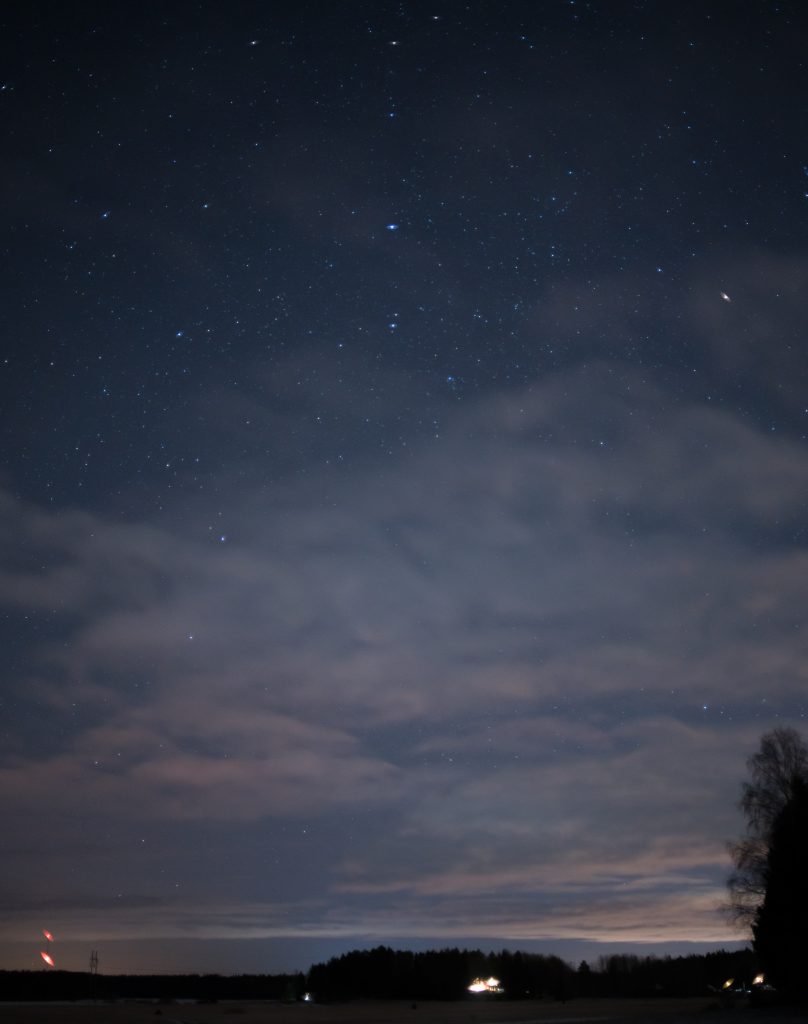
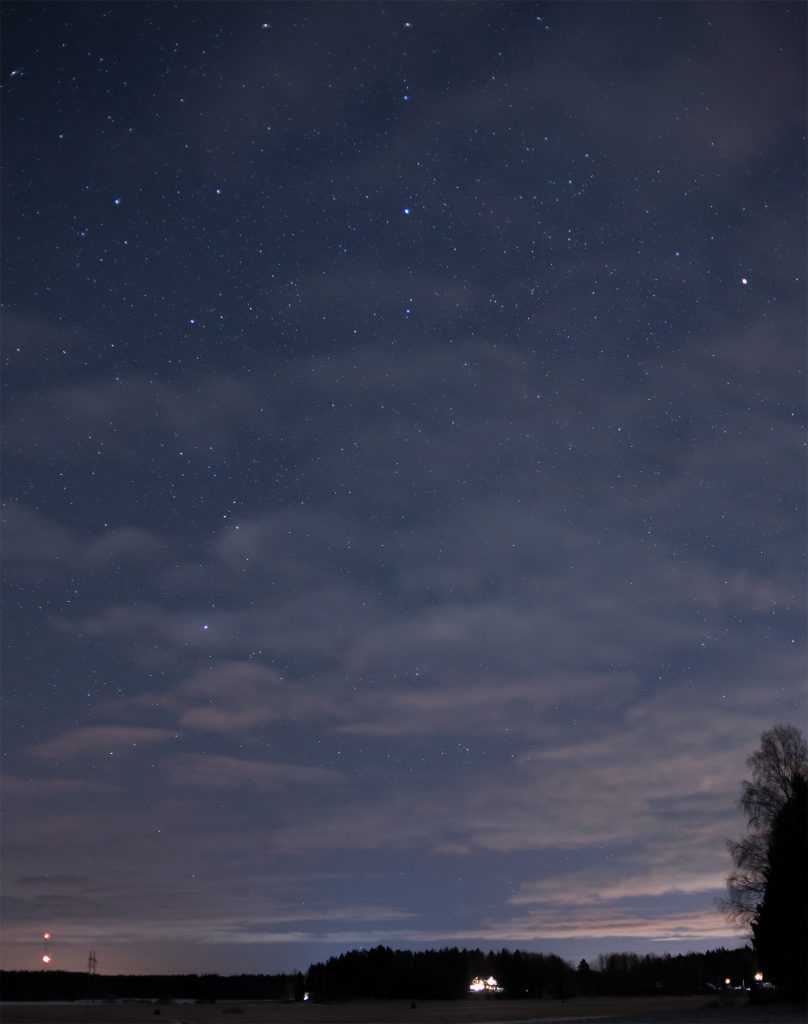
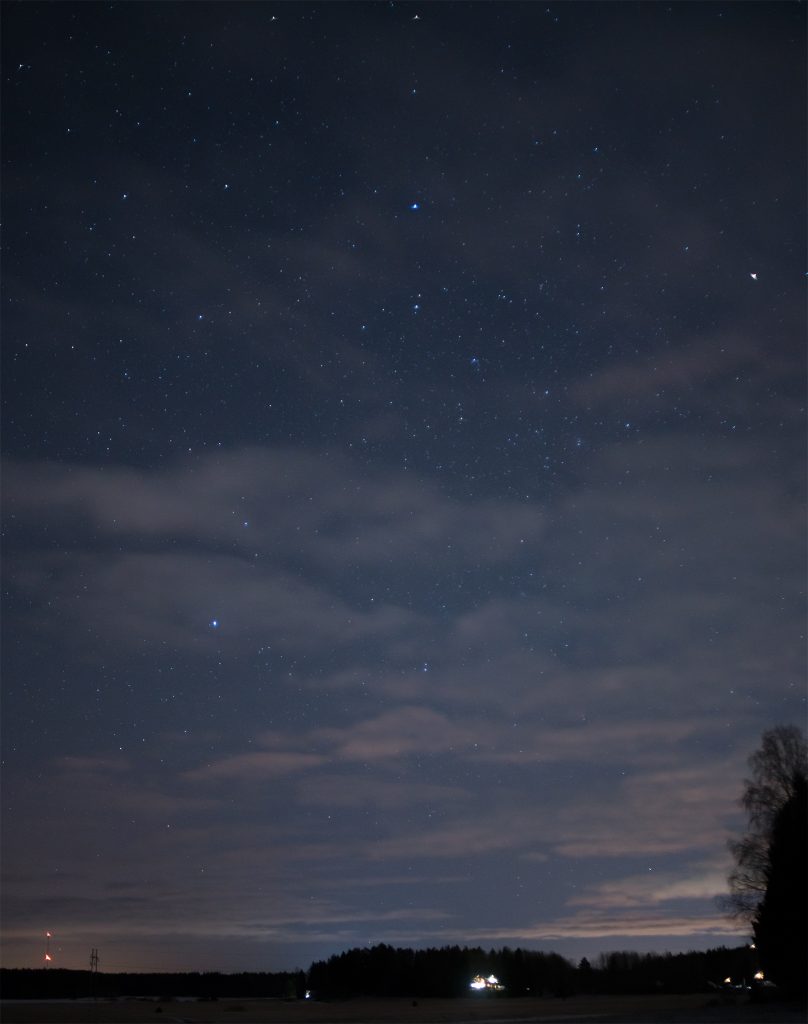
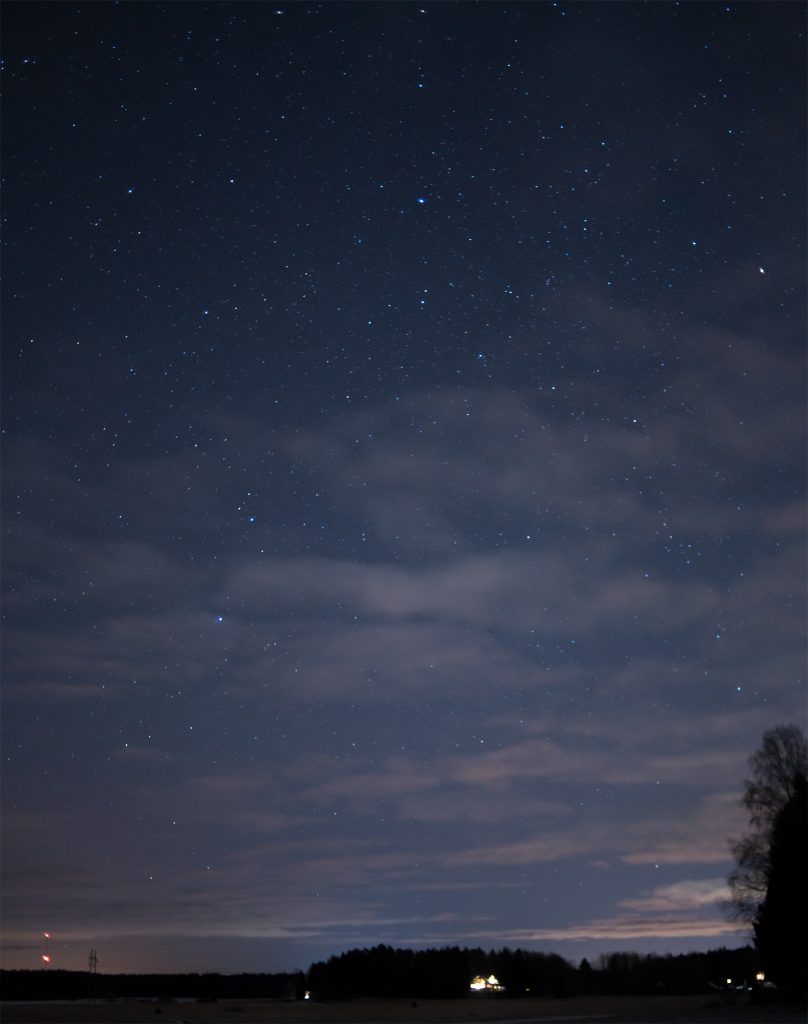
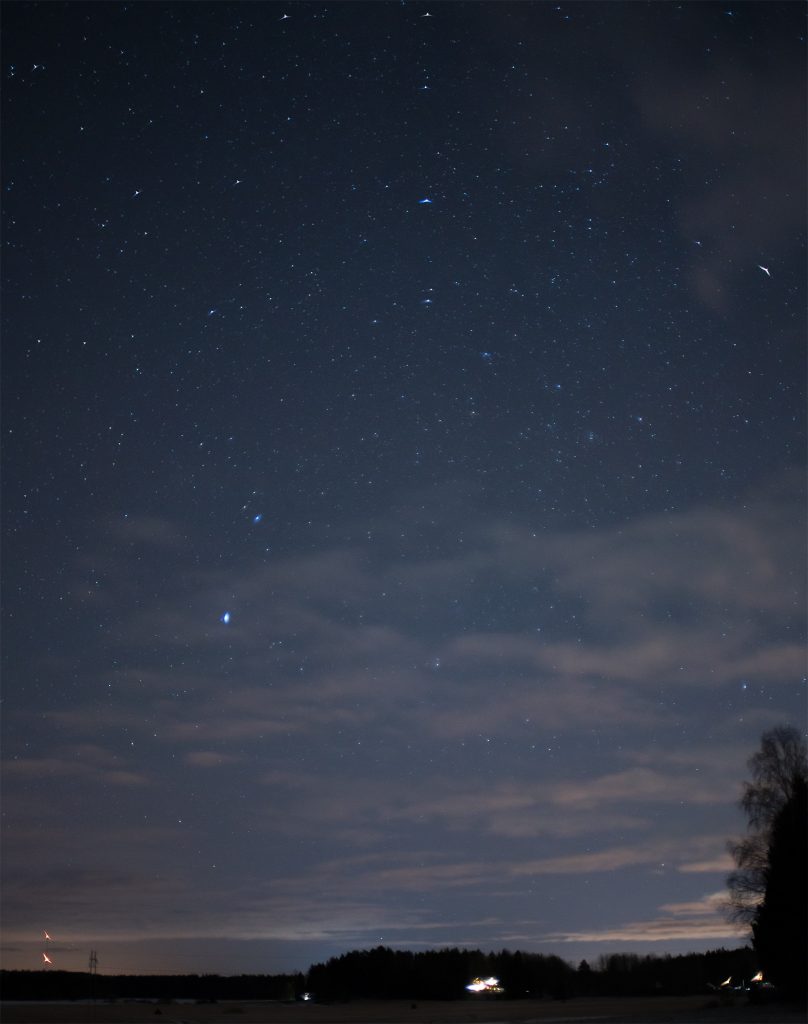
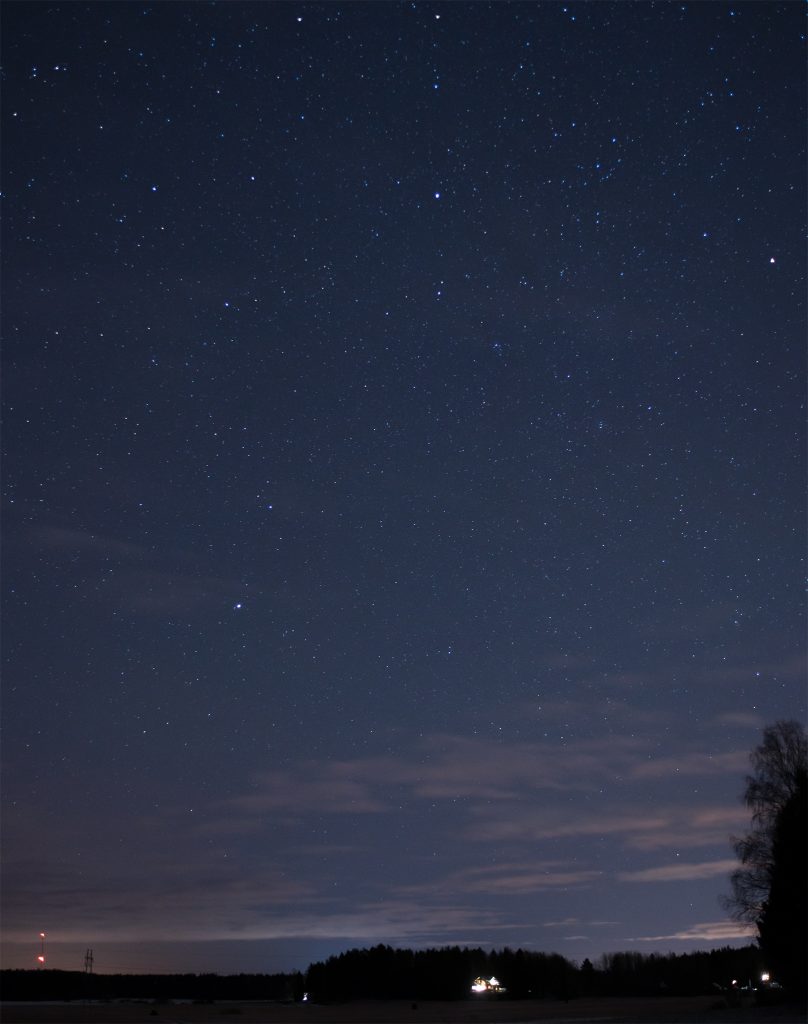
Astrophotography – image comparison:
Let me be the first to state what soon will be obvious to all: I am no astrophotographer. That is, I like the idea of trekking out into the dark (away from artificial light), setting up my tripod and trying to capture a nice shot of the milky way. Alas, I have never managed that. The two main reasons are
a) while I live far from the most crowded parts of the world, even I have to travel 6 hours (one way) to reach real darkness (class 2 on the Bortle scale), and ‘rural sky’ (Class 3) is also 2,5 hours away (one-way)
b) family and work keep me busy, therefore, trying to organise an all-night photography trip is – while tempting – not going to happen any time soon.
Moreover, while southern Finland enjoyed a number of cloudless (and moonless) nights earlier in the year, now (during the dark period between autumn and spring equinox), we’ve been constantly pained by cloudy nights. In the end (as you shall see), I had to settle for some clouds.
Basic setup: Darkness (ground invisible even after eyes have acclimatised). Tripod. 2s Delay. I settled for raising sensitivity (ISO 800) to keep shutter speeds decent (4-5 secs) and avoid star trails. Also, as the point of the shots was to see whether any of these lenses are any good for astrophotography, all lenses were shot wide open (the Nikkor 35 f/1.4 was shot wide open and at f/2). Also, as an oddball benchmark, I added a semi-vintage zoom (the Nikkor AF-D 35-70/2.8) into the mix and as that had a maximum aperture of f/2.8, its shutter speed was set for 8s.
Furthermore, this time I did some editing in post. The full list of changes are below, and on top of that I had to straighten the pics a bit (It was so dark, I did not see that my tripod had shifted after setting it up straight).
Modifications in post (ACR):
– WB: 2950K; Tint +8
– EV+2.0; shadows: -100; white: +18
– sharpening: 0; Luminance NR: 35 (detail 18); Color NR: 20 (detail 2)
– rotate: -1.8
– Crop away some of the ground; resize to 1615*2048, save jpeg quality 85
Here come the pics.
(For bigger version, right-click and open picture in new tab)
(For bigger version, right-click and open picture in new tab)
(For bigger version, right-click and open picture in new tab)
(For bigger version, right-click and open picture in new tab)

(For bigger version, right-click and open picture in new tab)

(For bigger version, right-click and open picture in new tab)
(For bigger version, right-click and open picture in new tab)
(For bigger version, right-click and open picture in new tab)
(For bigger version, right-click and open picture in new tab)
(For bigger version, right-click and open picture in new tab)
(For bigger version, right-click and open picture in new tab)
Interpretations:
Assuming you read the earlier analysis of the night-time vistas, these results should not come as a surprise: While all of these lenses are able to produce a decent star-scape photograph, there is no way to recommend any of these for a photographer intent on producing clean, crisp astrophotographs.
The main issue (as before) is the quite prominent appearance of (mainly) sagittal astigmatism and while the effect obviously is easily corrected by stopping down, that can happen only at the expense of higher levels of noise. Unless one’s tripod is equipped with the apparatus for following stars, star trails start to show at roughly 8 second exposures (the f/2.8 zoom is at its limits here).
Again, these lenses show the issue in varying degrees: the f/1.4 Nikkor when shot wide open obviously suffers immensely, but is semi-decent at f/2, while most other lenses show varying degrees of astigmatism. For the fan of legacy lenses, this comparison however must draw a worrying conclusion: the more modern the lens, the better it performs (in this task).
You read correctly. If you look at the lenses which show the least issues, these are those (like the AF-D Nikkor’s, designed in the late 80’s) which strictly speaking are not legacy at all. The fact that the a semi-modern zoom like the Nikkor AF-D 35-70/2.8 basically outperforms all the older prime lenses when shot wide open is a telling point. Legacy lenses are not the astrophotographer’s friend.
P.S. I deliberately shot the Nikkor Ai 35/1.4 wide open using the same shutter speed as for f/2 to highlight the one stop’s real world difference.
Finally, some loose ends…
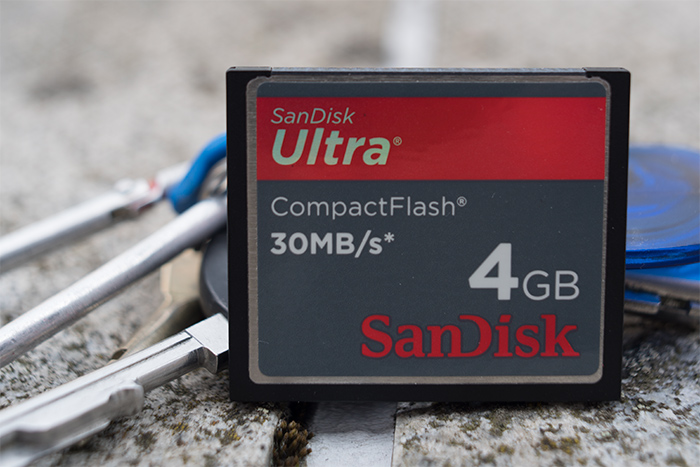
MFD & Macro
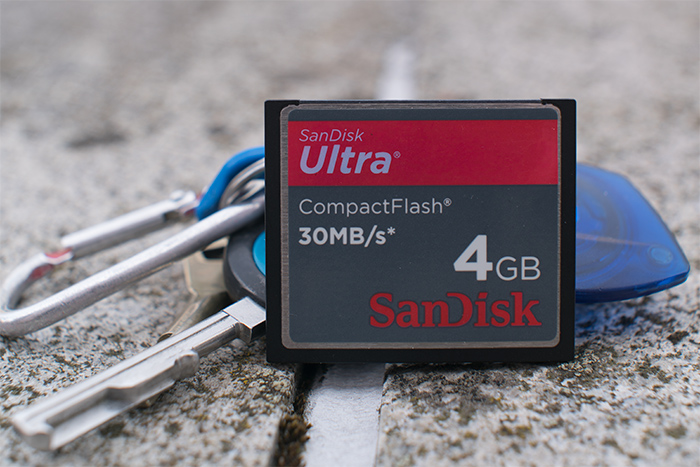
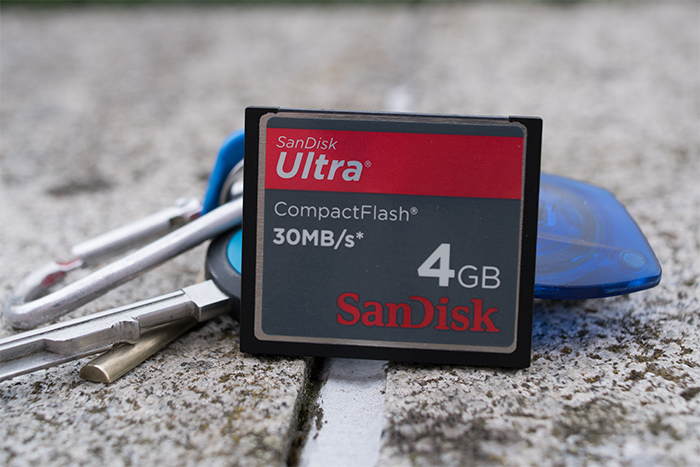
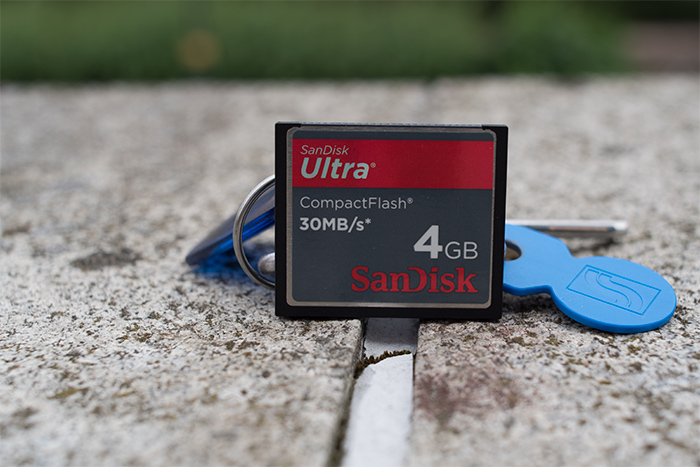
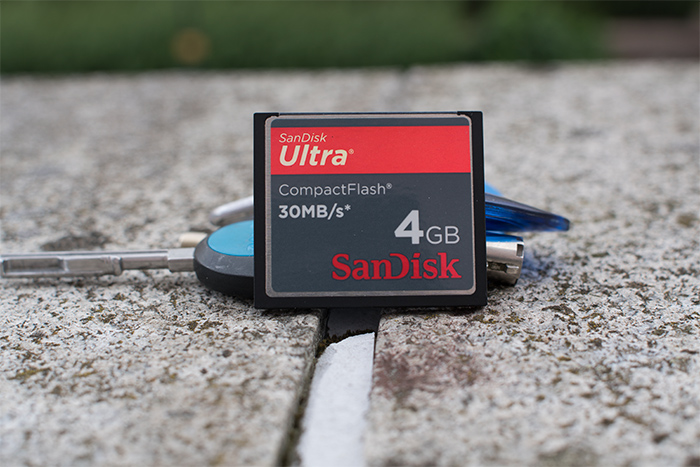
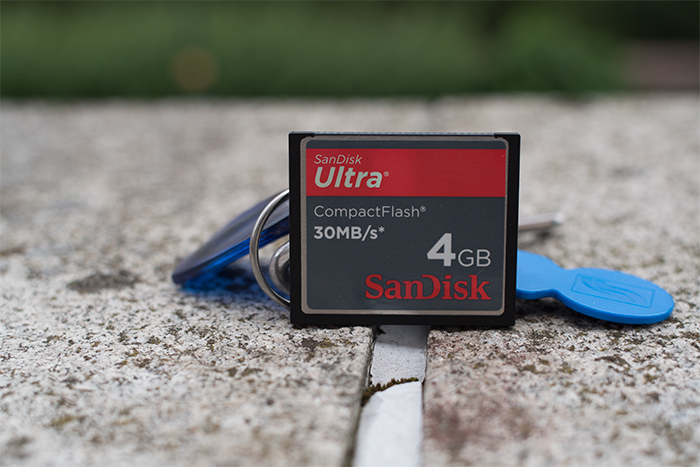
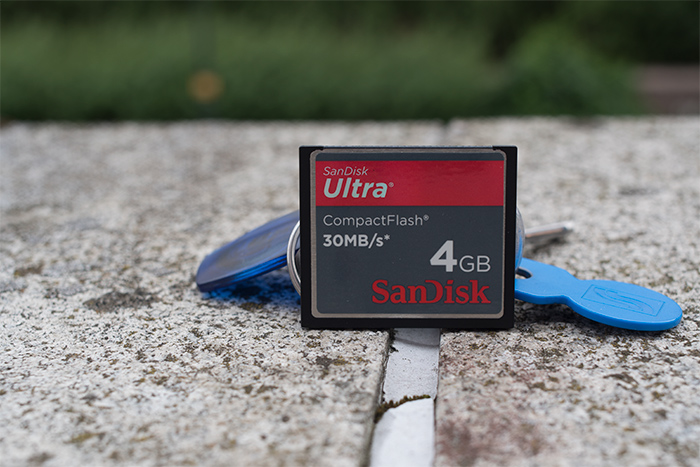
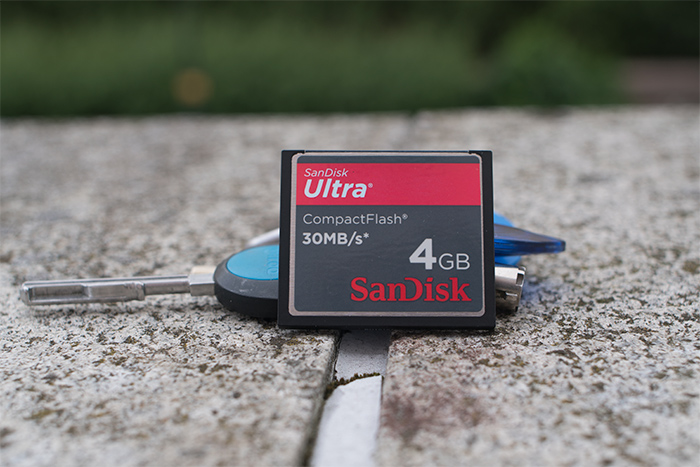
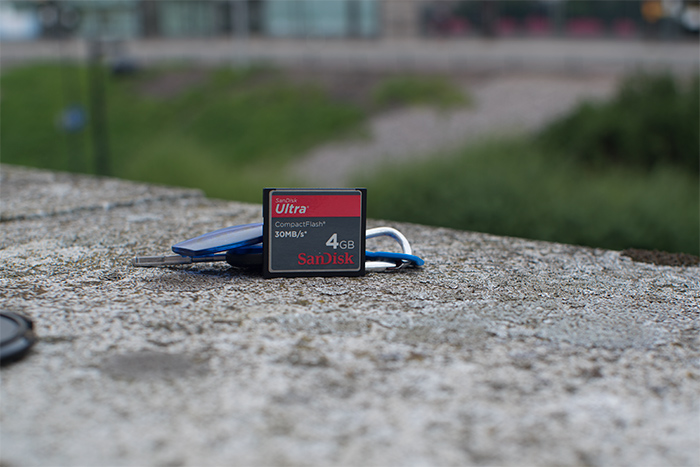
As noted earlier in this comparison, one big difference between these lenses is in the range of (reported) minimum focusing distances which starts with the ‘Flek’s 21,9 cm and goes all the way to the Porst’s 50 cm. While none of these lenses manage to even approach true macro capabilities (1:1), the question of a lens’ minimum focusing distance is by no means insignificant, as a short MFD introduces a new ability in the lens’ repertoire. This is most easily proven through a sample of shots at (real) MFD.
In the samples below, the camera was on a tripod in Portrait mode, the lens set to f/5.6 and focused to MFD, and the subject (CF card) slowly brought toward the camera until it was in perfect focus. The original shots have since been cropped (portrait to landscape) and resized. Thus, while they are not representative of how much of the frame a CF card would fill at MFD, they are proportionally representative, meaning that the difference in size of the rendering of the CF card is representative of the different magnification ratios you would get.
(Pictures ordered according to real magnification (measured))
How about that yellowed (radioactive) lens?
Yes, the Canon FD 35/2 (concave) is commonly known to be radioactive, and the yellowed element (yellowed due to F-centres in the crystalline matrix of the glass, produced by radiation) supports this. On the other hand, I have no indications that any of the other lenses tested here would be in any way radioactive.
While I have posted a short piece about radioactive lenses (and what you really need to know about them), let me here address one point specific to this comparison:
As has been obvious throughout this comparison/review, the Canon FD lens produces overall warmer colors, and does not do so only when shooting with a preset white balance, but does so even when AWB is used. Also, due to the yellowing of one or two lens elements, the Canon FD also consistently records slower shutter speeds at same apertures, which indicates that the yellowing (not unexpectedly) reduces the lens’ actual ability to transmit light to the sensor (t-stop). On the other hand, it should from this comparison also be obvious that this yellowing also has no detrimental effect on the lenses overall sharpness or ability to produce stunning results.
Regarding thoriated, yellowed lenses, there are a number of persistent ‘truths’ out there (in the blogosphere and social media). While I try to address some of the more outlandish in the post I mentioned earlier, one of the less preposterous ‘truths’ is that a thoriated (and yellowed) lens acts as a lens with a built-in yellow filter, thus making it especially suitable for B&W photography.
Naturally, the only real test of this theory is to use the same lens sample before and after treating it for yellowing, and maybe I will do that one day. In the meanwhile we’ll do the next best thing, by having a look at the FD on one hand and the (otherwise) probably most equivalent lens, with regard to a special suitability for B&W photography. Here goes…
All three clips on the left-hand side: Canon FD; All three on the right-hand side: Minolta MD, both at f/4.
• Middle row: default ACR conversion;
• Top row: copy of mid row with auto levels in PS
• Bottom row: copy of mid row with simple B&W (desaturate)
The top row is a quick proof of an earlier statement (that the FD’s warmer colors can be tweaked to leave little if any difference to the colors from other lenses). While the bottom row … I must admit I see basically no difference (I reiterate that the bottom row is based on desaturating the middle row, not the top row).
While this sample does not indicate that the yellowed, FD lens would have any special aptitude for B&W-photography, that does not mean that the FD’s imagery could not in some situations offer significant benefit prior to a B&W conversion, but if so, I doubt a simple desaturation could offer the sought benefits (instead necessitating tweaking colour-specific sliders in ACR or whatever other RAW converter you prefer, at which time (IMO) we’re far from the FD having an inherent aptitude).
Handling of flare
First, understand that testing a lens for its susceptibility towards flaring is everything but straightforward. Importantly, the same approach (setting up a tripod and taking a bunch of pictures) cannot be used as – as you’ve surely noted – even a minute difference in angle can have immense effects on how badly/beautifully a lens flares. Moreover, different lenses have very different flare characteristics: one lens can really dislike the sun in the middle of the frame, another lens goes haywire when the sun is in a frame corner, while a third lens goes bananas when the sun is outside of the frame but sunlight strikes the front element. In short, you cannot approach testing for flare as you can bokeh, sharpness, CA’s etc.
Problematically, I have to say that my earlier tests of flaring with these lenses offer only the conclusion that all these lenses flare, and that I cannot say that one would flare systematically worse/more nicely than others.
If I find a way to test these lenses for flare in a meaningful way, I might append the comparison later.
Next… or back?
• Part 1: Introduction, the lenses: pedigree and handling
• Part 2: IQ-comparison I – The Brick wall test
• Part 3: IQ comparison II – Urban vistas
• Part 4: IQ-comparison III – Bokeh and blur
• Part 5: IQ-comparison IV – Night-time vistas (you are here)
• Part 6: Summary and conclusions