Pekka Buttler, June-July 2021
Introduction
‘Spherical aberration’, is the main cause for why especially legacy lenses are typically less than tack-sharp and lack contrast when used wide open (without stopping down). Again, this has nothing to do with magic, but has a perfectly straightforward logical explanation.
This article is part of a JAPB series of articles on the optical flaws of lenses and you can find the index of the series here.
How lenses work
A photographic lens is made up of a collection (typically between 3 and 20) of lens elements. While some of those lens elements are concave (minus lenses, dispersing lenses) others are convex (plus lenses, focusing lenses). Because all photographic lenses – in order to be able to focus on infinity – must be able to transform parallel rays into focused rays, photographic lenses are (on the whole) akin to plus lenses.
What happens inside photographic lenses is that these various convex and concave lens elements try to collaborate in forming a sharp, contrasty, undistorted and aberration-free image on the sensor/film. The process is too complex to explain in simple terms, but there is one relevant ‘rule’ that I can express simply: If one lens element introduces an aberration or quirk it will most often propagate and be visible in the final image. There are basically only two exceptions to this rule: Firstly, if the aberration or quirk introduced by one element falls ‘outside’ of the surface area of the subsequent elements (and is therefore not transmitted to the film/sensor). Secondly, with some aberrations (especially with optical distortion and spherical and chromatic aberration), the detrimental effect of one lens element is so constrained and so well known that another element can (theoretically) be added to correct for precisely those aberrations.
What causes spherical aberrations?
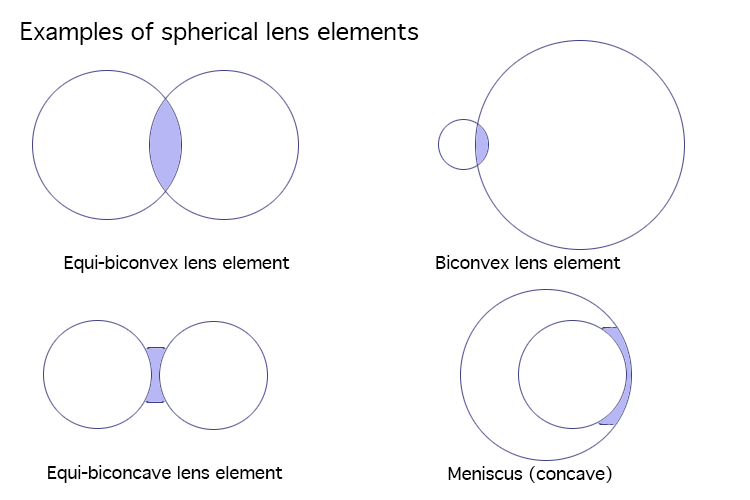
In the simplest terms, spherical aberrations are caused by the use of spherical lens elements. A spherical lens element is a lens element whose surfaces are elements of a sphere. See illustration below.
Spherical lens elements are troublesome, because – unlike in many illustrations – spherical lenses do not actually manage to focus all parallel light beams onto a single point. Instead, the farther from the lens’ centre a ray of light hits the lens, the stronger it will be bent, and only rays that hit the lens at the exactly same distance from the lens centre will be focused on a single point. See illustration below.
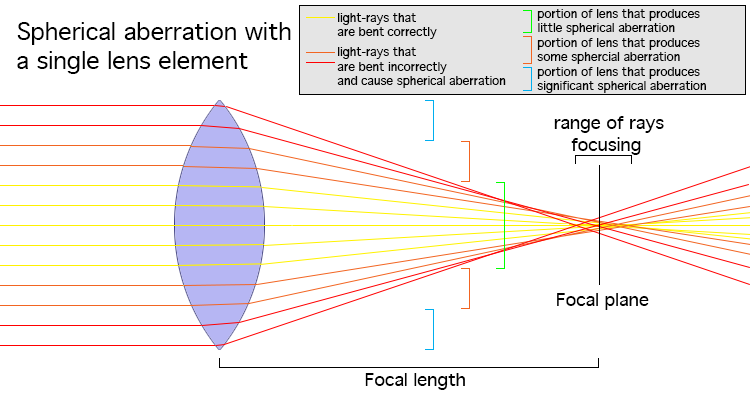
In reality spherical aberrations leads to a range wherein different rays are not perfectly focused, but one can resort to an approximation: divide the diameter of the lens in six equal parts:
• Rays hitting the 3rd and 4th sixths (those around the centre) manage to focus all rays pretty well onto a single point.
• Sixths 2 and 5 produce noticeable spherical aberration.
• The outermost sixths (1 and 6) produce significant spherical aberration.
Going from diameter to lens area, this gives you a centre ball and two concentric doughnuts (see below).
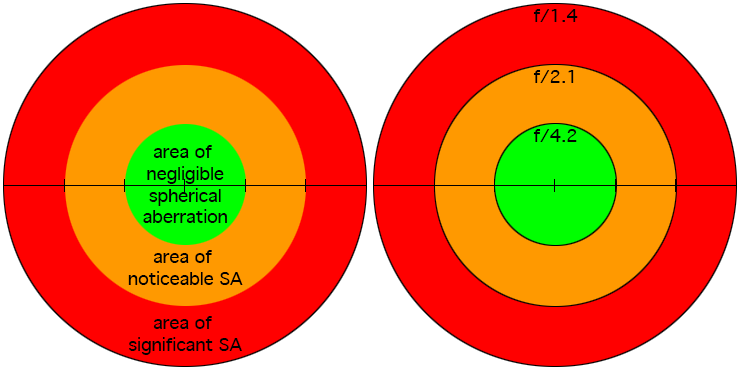
Right: Assuming the lens has a wide-open f-stop of f/1.4, approximate f-stops for reaching the 2nd to 5th sixth and centre sixths displayed.
How does spherical aberration manifest?
The central effect of spherical aberration is a significant lessening of contrast together with a decrease in definition in fine structures. If you look at the focal plane in that illustration, you can see that while some rays converge nicely on one point, a significant portion of rays hit the focal plane a good distance away from where they should. The effect can be illustrated as below.

One might look at this and see a halo of sorts around the white ball, but what one would not necessarily understand straight away, is that the light that makes up that halo came from somewhere – it came from the white ball (which, on closer inspection, is a bit dimmer.
But we rarely just photograph a single light source against a background of infinite blackness. Instead, every pixel in our final image captures (even with a perfect lens) a great many light sources and our ability to discern detail in the final image is very much dependent on our lens’ ability to direct light where it should. This means, that with more complicated, more detailed image, the cumulative effect of that spherical aberration gets worse.
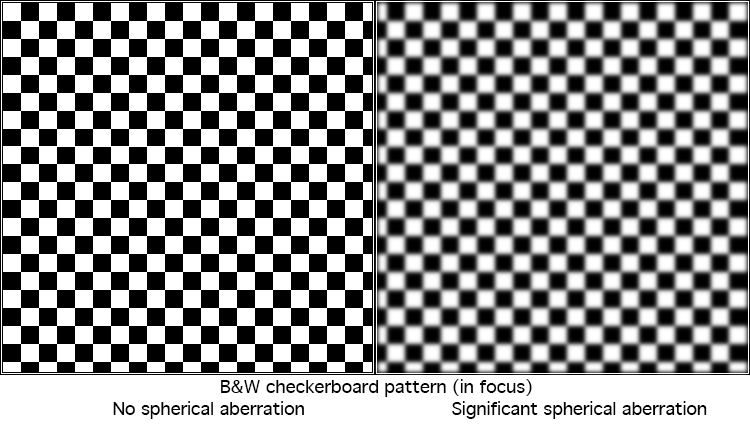
With the checkerboard pattern we now see that not only does spherical aberration lead to a loss of definition (edges are no longer clear), it also leads to a significant lessening of overall contrast: blacks are no longer as black; whites are no longer as white. But it is still quite easily distinguishable that – even with all that spherical aberration thrown in – the motif is a checkerboard. Alas, compared with real-life motif’s – these examples are still almost laughably simplistic.
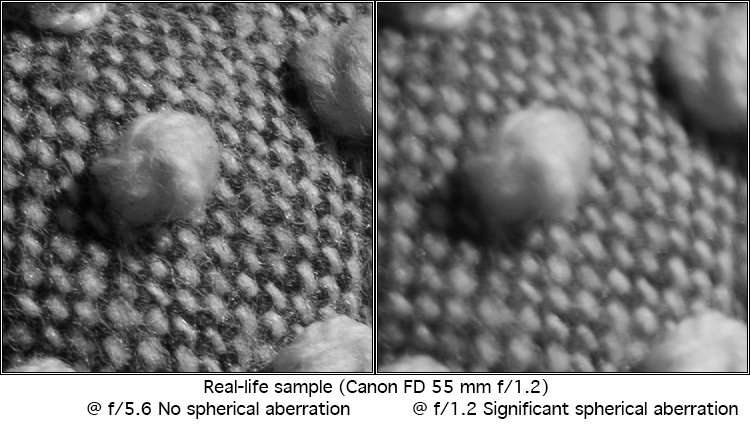
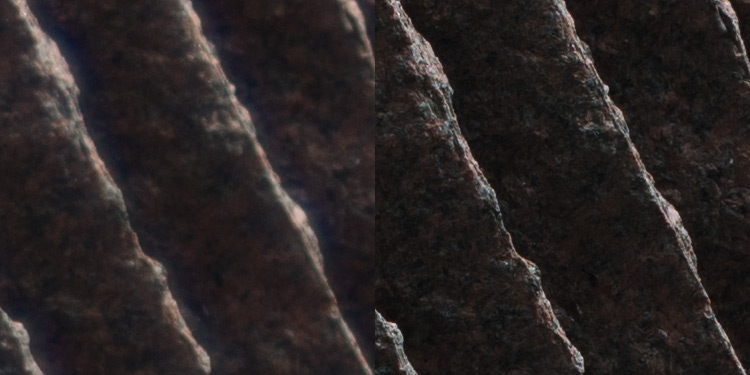
This last pair is based on a real-life test shoot, at close to minimum focusing distance. The left-hand side image (at f/5.6) shows good detail and strong contrast, while the right-hand side images (at wide open) shows neither. This offers a tangible demonstration of that spherical aberration is not only liable to lose some of the finer details, it also leads to pictures that lack punch.
Let’s take a step back and consider what’s actually happening: Assuming you have a lens with a perfectly spherical front element, then the light that hits that front element’s centre portion (2/3 of the lens elements’ diameter or 2/5 of its area) is focused correctly, but the rest is not. This means that even when you manage to focus perfectly, only the rays that hit the centre ≈40% of the lens element will be focused perfectly while the rest (≈60%) will be focused imperfectly (some in front of the focal plane, some behind). Of that 60% share, some rays will be focused so close to perfectly that they remain within the circle of confusion and will have only a marginal effect, but a majority of those off-centre rays will in fact be focused onto the adjacent sensor photosites (or photoreactive particles with film). In effect, spherical aberration produces something like a double exposure wherein one shot is perfectly focused and sharp, whereas the other is somewhat defocused.
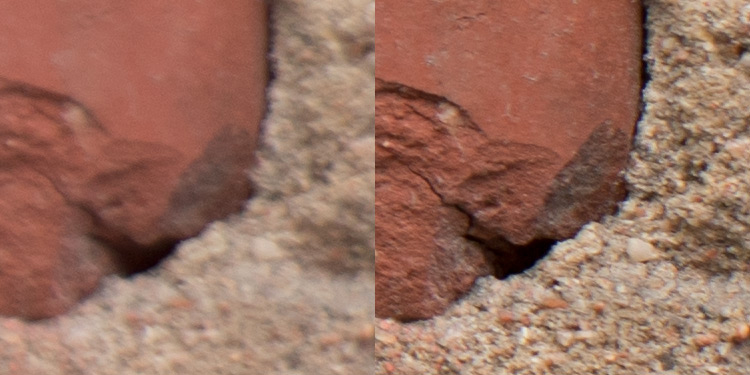
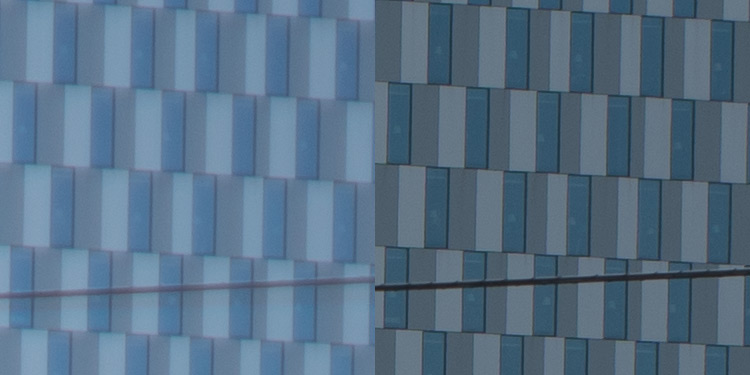
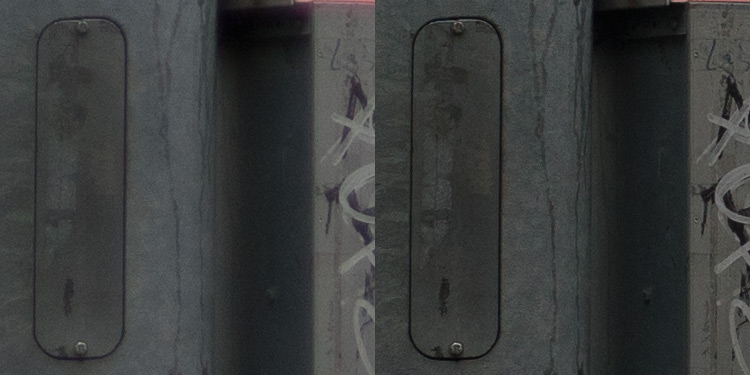
Typically this leads to a significant degree of loss of detail and even more to a loss of contrast. Some detail examples below:
Examples:

Designing lenses to avoid spherical aberration
In theory, there are three ways in which lenses could be designed to avoid producing spherical aberration at larger apertures.
Firstly – given that of all the lens elements in a lens only a few contribute significantly to the existence of spherical aberration, one could design a lens that uses an aspherical element or several. Today this is far from uncommon as computer-guided precision grinding and polishing equipment makes producing aspherical lens elements only slightly more complicated than that of aspherical lens elements, but during the heyday of legacy lenses, aspherical lens elements required a totally different (often manual) approach. This led to a significant hike in the price of the resulting lens (e.g. the Canon FD 55mm f/1.2 AL was originally priced three times higher than it’s non-aspherical sibling) and resultingly lower sales numbers. Not surprisingly therefore, today most of these aspherical legacy lenses1 carry absolutely ludicrous price tags.
Secondly, one could produce lenses in such a way that elements that are more liable to induce spherical aberrations are attended by a correcting lens element. While certainly doable, it would also likely lead to other complications2.
Finally, one could (relatively) easily correct for spherical aberrations created by the front lens element by employing an oversized front lens element (or front lens group). In such an approach subsequent (in the light path) lens elements would only make use of the front element’s sweet spot. This is quite doable (and sometimes used) with relatively dark wide-angle lenses, but using the approach on other lenses would lead to oversized front elements (and, resultantly:oversized lenses)
Therefore, while with today’s manufacturing technology using aspherical elements is the obvious way to approach mitigating spherical aberrations, in the legacy age the obvious approach was to leave them be.
Addressing Spherical aberrations in practice.
If you’ve read every word above, you’ve already come to the conclusion that the simplest way to mitigate spherical aberrations is stopping down. Correct. But how much do you need to stop down? As the examples above showed, fast (f/1.2–1.4 lenses) are quite sharp by f/5.6 (which is four to four-and-a-half stops stopped down), and now you might be thinking “wait a moment… it should not take that much…” and you’re right. Sort-of.
Above, this article approximated that the worst spherical aberration effects are caused by the ‘outer doughnut’, i.e. the third of the lens’ diameter (or ≈ 40% of the lens’ area) closest to the lens’ edge, whereas the centre ring around the lens’ centre (also a third) being basically free of spherical aberration. Let’s do some simple math
• a 50 mm f/1.4 lens has a wide-open entrance pupil of 50mm/1.4≈36 mm diameter
• two thirds of that would be 36/3*2≈24 mm, and one third would be (36/3≈12 mm, so ….
• 50mm/24mm ≈ f/2,1 would correspond to having eradicated most spherical aberration, and
• 50mm/12 mm ≈ f/4.2 would reach the spherical aberration sweet spot.
So if you stop down 1 and 1/3 stop, you should have eliminated the worst spherical aberrations, and if you stop down 3 and 1/3 stop spherical aberrations should be eliminated, right? Almost.
Firstly, it’s not as if lens elements had just three zones – one free of spherical aberration and two others of worsening spherical aberration. In fact, those ‘three times one third’ are approximations based on the somewhat problematic3 concept of the circle of confusion. In effect, while one can be reasonably certain that spherical aberration is nonexistent regarding light rays hitting the absolute centre of a lens element, spherical aberration starts occurring as soon as the lens element’s centre is left behind – only that for a portion of the lens element, the effect of spherical aberration is beneath the threshold defined by the circle of confusion (CoC). With digital sensors having increasingly high resolutions, the pixel peeper’s CoC is becoming increasingly unforgiving. More importantly, as spherical aberrations become increasingly egregious towards the outer limits of the light path, even a relatively modest (less than a stop) stopping down can have a great effect on resolution and contrast.
Secondly, that ‘three times one thirds’ -rule is an average, and depending on the strength (positive or negative) of the lens element, that may or may not hold. Obviously, the more strongly the lens tries to refract light, the more pervasive those non-sweet-spot effects will be.
Finally, you may be thinking as if the entire lens was just made up of one element, but it is not. If it was, modern lenses would always need only one aspherical element (instead they often use several). Remember, while you (typically) have multiple lens elements that contribute to spherical aberration, you’re not stopping down each lens element separately – instead, you only have one diaphragm to change the aperture with. This means that while stopping down by 3 and 1/3 of a stop may indeed address a great deal of spherical aberration, it does not address all…
The series of test shots below are selected for their ability to highlight spherical aberration:
– All shots are on a tripod (remote trigger, ISO 200, WB cloudy),
– All the crops are from the absolute centre of the frame (minimising the effect of lateral chromatic aberrations, astigmatism, vignetting, coma, geometric distortion)
– The blemish in the brick’s surface was the focus target, focus was re-checked after stopping down (no focus-shift, no field curvature), and the target area is small (≈1 cm wide) and flat (little chance for longitudinal chromatic aberrations)
– The subject is a brick wall on a cloudy day (no veiling flare, no ghosting, minimal internal reflections)
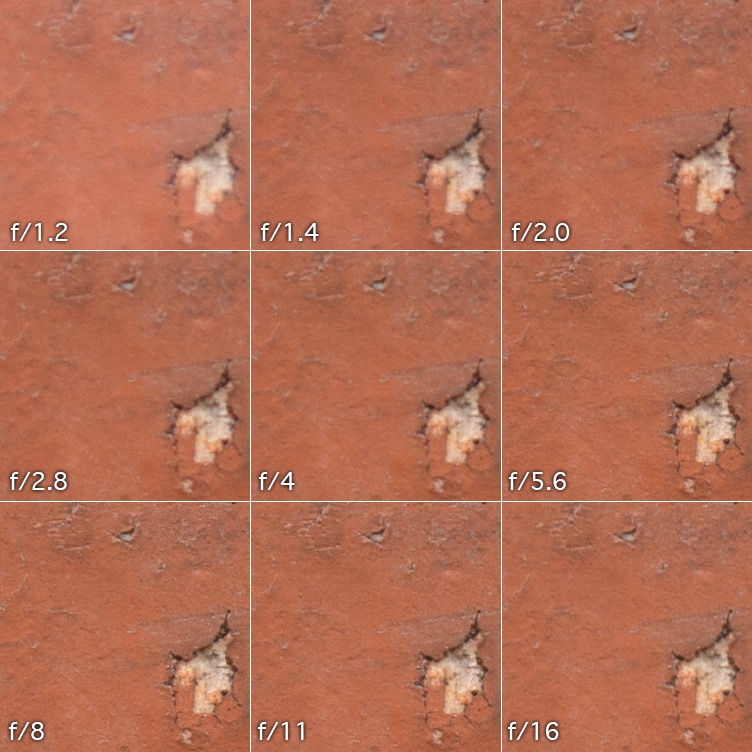
Quick analysis:
• image detail keeps improving until f/8 and f/11 is both better and worse than f/8, while f/16 is obviously worsened by diffraction.
• there’s a massive jump between f/1.2 and f/1.4 with both definition and contrast improving significantly. Thereafter improvement is more gradual, with diminishing returns.
• Focusing on contrast (how dark are the dark spots, how bright are the bright spots) instead of definition, there are significant improvement until f/2.8 after improvement becomes markedly more slow. This would indicate that spherical aberration (with this lens) is mostly addressed before f/2.8.
• While definition continues to improve past f/2.8, this improvement can no longer be attributed to spherical aberration alone.
Footnotes
1 First off, I am not aware of a definitive list of legacy aspherical lenses, but they are very rare. Leica introduced the 50mm f/1.2 Noctilux in 1966, which seems to be the first serially produced lens containing aspherical elements, and while today many Leica lenses sport aspherical elements, these are all relatively recent (1990->) additions. Starting in the 1970s, Canon had a number of aspherical lenses in their lineup of FD lenses (most notably the 24/1.4 aspherical, 85/1.2 aspherical, a wide-angle zoom and three versions of the 55/1.2 AL/aspherical). Of a roughly similar age are the Nikkor 58/1.2 Noct (1977), Nikkor OP Fisheye 10/5.6 (1968), and the SMC Pentax K 15/3.5 (1975; however, only the initial part of the production run used aspherical elements. See more here).
Of these early aspherical lenses only the Canon FD samples match JAPB’s criteria for being legacy lenses (as Leica M, Nikon F and Pentax K are still supported mounts with new cameras still being launched – although this might change soon).
2 For instance spherical aberration and (lateral) chromatic aberration are caused by different mechanisms. Therefore a doublet to correct for spherical aberration would very likely increase lateral chromatic aberrations. Because spherical aberrations are easily addressed by stopping down a bit (but lateral chromatic aberrations are not), constructing a doublet to correct for spherical aberrations would mitigate spherical aberrations at wide apertures but exacerbate lateral CA’s in the lens’ entire aperture range.
3 The ‘circle of confusion’ is today a somewhat problematic concept, because – in its original milieu – it utilised the assumption of a person viewing a photograph at ‘viewing distance’ (with viewing distance growing as the blow-up grew). Therefore, the CoC is sensor/film -agnostic, because it assumes a lot about viewing distances, visual acuity and, resultantly, a viewer’s ability to distinguish a point from a spot.
“So what has changed?”. In two words: pixel peeping. Because it is today only a click away to view detail at 1:1 (and more) we’ve become increasingly less tolerant towards levels of unsharpness that previously were par for the course. If you consider the difference between the modern path (lens->sensor->computer screen) and the film-age-path (photographic lens->photographic film grain->enlarging lens-> paper grain) you can see that there are also other pairs of factors involved: Not only did (in the past) the combination of film and paper grain matter, we’ve also eliminated one set of lens elements (the enlarging lens) from the equation.